Casio Pedal Unit SP-30 User Manual
Casio Musical Instruments
CAUTION
• When installing the Pedal Unit onto the stand, take care that you do not pinch your fingers.
• This stand should be assembled on a flat surface.
PRECAUCIÓN
• Al instalar la unidad de pedal en el soporte, asegúrese de no pillarse los dedos.
• El armado de este soporte debe realizarse sobre una superficie plana.
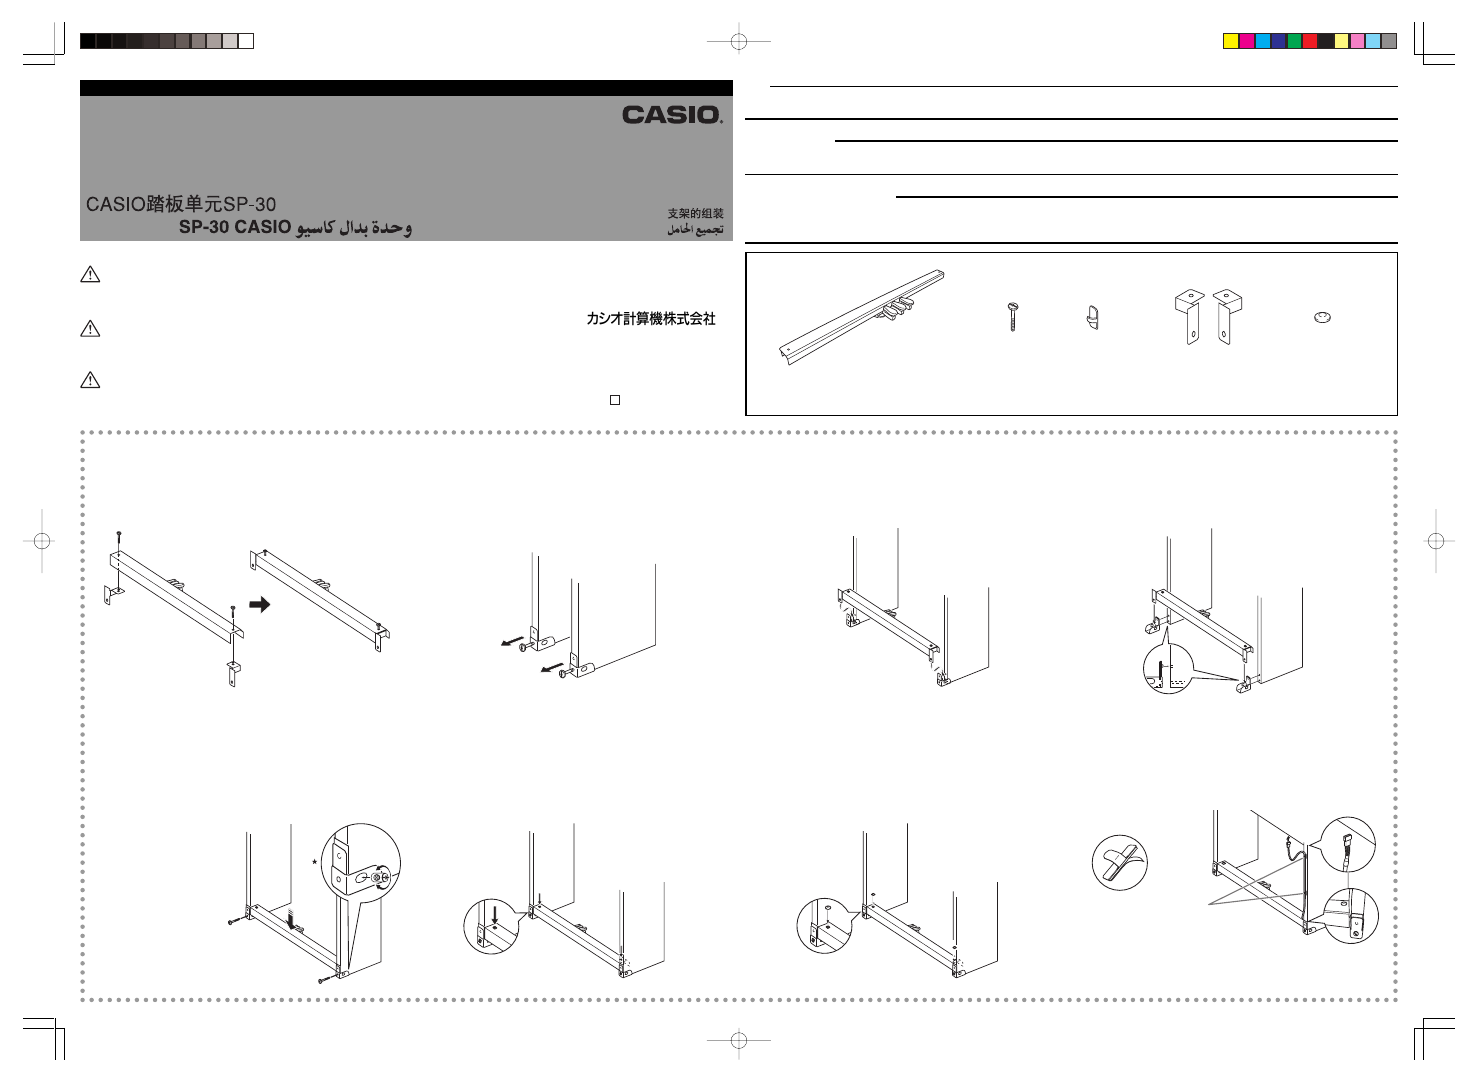
GETTING READY
• This stand does not include any of the tools required for assembly. It is up to you to prepare a large Phillips head (+) screwdriver for assembly.
• Before starting assembly, check to make sure that you have all the parts shown below.
PROCEDIMIENTOS INICIALES
• Este soporte no incluye ninguna de las herramientas requeridas para el armado. Para el armado, deberá tener un destornillador de cabeza
Phillips (+) grande a mano.
• Antes de iniciar el armado, compruebe que dispone de todos los elementos mencionados a continuación.
○○○○○○○○○○○○○○○○○○○○○○○○○○○○○○○○○○○○○○○○
○○○○○○○○○○○○○○○○○○○○○
○ ○ ○ ○ ○ ○ ○ ○ ○ ○ ○ ○ ○ ○ ○ ○ ○ ○ ○ ○ ○ ○ ○ ○ ○ ○ ○ ○ ○ ○ ○ ○ ○ ○ ○ ○ ○ ○ ○ ○ ○ ○ ○ ○ ○ ○ ○ ○ ○ ○ ○ ○ ○ ○ ○ ○ ○ ○ ○ ○ ○ ○ ○ ○ ○ ○ ○ ○ ○ ○ ○ ○ ○ ○ ○ ○ ○ ○ ○ ○ ○ ○ ○ ○ ○ ○ ○ ○ ○ ○ ○ ○ ○ ○ ○ ○ ○ ○ ○ ○ ○ ○ ○ ○ ○ ○ ○ ○ ○ ○ ○ ○ ○ ○ ○ ○ ○ ○ ○ ○ ○ ○ ○ ○ ○ ○ ○ ○ ○ ○ ○ ○ ○ ○ ○ ○ ○ ○ ○ ○ ○ ○ ○ ○
○
○○○○○○○○○○○○○○○○○○○○○○○○○○○○
○○○○○○○○○○○○○○○○○○○○○○○○○○○○○○○○○○○○○○○
○○○○○○○○○○○○○○○○○○○○○○
1
Attach the brackets to the pedal unit, and loosely tighten them in place with the
screws.
Fije los herrajes de fijación a la unidad de pedal y apriételos flojamente, por medio
de los tornillos.
2
Remove the screws that hold the metal pieces in place on the back corners (the
corners that face away from the pianist) of the side panels of the stand.
Quite los tornillos que fijan las piezas metálicas a las esquinas traseras (las esquinas
del lado opuesto al pianista) de los paneles laterales de los soportes.
3
Insert the plates on either end of the pedal unit into the space between the edge of
the side panels and metal pieces.
Inserte las placas en uno u otro extremo de la unidad de pedal, en el espacio
comprendido entre el borde de los paneles laterales y las piezas metálicas.
* The illustration below shows installation when the metal pieces are positioned to
guard against the stand tipping over.
* En la siguiente ilustración se muestra una instalación con las piezas metálicas
posicionadas para evitar la eventual caída del soporte.
4
2
Replace the metal piece screws to secure everything in place.
Important! : When tightening the metal piece screws, press down on the pedal unit to ensure that
the pedal part comes into contact with the floor.
Reinstale los tornillos de las piezas metálicas para una fijación correcta.
¡Importante! : Al apretar los tornillos de las piezas metálicas, presione la unidad de pedal para
asegurarse de que la parte del pedal entre en contacto con el piso.
5
1
Securely tighten the screws that you loosely tightened in step 1.
Apriete fuertemente los tornillos que fueron apretados flojamente en el paso 1.
6
Cover the screw heads with the caps.
Ponga las tapas sobre las cabezas de los tornillos.
7
Orienting the pedal unit plug as shown in the illustration, plug it into the pedal connector
on the bottom of the piano. Secure the pedal cord with the clips.
Orientando la clavija de la unidad de pedal de la manera mostrada en la ilustración,
introdúzcala en el conector del pedal en la parte inferior del piano. Asegure el cordón
del pedal con los clips.
Pedal Unit
Unidad de pedal
쎹2
Brackets
Herrajes de fijación
Screws
Tornillos
쎹2
Clips
Clips
쎹2
Caps
Tapas
CASIO Pedal Unit SP-30
Unidad de Pedal CASIO SP-30
Unidade de Pedais SP-30 da CASIO
Assembling the Stand
Armado del soporte
Montagem do suporte
JESPoCkAr
SP-30-LEAF-1
•
앲
• If you have trouble inserting the bolts
that come pre-installed in the side
panels into the joint connector screw
holes, use a screwdriver to rotate the
joint connector so the bolts can enter
the holes (
앲 in Figure).
• Si los pernos que vienen prefijados a
los paneles laterales se resisten a
entrar en los orificios del los tornillos
del conector de unión, gire el conector
de unión con un destornillador para
facilitar la introducción de los pernos
(
앲 en la Figura).
•
• Note that you must install the two clips
on the side panel of the stand as shown
in the illustration.
• Asegúrese de fijar los dos clips en el
panel lateral del soporte, tal como se
muestra en la ilustración.
MA0506-A Printed in China
SP-30-LEAF-1
P
CASIO COMPUTER CO.,LTD.
6-2, Hon-machi 1-chome
Shibuya-ku, Tokyo 151-8543, Japan
151-8543
1-6-2
SP30_JES_01.p65
05.6.21, 5:57 PM
Page 1
Adobe PageMaker 6.5J/PPC