Casio RS-232C User Manual
Casio data projector rs-232c control
You can use the YK-5 serial conversion cable to connect the projector to a computer with a commercially available serial cable
(straight) and control the projector from the computer.
Be sure to read the user’s guide that comes with the projector and the YK-5 User’s Guide before trying to perform any of the
operations provided here.
Keep these instructions in a safe place for future reference.
• The contents of these instructions are subject to change without notice.
• Copying of these instructions, either in part or their entirety, is forbidden. You are allowed to use these instructions for your
own personal use. Any other use is forbidden without the permission of CASIO COMPUTER CO., LTD.
• CASIO COMPUTER CO., LTD. shall not be held liable for any lost profits or claims from third parties arising out of the use of
this product or these instructions.
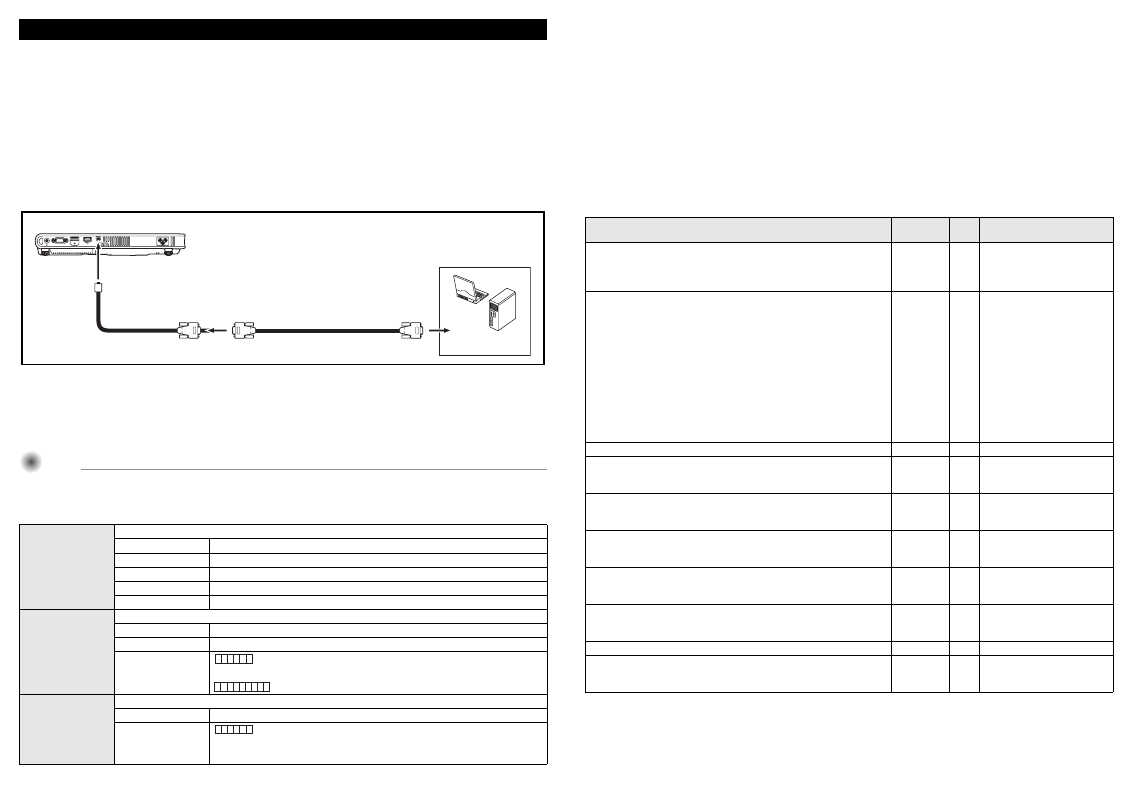
■ Connecting the Projector to a Computer
Connect the projector to the computer as shown in the illustration below.
* A D-Sub 9-pin (male) type connector is standard for computer serial ports, but there may be cases where the shape of a
particular computer’s connector is different. For details about connecting a commercially available serial cable to your
computer, see the user documentation that comes with it.
■ Using Control Commands
This section explains the commands that are used to control the projector from a computer.
Important!
Important!
Important!
z
The commands that will be available to you depend on your projector model. Refer to your projector’s User’s Guide
for information about the menu items and button functions supported by your projector.
Example: Some models do not support “Lamp Time Reset”.
Command Send Format
• See the “Command List” for details about command names and settings.
• All commands use ASCII characters and decimal format integers.
• The projector will return a question mark (?) when it is sent a command it cannot recognize.
• Generally, the projector will ignore anything that is not a valid setting. However, in the case of a setting like VOL (volume) that
has a range (defined by minimum and maximum values), sending a value that is outside the specified range will change the
setting to its maximum value.
• If the projector is performing a process initiated by a previously sent command, a projector key operation, or a remote
controller key operation, send of the next command must wait until the projector completes the previous process.
Command List
• Except for the following functions, read and write cannot be performed while the projector is turned off.
• Power on/off: Read
• Power on: Write
• Get lamp time: Read
• Reset lamp time: Write (Only when the lamp reset time exceeds 2100 hours)
• Input of a valid signal must be in progress in order to use a command to turn on blank screen or change the aspect ratio.
R: Read enabled W: Write enabled
CASIO DATA PROJECTOR RS-232C Control
Communication
Protocol
Configure your computer’s serial port with the following settings.
Data Rate
19200bps
Data Bit
8bit
Parity
None
Stop Bit
1bit
Flow Control
None
Read Command
Send this command when you want information about the current setup of the data projector.
Send Format
(<command name>?)
Receive Format
(<applicable command setting range>,<current setting>)
Command Send
Example
sent from the computer to the projector.
4
returned from the projector to the computer.
Write Command
Send this command to control the data projector (power on/off, etc.) and to write data to it.
Send Format
(<command name><setting value>)
Command Send
Example
sent from the computer to the projector.
4
Projector volume setting becomes 0 (mute).
Projector
Commercially available serial cable (straight)
Computer
Round connector
Serial port (RS-232C)
YK-5
D-Sub 9-pin (female)
D-Sub 9-pin (male)
Serial port
*
D-Sub 9-pin (female)
( V O L ? )
( 0 - 5 0 , 3 5 )
( V O L 0 )
Function
Command
Name
RW
Settings
Power On/Off: After turning off a model that requires cool down, you
must wait until the projector cools down before turning
power back on again. After power on, wait at least one
minute be turning power off.
PWR
RW
0: Off, 1: On
Input Switching: 0: Switches the input source to the COMPUTER
terminal and changes the COMPUTER terminal
setting to RGB.
1: Switches the input source to COMPUTER terminal
and changes the COMPUTER terminal setting to
component.
2: Switches the input source to Video.
5: Switches the input source to USB. This setting is
supported only when the projector is equipped with
a USB function and the USB application is running.
6: Switches the input source to COMPUTER terminal
and changes the COMPUTER terminal setting to
Auto.
SRC
RW
0: RGB, 1: Component,
2: Video, 5: USB,
6: Auto (RGB/Component),
7: HDMI, 8: Wireless
Blank Screen: Switches the blank screen on or off.
BLK
RW
0: Off, 1: On
Volume: Specifies a value to adjust the volume level. This setting is
applied to the input source signal that is currently being
projected by the projector.
VOL
RW
0 to 50 (or 0 to 30)
*
1
Color Mode: Selects the color mode.
PST
RW
0: Presentation, 1: Graphics,
2: Theater, 3: Standard,
4: Blackboard, 5: Game
Aspect Ratio: Specifies the aspect ratio.
ARZ
RW
0: Normal
*
2
, 1: 16:9,
2: Normal
*
3
, 3: Letter Box,
4: Full, 5: True, 6: 4:3
Optical Zoom Shift: Shifts the optical zoom setting by one step.
OZM
W
0: No change,
1: Shifts one step towards wide,
2: Shifts one step towards tele
Optical Focus Shift: Shifts the optical focus setting by one step.
OFC
W
0: No change,
1: Shifts one step towards near,
2: Shifts one step towards far
Get Lamp Time: Gets the lamp time from the projector.
LMP
R
0- Unit: Hours
Lamp time Reset: Resets the lamp time.
Lamp time can be reset only when it exceeds 2100 hours and projector
power is turned off.
LRT
W
0: Do not reset, 1: Reset
*1 The range depends on the projector.
*2 Input source: RGB or HDMI (PC)
*3 Input source: Video, component or HDMI (DTV)
RJA519687-001
Printed in Japan
MA1208-D