Crivit 3000-s User Manual
Parts overview, Free spool system, The brake
Freespool reel 3000-s / 5000-s
Freespool reel 3000-s / 5000-s
Instructions for use
Kołowrotek z wolnym biegiem 3000-s / 5000-s
Instrukcja obsługi
Horgászorsó 3000-s / 5000-s
Használati útmutató
ribiško kolesce 3000-s / 5000-s
Navodilo za uporabo
Volnoběžný rybářský naviják 3000-s / 5000-s
Návod k obsluze
rybársky voľnobežný naviják 3000-s / 5000-s
Návod na obsluhu
Angelfreilaufrolle 3000-s / 5000-s
Gebrauchsanleitung
IAN 93774
1 drag knob
2 spool assembly
3 spool click gear fixed washer
4 spool click gear
5 spool click gear washer
6 main shaft
7 pinion gear nut
8 pinion gear nut fixed screw
9 bail holder side cover
10 bail holder side cover screw
11 rotor
12 line roller fixed screw
13 bail arm
14 bail arm screw
15 line roller bushing
16 line roller
17 line slider bushing
18 line roller washer
19 line roller ball bearing
20 bail holder screw
21 bail assembly
22 kick lever
23 spring bail trip
24 bail trip shaft spring seat
25 bail trip shaft spring
26 Bail arm side cover
27 Bail arm side cover screw
28 rotor washer
29 ball bearing fixed washer
30 ball bearing fixed washer screw
31 pinion gear ball bearing
32 ball bearing bushing
33 one way clutch ball bearing
34 one way clutch ball bearing spring
35 inside track
36 pinion gear
37 anti-reverse shaft
38 anti-reverse switch
39 anti-reverse switch screw
40 anti-reverse spring
41 body
42 handle
43 hexangular washer
44 body decorated cover
45 body ball bearing
46 drive gear
47 oscillating gear
48 oscillating gear screw
49 oscillating slider
50 oscillating slider fastener
51 oscillating slider screw
52 stop pin tension spring
53 drag knob stop spin
54 stop pin press block
55 stop pin press block screw
56 transposition trip shaft spring
57 lever connected shaft
58 return fiddled plate spring
59 return fiddled plate
60 return fiddled plate screw
61 body cover ball bearing
62 body cover
63 body cover screw
64 body cover decorated cover
65 handle assembly
66 right lever
67 lever decorated collar
68 lift lever
69 B2.5M*6.0*7.0
70 B2.5M*4.2*9.5
71 washer
72 rear drag knob stop washer
73 rear drag clicker gear
74 rear brake key washer
75 rear brake washer
76 rear brake eared washer
77 rear brake spring
78 rear brake screw
79 rear drag knob click ring
80 rear drag knob
81 rear drag knob retainer
82 rear drag knob ringer
drag assembly
101 front drag knob decorated cover
102 front drag knob
103 drag knob click gear
104 drag knob nut
105 drag knob spring
106 drag knob seat
107 drag knob spring
108 drag knob spring screw
spool assembly
201 hexangular retainer
202 key washer
203 drag knob washer
204 ear washer
205 spool
206 line hook
207 line hook copper nail
208 spool click gear spring
209 spool click gear screw
210 spool click gear
bail assembly
2001 line roller shaft
2002 bail
2003 bail holder
handle assembly
6501 handle cap insert
6502 joint
6503 handle joint fixed pin
6504 press
6505 press spring
6506 handle arm
6507 handle knob
6508 handle rivet
3mm
A
B
e
G
F
D
C
1
1
5
4
2
2
3
4
5
GB
Congratulations!
With your purchase you have decided on a
high-quality product. Get to know the prod-
uct before you start to use it. Carefully read
the following operating instructions. Use
the product only as described and only for
the given areas of application. Keep these
instructions safe. When passing the product
on to a third party, always make sure that
the documentation is included.
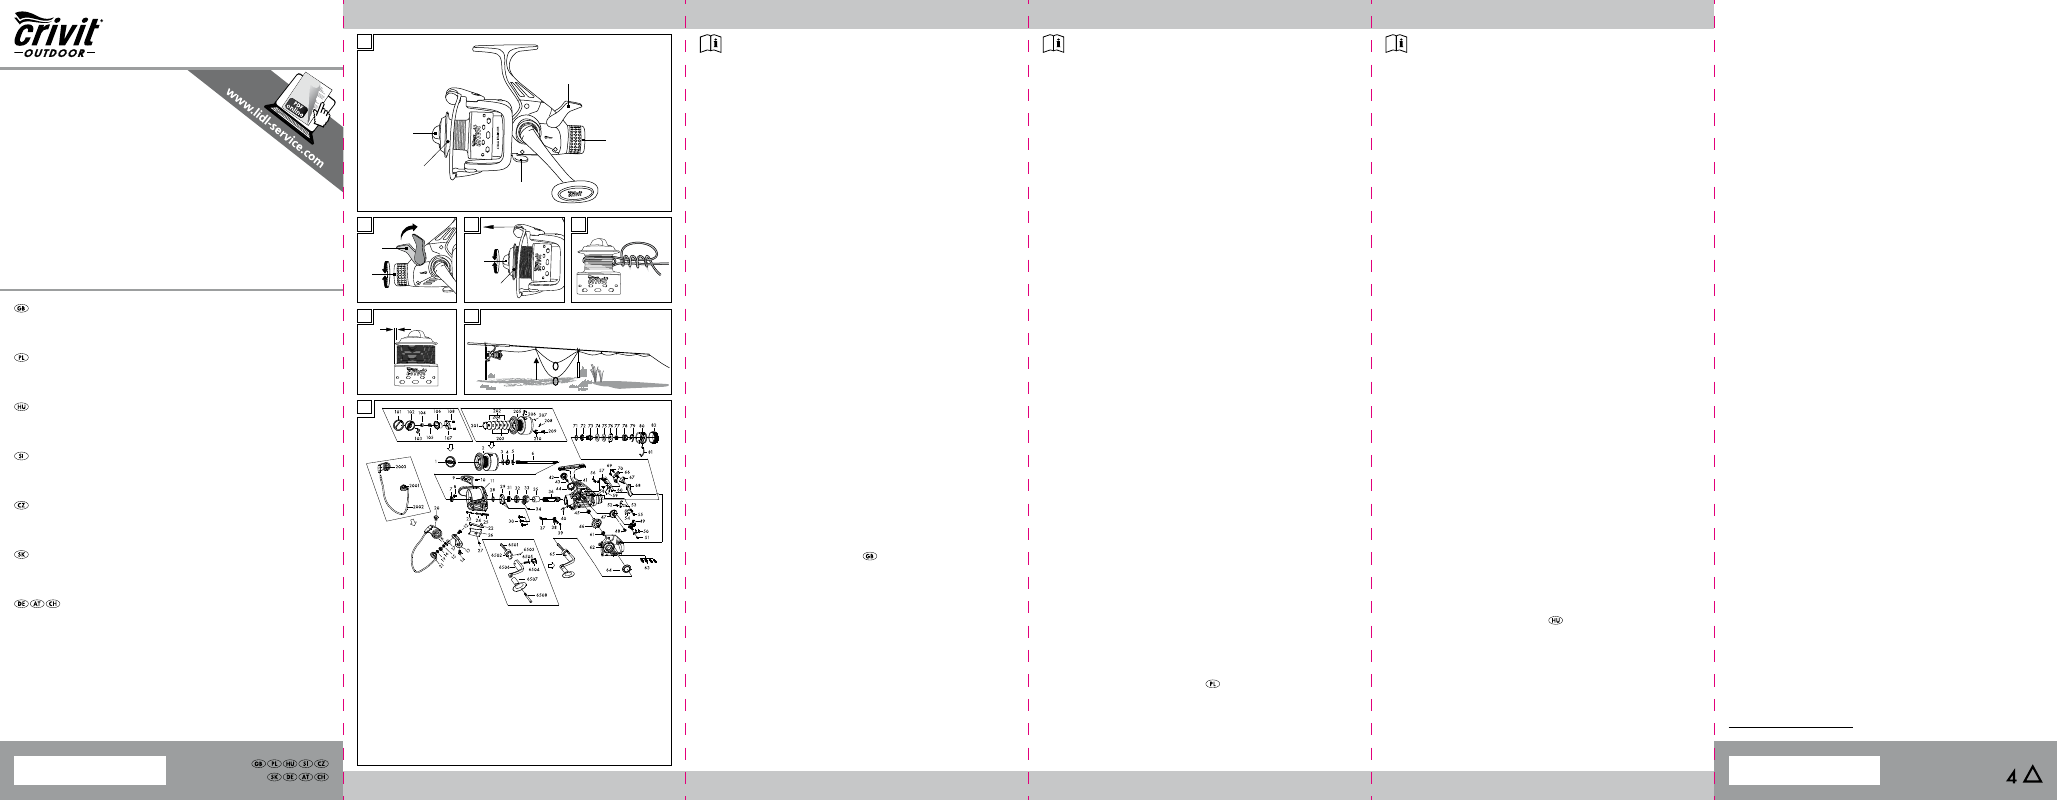
parts overview
(Fig. A)
1
Free spool lever
2
Knob
3
Anti-Reverse Lock – Prevents the spool
from spinning and twisting
4
Spool with front drag – Adjust your
drag here
5
Brake nut
Free spool system
(Fig. B)
Slide the free spool lever 1 forward to ac-
tivate free spooling. If a fish bites it can now
take line off the spool with the bail closed.
The free spooling drag can be adjusted
with the knob 2 without impacting the
brake. Free spooling will automatically
engage when the knob is turned. The bail
may also be closed manually.
The brake
(Fig. C)
Large fish are too strong to simply reel in.
Adjust the brake nut 5 until the spool 4
slides with the rod bent about halfway. The
fish can now first make a run and pull line
off the spool, but quickly tires as it has to
fight the resistance from the brake.
spooling reel with line
Tie the line to the reel using a grinner knot
(Fig. D).
Spool the reel to about 3 mm from the lip
(Fig. E).
Using free spool
1. Trolling
When trolling from a boat with bait fish,
unlike artificial bait, you should not set the
hook immediately when the fish bites. It’s
rather advisable to first give the predatory
fish a few seconds to turn and swallow
the bait fish. Set free spooling as light as
possible – once it bites the fish can now
easily pull line off the spool while the fisher-
man gains time to grab the rod. Be sure to
pop the free spooling before it completely
unwinds, for example by slightly turning the
knob!
2. Bottom fishing (Fig. F)
The rod is on two holders, free spooling is
engaged. When a fish bites the bite indica-
tor will move upward. The free spool must
be closed before completely unwinding.
In standing water free spooling is fine-tuned
so that the biting fish can pull line off the
spool without the line wafting off the spool
or tangling as with an open bail. When
fishing rivers it must be adjusted according
to the current.
3. Fishing carp
In modern carp fishing the fish will hook to
the heavy lead itself. The bite is actually the
carp’s first method of flight. Unlike other fish-
ing methods in this case high resistance is
not only beneficial but required. Close free
spooling as far as possible to set the hook
deeper and take the line off the bottom as
soon as possible (risk of snags). However,
be sure the rod is securely seated in the
rod holder to avoid the rod falling into the
water on a bite!
3 Years Warranty
The product was produced with great care
and under constant supervision. You receive
a three-year warranty for this product from
the date of purchase. Please retain your
receipt.
The warranty applies only to material and
workmanship and does not apply to misuse
or improper handling. Your statutory rights,
especially the warranty rights, are not af-
fected by this warranty.
With regard to complaints, please contact
the following service hotline or contact
us by e-mail. Our service employees will
advise as to the subsequent procedure as
quickly as possible. We will be personally
available to discuss the situation with you.
Any repairs under the warranty, statutory
guarantees or through goodwill do not ex-
tend the warranty period. This also applies
to replaced and repaired parts.
Repairs after the warranty are subject to a
charge.
IAN: 93774
Service Great Britain
Tel.: 0871 5000 720
(£ 0.10/Min.)
E-Mail: [email protected]
You can also find spare parts for your product at:
www.delta-sport.com, category Service - Lidl Spare
Parts Service
PL
Gratulujemy!
Przez Państwa zakup wybraliście produkt o
wysokiej jakości. Przed pierwszym użyciem
zapoznajcie się z produktem. W tym celu
przeczytajcie następującą instrukcję obsłu-
gi. Z produktu należy korzystać jedynie jak
to zostało opisane i w podanych zakresach
zastosowania. Zachować niniejszą instruk-
cję. W razie przekazania produktu osobom
trzecim dołączyć do niego wszystkie
dokumenty.
opis elementów
(Ilustracja A)
1
Dźwignia spustu jałowego
2
Gałka obrotowa
3
Blokata biegu wstecznego – Uniemożli-
wia przerzut i przekręcenie się rolki
4
Szpula z hamulcem frontowym – Tutaj
uregulować opornik do hamowania
5
Nakrętka hamulca
system spustu jałowego
(Ilustracja B)
Przesunąć dźwignię spustu jałowego 1 do
przodu aby włączyć spust jałowy. Jeżeli
ryba chwyciła możliwe jest przyciąganie
wędki przy zamkniętym kabłąku.
Opór spustu jałowego można uregulować
bezstopniowo przy pomocy gałki obroto-
wej 2 , nie ma to wpływu na uregulowany
hamulec. Spust jałowy wyskakuje automa-
tycznie, jak tylko przekręci się pokrętło.
Dźwignię można również przestawić
manualnie.
Hamulec
(Ilustracja C)
Większe ryby są za ciężkie, aby podcią-
gnąć je do góry. Nakrętkę hamulca 5
należy uregulować w ten sposób, aby
szpulka 4 prześlizgnęła się przy na wpół
zgiętej wędce. Ryba może najpierw dalej
pływać i ciągnąć sznurek z rolki, ale szybko
się zmęczy, ponieważ musi przezwyciężyć
opór hamulca.
Nawijanie linki
Żyłkę przymocować do szpuli przy pomocy
węzła grinner (Ilustracja D).
Szpulę wypełnić do ok. 3 mm poniżej
brzegu (Ilustracja E).
Zastosowanie
spustu jałowego
1. rybołówstwo za pomocą sieci
trałowych
Przy łowieniu z przynętami rybnymi nie
należy w przeciwieństwie do przynęt
sztucznych od razu podnosić ryby do
góry. Ryba drapieżna powinna mieć przez
kilka sekund czas aby odwrócić i połknąć
przynętę. Wędkę należy ustawić na
spust jałowy – ryba drapieżna może bez
przeszkód chwycić przynętę, podczas gdy
wędkarz ma czas na uchwycenie wędki.
Należy zwrócić uwagę, aby spust jałowy
prawidłowo wyskoczył, np. przez krótkie
przekręcenie korbki!
2. Wędkarstwo gruntowe
(Ilustracja F)
Wędka ułożona jest na dwóch stojakach,
spust jałowy jest włączony. Jeżeli ryba
połknęła haczyk, wskaźnik przeskakuje do
góry. Spust jałowy należy zamknąć przed
momentem oporu.
W wodach stojących spust jałowy należy
należy ustawić w ten sposób, aby ryba mo-
gła ciągnąć linkę z rolki, tak aby linka nie
było możliwe zsunięcie lub zaplątanie się
linki – co ma miejsce w kabłąku otwartym.
Łowiąc ryby w rzekach należy dostosować
regulację do nurtu rzeki.
3. Łowienie karpi
Przy współczesnych przynętach ryba
zahacza się sama na ciężkim ołowiu.
Połnięcie przynęty jest pierwszą ucieczką
zahaczonego karpia. W przeciwieństwie
do wszystkich innych metod wędkarstwa w
tym przypadku opór jest nie tylko korzystny
ale też i konieczny. Spust jałowy należy do-
kręcić tak mocno, jak tyko jest to możliwe,
aby haczyk mógł jak najmocniej się wbić
i jednocześnie poluzować linkę z podłoża
(zagrożenie zahaczenia). Należy jednak
zwrócić uwagę na bezpieczne ustawie-
nie wędki w stojaku, w innym przypadku
zahaczona ryba może pociągnąć wędkę
do wody!
3 lata gwarancji
Produkt został wyprodukowany bardzo
starannie i podczas stałej kontroli. Państwo
otrzymują na ten produkt trzy lata gwaran-
cji od daty zakupu. Prosimy o zachowanie
paragonu.
Gwarancja obejmuje tylko błędy materiało-
we lub fabryczne i traci ważność podczas
używania produktu nie właściwie i nie
zgodnie z jego przeznaczeniem. Państwa
prawa, w szczególności zasady odpo-
wiedzialności z tytułu rękojmi, nie zostaną
ograniczone tą gwarancję.
W razie ewentualnych reklamacji należy
skontaktować się pod niżej podanym
numerem infolinii lub poprzez pocztę elek-
troniczną. Nasi współpracownicy omówią z
Państwem jak najszybciej dalszy przebieg
sprawy. Z naszej strony gwarantujemy
doradztwo.
Czas gwarancji nie zostanie przedłużony
przez ewentualnie podjęte naprawy na
podstawie gwarancji, prawnej odpowie-
dzialności z tytułu rękojmi czy dokonania
bezpłatnej naprawy. Dotyczy to również
wymienionych i naprawionych części.
Po upłynięciu czasu gwarancji powstałe
naprawy są płatne.
IAN: 93774
Serwis Polska
Tel.: 22 397 4996
E-Mail: [email protected]
Części zamienne do Waszego produktu znajdziecie tak-
że pod adresem: www.delta-sport.com, Rubryka serwisu
- Serwis części zamiennych Lidl
HU
Gratulálunk!
Vásárlásával egy kiváló minőségű termék
mellett döntött. Az első használatba vételt
megelőzően ismerkedjen meg a termékkel.
Ehhez figyelmesen olvassa el a következő
használati útmutatót. Csak a leírásnak és
csak a megadott felhasználási területeknek
megfelelően használja a terméket. Ezt a
útmutatót jól őrizze meg. Amennyiben a
terméket harmadik személynek továbbadja,
adja át neki a teljes dokumentációt is.
Alkotórészek megnevezése
(A ábra)
1
Szabadonfutó pecek
2
Forgó gomb
3
Visszafutás-gátló – Megakadályozza
az orsó átcsapását és elfordulását
4
Homlokfékes orsó – Állítsa be a fékel-
lenállást
5
Fékanya
szabadonfutó-rendszer
(B ábra)
Tolja előre a szabadonfutó-pecket 1 , a
szabadonfutó bekapcsolásához. A kapás-
nál a hal a zárt kengyel ellenére le tudja
húzni a zsinórt az orsóról.
A szabadonfutó ellenállását a forgó
gombbal 2 fokozat nélkül állíthatja be,
a fék beállítását ez nem befolyásolja. A
szabadonfutó automatikusan kiugrik, ha a
hajtókart megforgatja. Választható a pecek
kézi visszaállítása is.
A fék
(C ábra)
A nagyobb halak olyan erősek, hogy nem
lehet őket egyszerűen felkurblizni. Úgy
állítsa be a fékanyát 5 , hogy az orsó 4
kb. félig meghajlott bot mellett ugorjon át.
A hal ekkor kezd menekülni és a zsinórt az
orsóról lehúzni, azonban gyorsan kifárad,
mert le kell győznie a fékellenállást.
A zsinór felcsévélése
Kösse a zsinórt a dobhoz grinner csomóval
(D ábra).
A zsinórt az orsóra a perem alatt kb. 3 mm-
ig töltse fel (E ábra).
A szabadonfutó
használata
1. Vontatásos horgászat
Ha élő csalihallal csónakból horgászunk,
a berántásnak a műcsalival szemben nem
azonnal kell a kapáskor bekövetkeznie.
Sokkal inkább tanácsos, a rablóhalat
néhány másodpercig arra bírni, hogy a
csalihalat elforgassa és lenyelje. A szaba-
donfutót a lehető legkönnyebbre kell beál-
lítani – a kapásnál a ragadozó a zsinórt
akadálytalanul húzhatja le, miközben időt
nyerünk a horgászbot megfogására. Arra
ügyeljen, hogy a szabadonfutó az ütközés
előtt kiugorjon, ehhez elég a hajtókar egy
rövid elforgatása!
2. Fenekező horgásza (F ábra)
A bot két tartón fekszik, a szabadonfutó
be van kapcsolva. Kapásnál a kapásjelző
felfelé mozdul el. Ütközés előtt le kell zárni
a szabadonfutót.
A szabadonfutót az állóvízben olyan finom-
ra állítsa, hogy a hal a kapáskor a zsinórt
le tudja húzni az orsóról, anélkül, hogy a
zsinór – mint a nyitott kengyelnél – megszo-
ruljon az orsón vagy összegubancolódjon.
Folyóvizekben a beállítást az áramláshoz
kell igazítani.
3. pontyozás
A modern pontyozásnál a hal fennakad a
nehéz ólmon. A kapás pontosan érzékelhe-
tő a megakasztott ponty első menekülése-
kor. Más horgász-módszerekkel szemben,
ilyenkor a nagy ellenállás nemcsak előnyös,
hanem egyenesen szükséges is. A szaba-
donfutót a lehető legszorosabbra állítsa,
hogy a horog még mélyebbre juthasson el,
és a zsinór idejekorán elszabadulhasson
a fenékről (beakadás-veszély). Azonban
vigyázzon arra, hogy botja jól rögzítve
legyen a tartójában, különben a kapáskor a
hal a vízbe viszi a botot!
3 év garancia
Ezen termék gyártása nagy gondossággal
és folyamatos ellenőrzés mellett történt.
Ön a termékre három év garanciát kap a
vásárlás időpontjától. Kérjük őrizze meg a
pénztárblokkot.
A garancia csak anyag- és gyártási hibákra
érvényes, visszaélésszerű vagy szakszerűt-
len kezelés esetén teljesen megszűnik. Az
Ön törvényes jogait, kiváltképpen a szava-
tosságra vonatkozó jogait, ez a garancia
nem korlátozza.
Esetleges reklamáció esetén, kérjük, hívja fel
a szerviz alábbi közvetlen telefonvonalát,
vagy lépjen kapcsolatba velünk e-mailben.
Szerviz szakembereink a további tenniva-
lókat a lehető leggyorsabban egyeztetik
Önnel. Minden esetben személyesen adunk
tanácsot Önnek.
A garanciális időt garancia, törvényes sza-
vatosság vagy kulantéria alapján történő
esetleges javítások nem hosszabbítják meg.
Ez a pótolt vagy megjavított alkatrészekre
is érvényes.
A garancia lejárta után felmerülő javítások
költségeit Önnek kell fedezni.
IAN: 93774
Szerviz Magyarország
Tel.: 0640 102785
E-Mail: [email protected]
Termékéhez pótalkatrészek itt is találhatók:
www.delta-sport.com, Szerviz rubrika - Pótalkatrész-
ellátás Lidl
IAN 93774
DelTA-sporT HANDelsKoNTor GMBH
Wragekamp 6
D-22397 Hamburg
Version: 02/2014
FreeSpool 3000-S: Delta-Sport-Nr.: AF-1550
FreeSpool 5000-S: Delta-Sport-Nr.: AF-1551