Crivit DS-MULTIX301 User Manual
Page 7
9
10
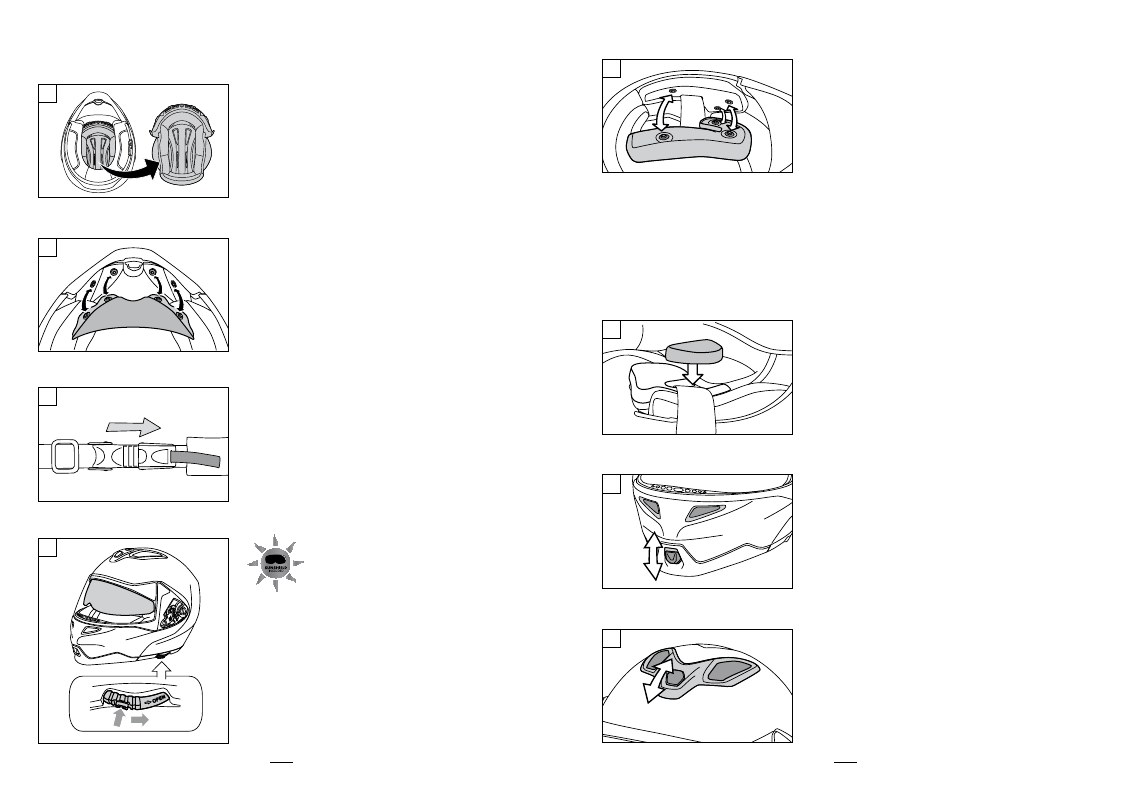
Sun Shield
The integrated sun shield ( 10 ) will en-
able you to quickly and easily react to
changed light conditions with the aid of
the patent mechanism.
To pull out and retract the sun shield,
press the safety latch to operate the
slider ( 3 ) ( see Fig. F ).
Note:
- Please take care that the edge of the sun shield does
not block your field of vision.
- The sun shield may only be used when the visor is
closed and may only be used during the day.
Cheek Pads
You will receive two different pairs of cheek pads ( 12 )
for individual size adjustment.
The thinner cheek-pads are already pre-mounted as
standard. The thicker cheek pad is enclosed with the
helmet separately.
If the helmet is too loose and therefore is not sitting
firmly on your head, you can replace the thin cheek
pad with the thicker ones.
The cheek pads are affixed via three press-studs re-
spectively in the helmet. You can easily remove the
pads ( see Fig. G ). The thicker cheek pads can now
also be affixed in the helmet with three press-studs.
You need to be able to hear that each press-stud
locks-in.
Acoustic Damping
The acoustic damping ( 11 ) is for noise reduction, in
particular when driving at high speeds.
Press the acoustic damping into the cavity of the cheek
pads ( see Fig. H ). The acoustic side pad equipped
with Velcro faces towards the helmet shell.
Front Vent
The front vent ( 6 ) can be opened and closed by
means of a slider ( see Fig. I ).
Top Vent
The top vent ( 1 ) can be opened and closed by means
of a slider ( see Fig. J ).
Inner Lining
The inner lining ( 2 ) can be completely removed and
cleaned separately (see care instructions).
To remove the inner lining, firstly remove the helmet
collar and the cheek pads. Then undo the back press-
studs of the inner lining and pull the clips of the inner
lining from the front side of the helmet ( see Fig. C ).
Chin-Wind Deflector
The chin wind deflector ( 8 ) is secured to the pivoted
piece by means of snaps.
This can be removed and re-attached as required
( see Fig. D ).
Snap-Fastener System
The snap-fastener enables an individual and quick
vernier adjustment of the chin strap.
Press the snap-fastener together until the helmet is sit-
ting comfortably but firm ( see Fig. E ).
By means of the snap at the end of the chinstrap,
the excess chinstrap can be attached to additionally
secure it.
Use and installation instructions
I
J
G
H
D
E
C
F