Sealey RE901 User Manual
Re901, Transportacar trolley, Model
3
Ensure the trolley is in sound condition and good working order. Take action for immediate repair or replacement of
damaged parts. Use genuine parts only. The use of improper parts may be dangerous and will invalidate the warranty.
p
WARNING! Prepare the vehicle ready for resting and moving on the trolley. Ensure the vehicle will not move, tip, fall etc
once it has been seated on the trolley. Take any necessary precautions to protect persons, property and equipment
when using this trolley.
3
Locate the trolley in a suitable, well lit working area.
3
Keep working area clean and tidy and free from unrelated materials.
3
Use trolley on level and solid ground, preferably concrete. Avoid tarmacadam as trolley may sink in.
3
Ensure the vehicle engine is switched off .
3
Ensure there are no passengers in the vehicle.
3
Ensure all non-essential persons keep a safe distance whilst the trolley is in use.
3
Only place trolley under those lifting points recommended by vehicle manufacturer
(see vehicle hand book).
3
Check the lifting point is stable and correctly held in trolley supports.
3
Ensure the trolley wheels are free to move and that there are no obstructions.
3
Ensure you have a clear view and necessary assistance when transporting vehicle.
3
Ensure there are no persons or obstructions beneath the vehicle before moving.
3
When stationary, always lock the two brake wheels.
7
DO NOT operate the trolley if damaged.
7
DO NOT allow untrained persons to operate the trolley.
7
DO NOT exceed the rated capacity of the trolley.
p
WARNING! DO NOT use the trolley to hold and move a vehicle which is unstable.
7
DO NOT allow the vehicle to move on the trolley.
7
DO NOT move vehicle if there is a risk of spillage of fuel, battery acid, or other dangerous substances.
7
DO NOT work under the vehicle unless supported by axle stands which have been correctly positioned.
7
DO NOT ride on the trolley.
7
DO NOT use the trolley without appropriate supports.
7
DO NOT use the trolley for purposes other than which it is intended.
3
When not in use store trolley in a safe, dry, childproof area.
INSTRUCTIONS FOR:
TRANSPORTACAR TROLLEY
MODEL:
RE901
Your new Trolley is produced and manufactured to a high standard of dependability and will, if used according to these instructions and properly
maintained, give you years of trouble free performance.
IMPORTANT: READ THESE INSTRUCTIONS CAREFULLY. NOTE THE SAFE OPERATIONAL REQUIREMENTS, WARNINGS AND CAUTIONS. USE
THIS TROLLEY CORRECTLY AND WITH CARE FOR THE PURPOSE FOR WHICH IT IS INTENDED. FAILURE TO DO SO MAY CAUSE DAMAGE
OR PERSONAL INJURY AND WILL INVALIDATE THE WARRANTY. RETAIN THESE INSTRUCTIONS FOR FUTURE USE.
1. SAFETY PRECAUTIONS
2. INTRODUCTION & SPECIFICATIONS
3. ASSEMBLY
RE901 - 0008 - (1) - 290600
Capacity . . . . . . . . . . . . . . . . .2000kg
Min. height . . . . . . . . . . . . . . .250mm
Max. height . . . . . . . . . . . . . . .310mm
Min. width* . . . . . . . . . . . . . .1035mm
Max. width* . . . . . . . . . . . . . .1430mm
Length . . . . . . . . . . . . . . . . . .600mm
Heavy duty steel frame-work suitable for supporting partly dismantled or badly damaged vehicles. Enables easy movement
around bodyshop. Supports interchangeable between v-crutches and sill clamps. Supports and clamps adjustable for height and
overall width. The trolley is fitted with 2 brake locking wheels.
*Widths measured between the centre of the
trolley points
3.1.
Assemble four wheels with nuts, spring washer, washers, and bolts. Ensure that the
two locking wheels are at the same end.
3.2.
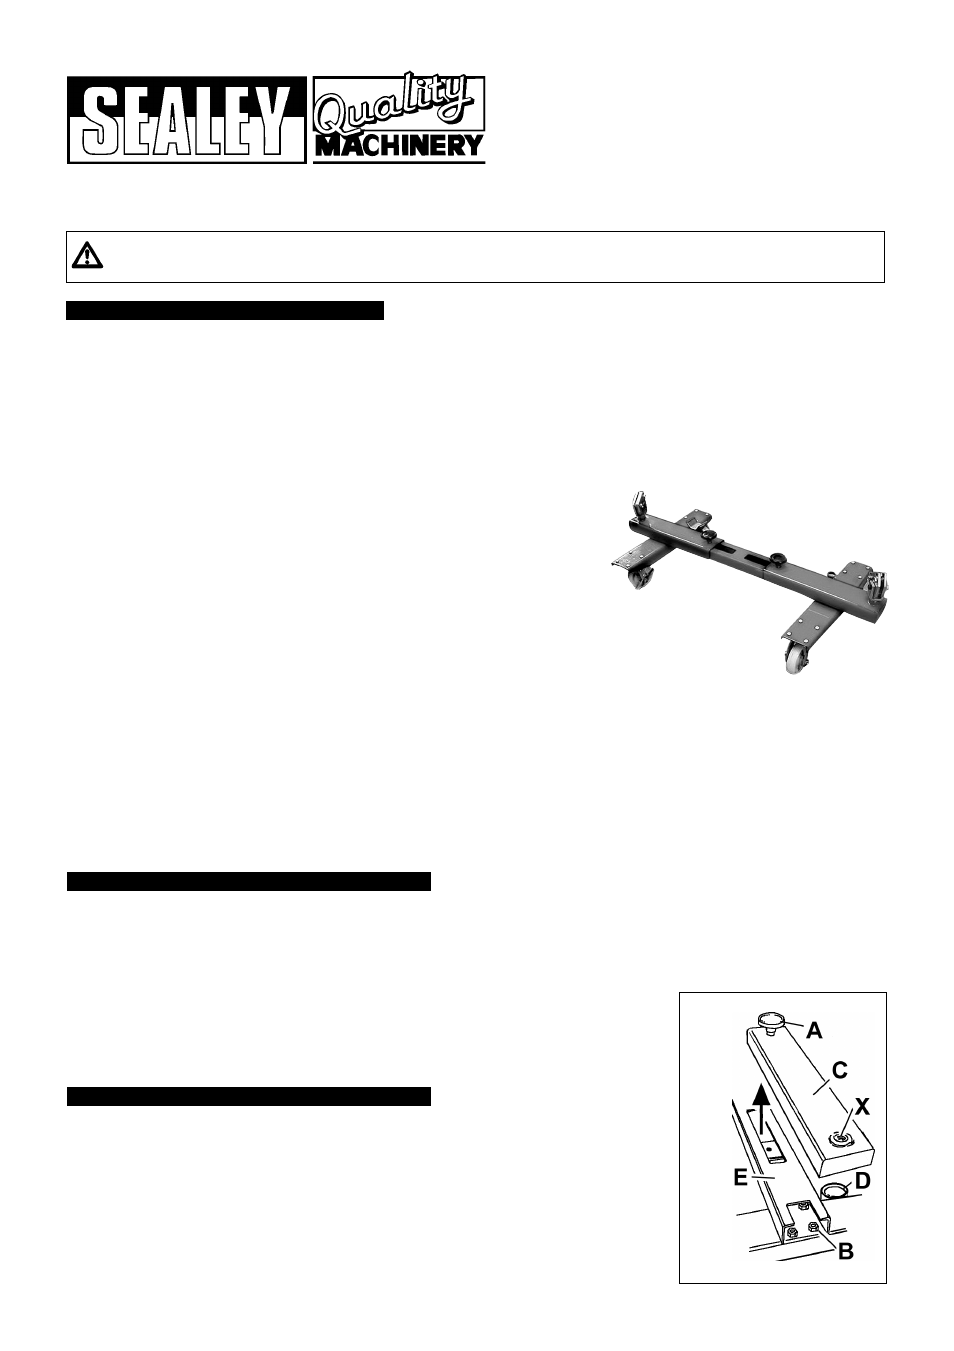
Remove extension arm (fig1.C) from main beam undoing knob (A) and lifting arm off.
3.3.
Assemble main beam (C) to wheel frames by fixing with four bolts, spring washers,
washers and nuts at each end (B).
3.4. Check that all connections are tight and replace the extension arm (C) by screwing
knob (A) into the holding plate set inside the frame of the main beam.
3.5. Screw the appropriate supports into the end of the extension arm at point (X)
and place the unused supports in their storage eyes (D).
fig 1