Sealey PC1 User Manual
Fig.1, Safety instructions 2. introduction, Operation
INSTRUCTIONS FOR:
PLUNGER CAN
Model No: PC1, PC19 & PC38
Thank you for purchasing a Sealey product. Manufactured to a high standard this product will, if used according to these instructions and properly maintained,
give you years of trouble free performance.
IMPORTANT
PLEASE READ THESE INSTRUCTIONS CAREFULLY. NOTE THE SAFE OPERATIONAL REQUIREMENTS, WARNINGS, AND CAUTIONS.
USE THIS PRODUCT CORRECTLY, AND WITH CARE FOR THE PURPOSE FOR WHICH IT IS INTENDED. FAILURE TO DO SO MAY
CAUSE DAMAGE, OR PERSONAL INJURY, AND WILL INVALIDATE THE WARRANTY.
1.2.
GENERAL SAFETY
p WARNING! Ensure Health & Safety regulations relating to the use of flammable liquids are adhered to when using this
equipment. Familiarise yourself with the Plunger Cans application and potential hazards.
7 DO NOT smoke whilst handling the Plunger Can and fluids.
7 DO NOT operate the Plunger Can in areas where there may be flying sparks or other sources of ignition.
3 Maintain Plunger Can in good condition.
3 Wear suitable protective clothing (PPE) including gloves and eye protection.
3 Ensure the work area is free of clutter and has adequate lighting.
3 Keep children and unauthorised persons away from the work area.
3 Replace/repair damaged parts. Use genuine parts. Unauthorised parts are dangerous and will invalidate warranty.
7 DO NOT use the Plunger Can to soak rags without the plunger attached.
3 Dispose of used cloths in a safe manner and away from sources of ignition.
3 When not in use store in a safe manner and away from sources of ignition.
1. SAFETY INSTRUCTIONS
2. INTRODUCTION
Easy one-handed operation, convenient and safe for dispensing flammable solvents. Spring-mounted plunger delivers measured
amounts of liquid to swab/cloth. Perforated metal flash arrestor protects against ignition and escape of flammable vapours.
Surplus liquid drains safely back into resevoir.
3. OPERATION
3.1
Filling the can.
3.1.1
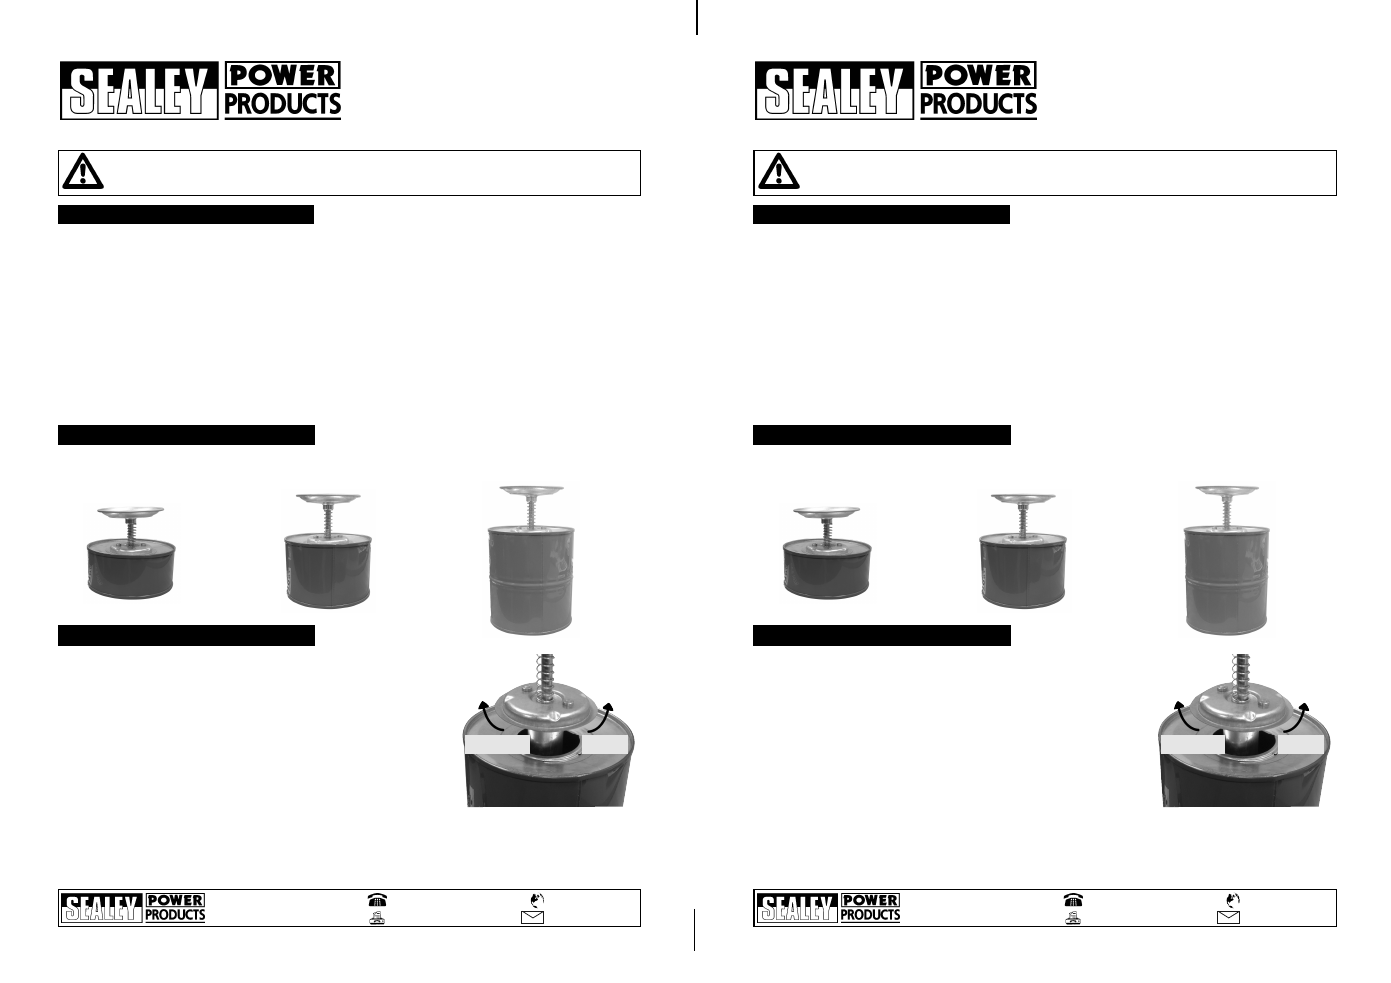
To fill the can, remove the plunger mechanism by twisting through 90° anti-clockwise (Fig. 1).
3.1.2
Fill the can no more than three quarters full.
3.1.3
Replace the plunger by inserting back into the can, aligning up the two rollers on
the underside of the plunger mechanism with the two cutaways on the can and
turning 90° clockwise until it locks in place.
3.2
To soak a cleaning cloth with fluid.
3.2.1
Wearing suitable hand protection, place cloth over the perforated flash arrestor
on the plunger.
3.2.2
Push the plunger down and release, repeat this procedure until you have
sufficiently wet the cloth.
3.2.3
Any excess fluid will drain back into the resevoir.
Caution! Do not operate the plunger without a cloth covering the perforated flash arrestor as cleaning fluid may be ejected,
causing personal injury.
PC1, PC19, PC38 - 1 - 061005
01284 757500
01284 703534
Sole UK Distributor
Sealey Group,
Bury St. Edmunds, Suffolk.
www.sealey.co.uk
Web
NOTE: It is our policy to continually improve products and as such we reserve the right to alter data, specifications and component parts without prior notice.
IMPORTANT: No liability is accepted for incorrect use of product.
WARRANTY: Guarantee is 12 months from purchase date, proof of which will be required for any claim.
INFORMATION: For a copy of our latest catalogue and promotions call us on 01284 757525 and leave your full name and address, including postcode.
Fig.1
Undo
Tighten
PC1
PC19
PC38
1ltr
1.9ltr
3.8ltr
INSTRUCTIONS FOR:
PLUNGER CAN
Model No: PC1, PC19 & PC38
Thank you for purchasing a Sealey product. Manufactured to a high standard this product will, if used according to these instructions and properly maintained,
give you years of trouble free performance.
IMPORTANT
PLEASE READ THESE INSTRUCTIONS CAREFULLY. NOTE THE SAFE OPERATIONAL REQUIREMENTS, WARNINGS, AND CAUTIONS.
USE THIS PRODUCT CORRECTLY, AND WITH CARE FOR THE PURPOSE FOR WHICH IT IS INTENDED. FAILURE TO DO SO MAY
CAUSE DAMAGE, OR PERSONAL INJURY, AND WILL INVALIDATE THE WARRANTY.
1.2.
GENERAL SAFETY
p WARNING! Ensure Health & Safety regulations relating to the use of flammable liquids are adhered to when using this
equipment. Familiarise yourself with the Plunger Cans application and potential hazards.
7 DO NOT smoke whilst handling the Plunger Can and fluids.
7 DO NOT operate the Plunger Can in areas where there may be flying sparks or other sources of ignition.
3 Maintain Plunger Can in good condition.
3 Wear suitable protective clothing (PPE) including gloves and eye protection.
3 Ensure the work area is free of clutter and has adequate lighting.
3 Keep children and unauthorised persons away from the work area.
3 Replace/repair damaged parts. Use genuine parts. Unauthorised parts are dangerous and will invalidate warranty.
7 DO NOT use the Plunger Can to soak rags without the plunger attached.
3 Dispose of used cloths in a safe manner and away from sources of ignition.
3 When not in use store in a safe manner and away from sources of ignition.
1. SAFETY INSTRUCTIONS
2. INTRODUCTION
Easy one-handed operation, convenient and safe for dispensing flammable solvents. Spring-mounted plunger delivers measured
amounts of liquid to swab/cloth. Perforated metal flash arrestor protects against ignition and escape of flammable vapours.
Surplus liquid drains safely back into resevoir.
3. OPERATION
3.1
Filling the can.
3.1.1
To fill the can, remove the plunger mechanism by twisting through 90° anti-clockwise (Fig. 1).
3.1.2
Fill the can no more than three quarters full.
3.1.3
Replace the plunger by inserting back into the can, aligning up the two rollers on
the underside of the plunger mechanism with the two cutaways on the can and
turning 90° clockwise until it locks in place.
3.2
To soak a cleaning cloth with fluid.
3.2.1
Wearing suitable hand protection, place cloth over the perforated flash arrestor
on the plunger.
3.2.2
Push the plunger down and release, repeat this procedure until you have
sufficiently wet the cloth.
3.2.3
Any excess fluid will drain back into the resevoir.
Caution! Do not operate the plunger without a cloth covering the perforated flash arrestor as cleaning fluid may be ejected,
causing personal injury.
PC1, PC19, PC38 - 1 - 061005
01284 757500
01284 703534
Sole UK Distributor
Sealey Group,
Bury St. Edmunds, Suffolk.
www.sealey.co.uk
Web
NOTE: It is our policy to continually improve products and as such we reserve the right to alter data, specifications and component parts without prior notice.
IMPORTANT: No liability is accepted for incorrect use of product.
WARRANTY: Guarantee is 12 months from purchase date, proof of which will be required for any claim.
INFORMATION: For a copy of our latest catalogue and promotions call us on 01284 757525 and leave your full name and address, including postcode.
Fig.1
Undo
Tighten
PC1
PC19
PC38
1ltr
1.9ltr
3.8ltr