Sealey AB9001 User Manual
Page 3
pressure left in the hose. Disconnect the air brush from the
compressor.
4.11. During and immediately after operation, the finned pump head
may be hot and should not be touched. If the unit must be
moved, lift it by the handle only. Allow the unit to cool before
storing it.
4.12. Should there appear to be any loss of efficiency when
spraying, ensure first that the air brush is scrupulously clean
and functioning properly. If the air brush is satisfactory then
refer to the trouble shooting guide for the compressor.
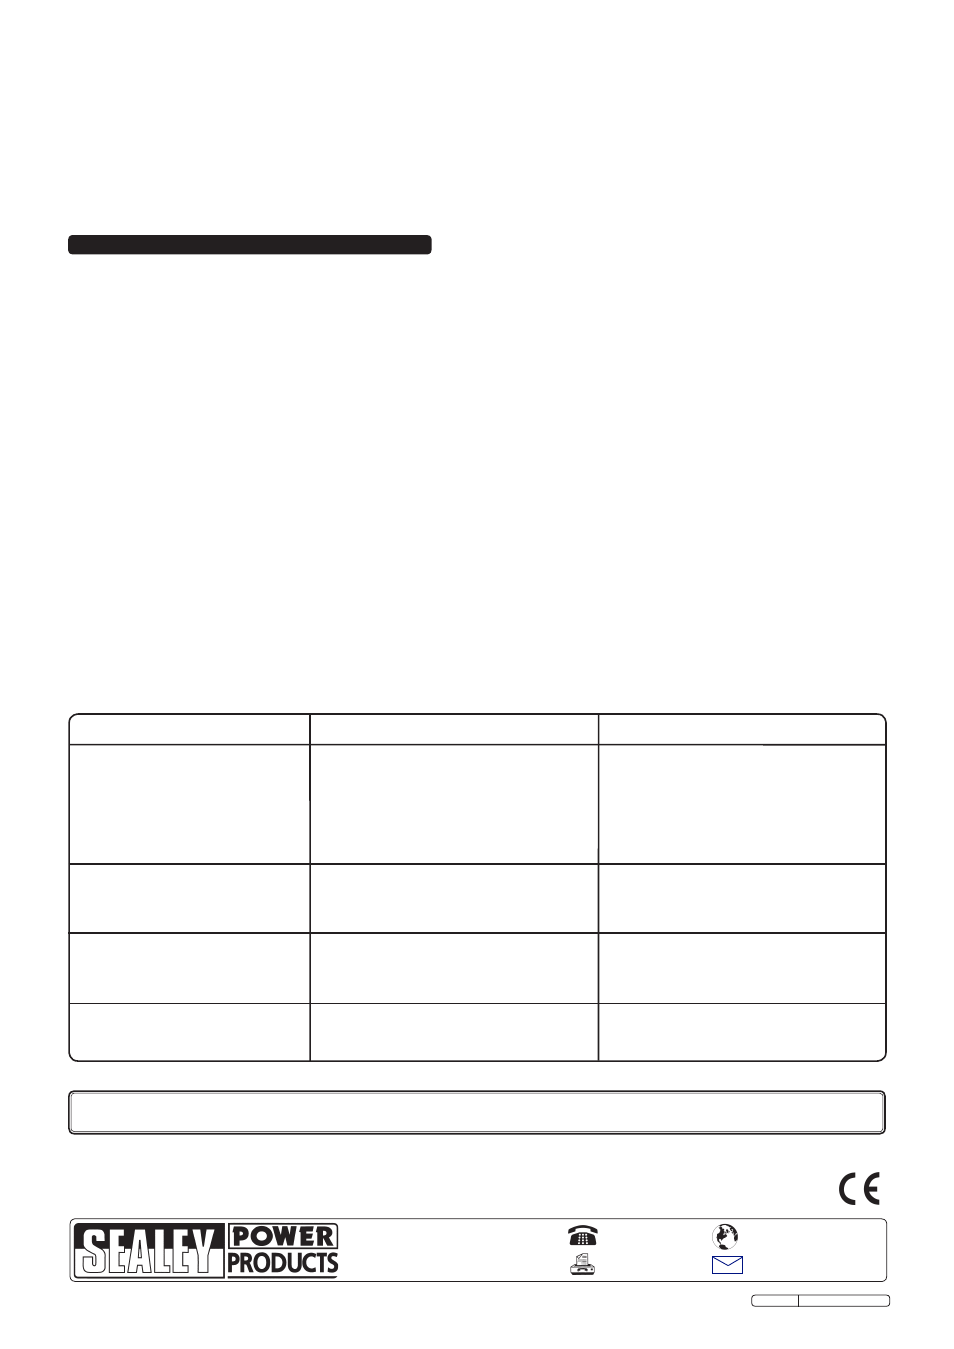
FAULT
CAUSE
REMEDY
Low air flow.
Air valve plate or air valve is
Change the defective air valve plate
damaged.
or air valve.
Diaphragm damaged.
Change diaphragm.
The head screws are too loose.
Tighten the screws equally.
Air hose leaking.
Check seals or renew hose.
noisy operation.
The head screws are too tight.
Loosen the screws and then tighten
them equally. Do not overtighten.
Bearing fault.
Contact authorised service agent.
Humming noise but does
The head screws are too tight.
Loosen the screws and then tighten
not work.
them equally. Do not overtighten.
Armature fault.
Contact authorised service agent.
The compressor does not stop
Irregular functioning of compressor
Switch off compressor and contact
and the safety valve is tripped.
or broken pressure switch.
authorised service agent.
Before carrying out any maintenance, switch compressor off,
unplug it from the mains electricity supply, depressurise the
tank and allow unit to fully cool down.
WARNING! Never drain or attempt to remove the filter
bowl if the compressor is pressurised.
5.1. Keep the compressor clean and free of dust. DO NOT use
cleaning agents. Wipe the compressor using a slightly
dampened cloth and blow it over with compressed air if
available.
5.2. Ensure that the ventilation openings are clear. Do not allow
any extraneous material to enter the unit via any of the
ventilation openings.
5.3. Routinely drain any moisture from the regulator filter bowl by
carefully pressing the spring loaded valve at the bottom of the
bowl. Periodically remove the filter bowl and clean in a mild
detergent solution.
DO NOT use solvents, thinners or alcohol
to clean the filter bowl.
5.4. To prevent corrosion to the tank interior, drain it on a regular
basis by opening the drainage tap at the bottom of the tank to
release any moisture that may have accumulated. After
draining ensure the drainage tap is fully closed.
5.5. The troubleshooting guide below is intended to give you an
indication of what type of fault may have developed with your
compressor over a long period of service. The chart is not
intended as a guide on how to repair the fault yourself. In all
cases we recommend that the compressor be returned to an
authorised service agent for rectification.
5. MAINTENANCE & TROUBLESHOOTING
Parts support is available for this product. To obtain a parts listing and/or diagram, please log on to www.sealey.co.uk,
email [email protected] or phone 01284 757500.
NOTE: It is our policy to continually improve products and as such we reserve the right to alter data, specifications and component parts without prior notice.
IMPORTANT: no liability is accepted for incorrect use of this product.
WARRANTY: Guarantee is 12 months from purchase date, proof of which will be required for any claim.
INFORMATION: For a copy of our latest catalogue and promotions call us on 01284 757525 and leave your full name and address, including postcode.
01284 757500
01284 703534
Sole UK Distributor, Sealey Group,
Kempson Way, Suffolk Business Park
,
Bury St. Edmunds, Suffolk,
IP32 7AR
www.sealey.co.uk
Web
Original Language Version
AB9001 Issue: 1 - 14/07/11