Sealey TB63 User Manual
Towing mirror extension, Tb63, Assembly & operation
Thank you for purchasing a Sealey Product. Manufactured to a high standard this product will, if used according to these instructions
and properly maintained, give you years of trouble free performance.
IMPORTANT: PLEASE READ THESE INSTRUCTIONS CAREFULLY. NOTE THE SAFE OPERATIONAL REQUIREMENTS,
WARNINGS AND CAUTIONS. USE THIS PRODUCT CORRECTLY AND WITH CARE FOR THE PURPOSE FOR WHICH IT IS
INTENDED. FAILURE TO DO SO MAY CAUSE DAMAGE OR PERSONAL INJURY AND WILL INVALIDATE THE WARRANTY.
PLEASE KEEP INSTRUCTIONS SAFE FOR FUTURE USE.
INSTRUCTIONS FOR:
TOWING MIRROR EXTENSION
MODEL No:
TB63
01284 757500
01284 703534
Sole UK Distributor, Sealey Group,
Kempson Way, Suffolk Business Park
,
Bury St. Edmunds, Suffolk,
IP32 7AR
Web
NOTE: It is our policy to continually improve products and as such we reserve the right to alter data, specifications and component parts without prior notice.
IMPORTANT: No liability is accepted for incorrect use of this product.
WARRANTY: Guarantee is 12 months from purchase date, proof of which will be required for any claim.
INFORMATION: For a copy of our latest catalogue and promotions call us on 01284 757525 and leave your full name and address, including postcode.
www.sealey.co.uk
Original Language Version
TB63 Issue: 1 - 15/11/11
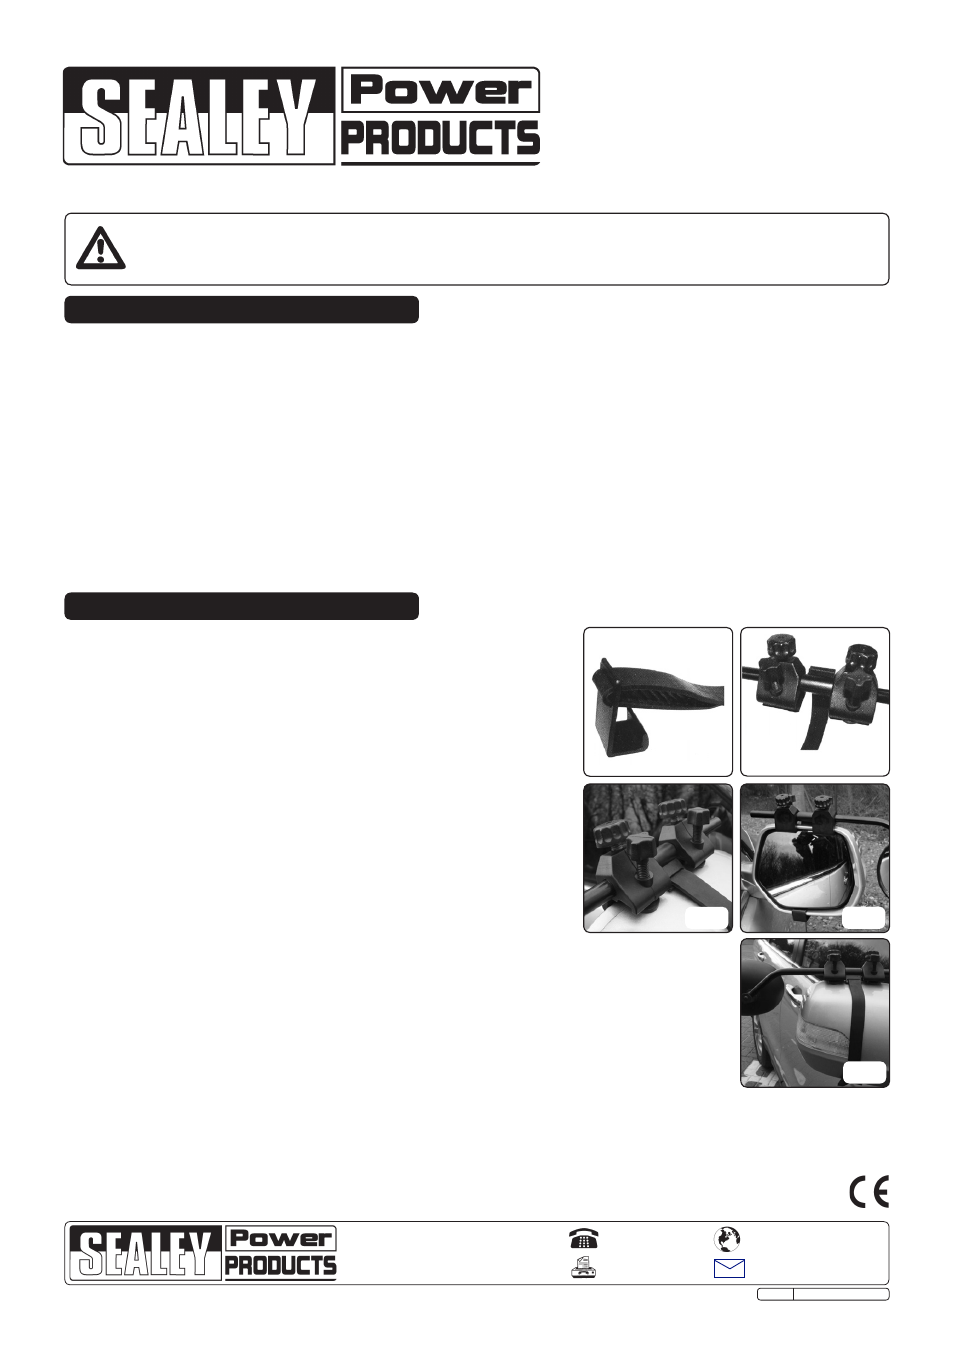
2. ASSEMBLY & OPERATION
2.1. Fit the tubular strap retaining clip and the L-shaped mirror clip to
the rubber strap as shown in fig.1, ensure the ribs are on the inside.
Ensure the small rubber protective feet are fitted to the ends of the
mirror bracket clamp screws shown in fig.2.
2.2. Slide one mirror clamp onto the mirror bar, so the clamps will slide
between the vehicle mirror and casing. Then slide on the tubular
strap retaining clip, ensuring the ribbed side of the rubber strap is
on the inside.
Fit the second mirror clamp bracket. The correct arrangement is
shown in fig.2.
2.3. Offer the towing mirror to the vehicle mirror and fit the mirror clamp
brackets, inserting the ends between the mirror and the casing.
See fig.3 for correct positioning.
2.4. Pass the rubber strap behind the body of the vehicle mirror (fig.5)
and position the end of the L-shaped bracket between the mirror
and the mirror casing, as shown in fig.4.
If the rubber straps do not have enough tension to provide a secure fixing remove the
L-shaped bracket and adjust the straps. Keep adjusting and reattaching until the mirror is
secure.
2.5. Adjust the mirror clamps to make them as far apart as possible, giving better stability.
Then secure them in position using the wheel adjusters.
Note: Do not over tighten as this could damage your mirror casing.
2.6. When the mirror is fitted as in fig.5, check the overall security of the mirror. Adjust the
mirror head for optimum rear view.
1. SAFETY INSTRUCTIONS
Familiarise yourself with this products application and limitations, as well as any specific potential hazards
peculiar to the mirror.
Always check the condition and security of the mirror before every journey, if any part is damaged or missing,
DO NOT use.
Replace or repair damaged parts. Use recommended parts only. Non authorised parts may be dangerous and
will invalidate the warranty.
DO NOT use the mirror for any purpose other than for which it is designed.
DO NOT use the mirror if any parts are missing or damaged as this may cause failure.
WARNING: The warnings, cautions and instructions discussed in this instruction manual cannot cover
all possible conditions and situations that may occur. It must be understood that common sense and
caution are factors which cannot be built into this product, but must be applied by the operator.
fig.1
fig.2
fig.3
fig.4
fig.5