Sealey SM27ST User Manual
Stand for sm27.v2, Sm27st.v2, Model no
InstructIons for:
stand FOR sM27.V2
Model no:
sM27st.V2
2. cOntents and asseMbly
IteM
descRIPtIOn
Qty
1
suDs trAY
1
2
r/H cABInEt
1
3
L/H cABInEt
1
4
AnGLE BrAcKEt
2
5
KIcK PLAtE
1
6
r/H sHIM BLocK 150mm
2
7
L/H sHIM BLocK 200mm
2
8
scrEW M6x25
8
9
scrEW M5x12
10
10
Ø5 fLAt WAsHEr
10
11
Ø5 sPrInG WAsHEr
10
12
M5 HEX nut
10
13
BoLt M10x100
4
14
Ø10 fLAt WAsHEr
4
15
Ø10 sPrInG WAsHEr
4
16
M10 HEX nut
4
WaRnInG! the lathe (not included) is heavy - it is
recommended that two persons lift and lower the lathe
onto the assembled stand.
1.1 Avoid trapping hands/fingers beneath the lathe, when
lowering onto the stand.
1.2 Ensure the stand is positioned on firm, level ground (we
recommend concrete or a similar hard surface).
1.3 Ensure the surrounding environment is not conducive to
rust. rust will damage the stand, rendering it structurally
unsafe.
3. MaIntenance
3.1 Very little maintenance is required, but regular checks should be made to ensure the structural integrity of the stand. the lathe is heavy and
should the stand sustain structural damage, it could collapse/overbalance if not properly repaired/replaced.
3.1.1 Periodically check the stand for rust.
3.1.2 occasionally remove the lathe and check the nuts & screws within the stand. Ensure they are all present, intact and tightened.
3.1.3 regularly check the stand for dents, distortion and signs of misuse.
3.1.4 for information regarding repairs/replacement contact your authorised sealey dealer.
NOTE: It is our policy to continually improve products and as such we reserve the right to alter data, specifications and component parts without prior notice.
IMPORtant: no liability is accepted for incorrect use of this product.
WaRRanty: Guarantee is 12 months from purchase date, proof of which will be required for any claim.
InFORMatIOn: for a copy of our latest catalogue and promotions call us on 01284 757525 and leave your full name and address, including postcode.
01284 757500
01284 703534
sole UK distributor, sealey Group,
Kempson Way, suffolk Business Park
,
Bury st. Edmunds, suffolk,
IP32 7Ar
www.sealey.co.uk
Web
Original Language Version
sM27st.V2 Issue: 1 - 07/02/12
thank you for purchasing a sealey product. Manufactured to a high standard this product will, if used according to these instructions and properly
maintained, give you years of trouble free performance.
IMPORTANT: Please Read tHese InstRUctIOns caReFUlly. nOte tHe saFe OPeRatIOnal ReQUIReMents, WaRnInGs and
caUtIOns. Use tHIs PROdUct cORRectly and WItH caRe FOR tHe PURPOse FOR WHIcH It Is Intended. FaIlURe tO dO sO May
caUse daMaGe and/OR PeRsOnal InJURy and WIll InValIdate tHe WaRRanty. Please KeeP InstRUctIOns saFe FOR FUtURe Use.
1. saFety InstRUctIOns
2.1
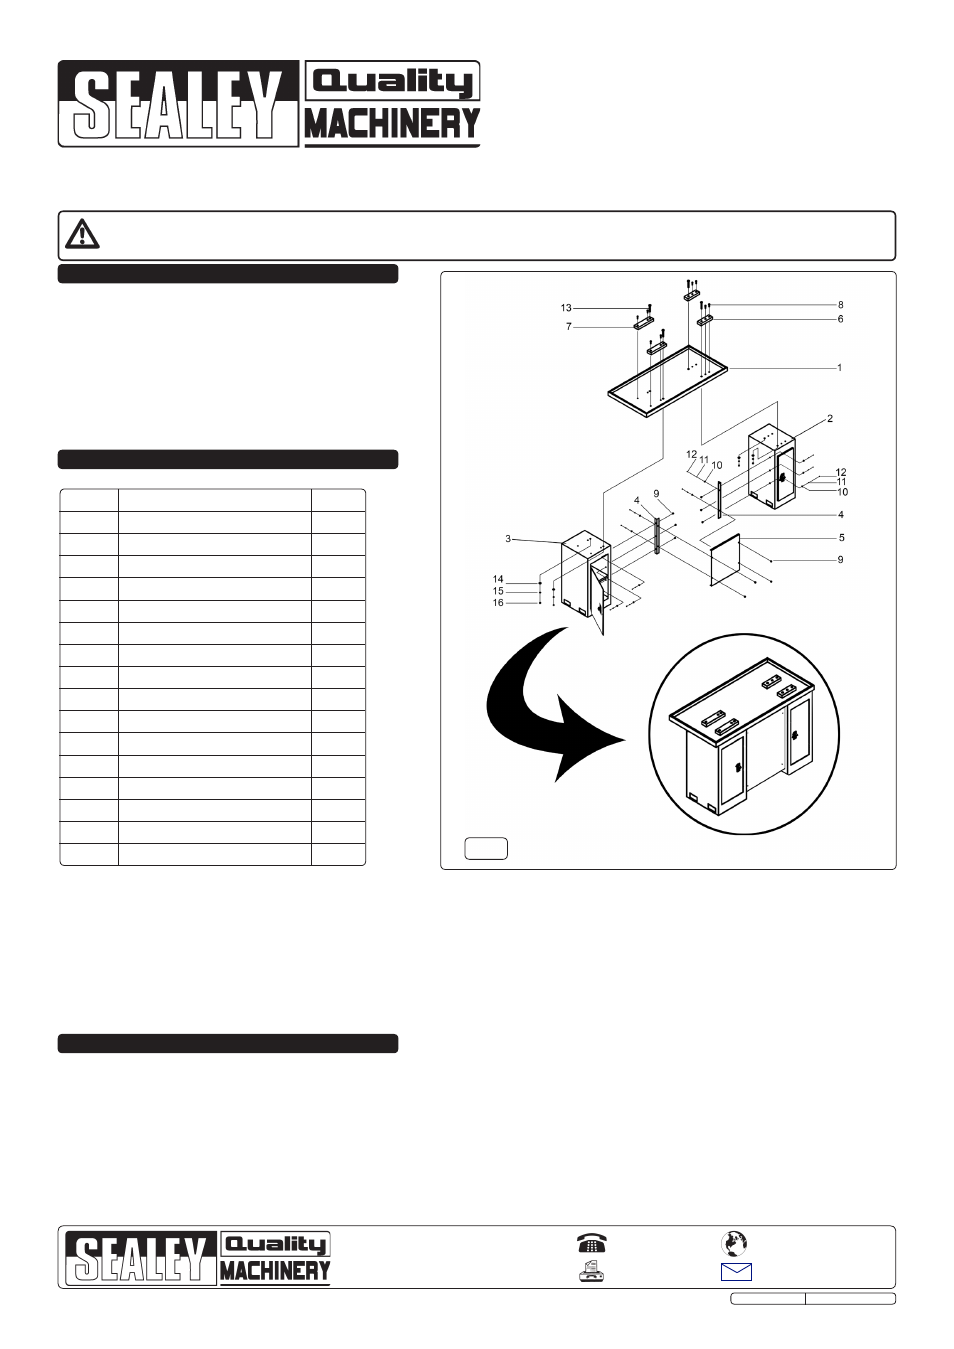
CONTENTS (Refer to fig.1)
2.2 ASSEMBLY (Refer to fig.1)
2.2.1 Attach the three hole side of the angle brackets (4) to the cabinets (2 & 3) using M5x12 screws (9), Ø5 flat washers (10), Ø5 spring washers
(11) and the M5 hex nuts (12).
2.2.2 Attach the kick plate (5) to the two hole side of the angle brackets (4) using M5x12 screws (9), Ø5 flat washers (10), Ø5 spring washers (11)
and the M5 hex nuts (12), joining the cabinets (2 & 3) together.
2.2.3 Place the suds tray (1) on top of the cabinets (2 & 3) and align the screw holes.
2.2.4 Align the L/H and r/H shim blocks (6 & 7) over the screw holes in the suds tray (1) and the cabinets (2 & 3). secure into place using the
M6x25 screws (8).
2.2.5 The lathe (not included) is secured to the stand using the M10x100 bolts (13), Ø10 flat washers (14), Ø10 spring washers (15) and the M10
hex nuts (16).
fig.1