Sealey VS2063 User Manual
Diesel injector nozzle puller, Vs2063, Instructions for
Thank you for purchasing a Sealey product. Manufactured to a high standard this product will, if used according to these instructions and properly
maintained, give you years of trouble free performance.
IMPORTANT: PLEASE READ THESE INSTRUCTIONS CAREFULLY. NOTE THE SAFE OPERATIONAL REQUIREMENTS, WARNINGS AND CAUTIONS.
USE THE PRODUCT CORRECTLY AND WITH CARE FOR THE PURPOSE FOR WHICH IT IS INTENDED. FAILURE TO DO SO MAY CAUSE DAMAGE
AND/OR PERSONAL INJURY AND WILL INVALIDATE THE WARRANTY. PLEASE KEEP INSTRUCTIONS SAFE FOR FUTURE USE.
InSTrucTIonS for
:
DIESEL INJECTOR NOZZLE PULLER
MoDEL no:
VS2063
1. SAFETY INSTRUCTIONS
2. INTRODUCTION
WARNING! Ensure Health and Safety, local authority and general workshop practice regulations are adhered to when using tools.
DO NOT use the tool if any parts are missing or damaged.
DO NOT use this tool for any purpose other than that for which it is designed.
operate in a well ventilated area. Do not inhale fuel vapours.
Wear approved eye protection. A full range of personal safety equipment is available from your Sealey dealer.
Wear suitable clothing to avoid snagging. Do not wear jewellery and tie back long hair.
Keep children and other unauthorised persons away from the working area.
NEVER smoke or have open flames near vehicles.
clean up all fuel spills immediately and dispose of all rags properly.
Maintain the tool components in good and clean condition for best and safest performance.
When finished, account for all tools and parts being used. Do not leave them in or near the engine.
Store tool in a safe, dry, childproof location.
used to remove the injector nozzle when servicing/cleaning diesel injectors. compatible with Bosch, Denso, Delphi and Siemens injectors.
3. OPERATION
NOTE: It is our policy to continually improve products and as such we reserve the right to alter data, specifications and component parts without prior notice.
IMPORTANT: no liability is accepted for incorrect use of this product.
WARRANTY: Guarantee is 12 months from purchase date, proof of which will be required for any claim.
INFORMATION: for a copy of our latest catalogue and promotions call us on 01284 757525 and leave your full name and address, including postcode.
Sole UK Distributor, Sealey Group,
Kempson Way, Suffolk Business Park
,
Bury St. Edmunds, Suffolk,
IP32 7Ar
Original Language Version
VS2063 Issue: 1 - 19/12/11
01284 757500
01284 703534
www.sealey.co.uk
Web
DO NOT USE AIR TOOLS WITH THIS PRODUCT.
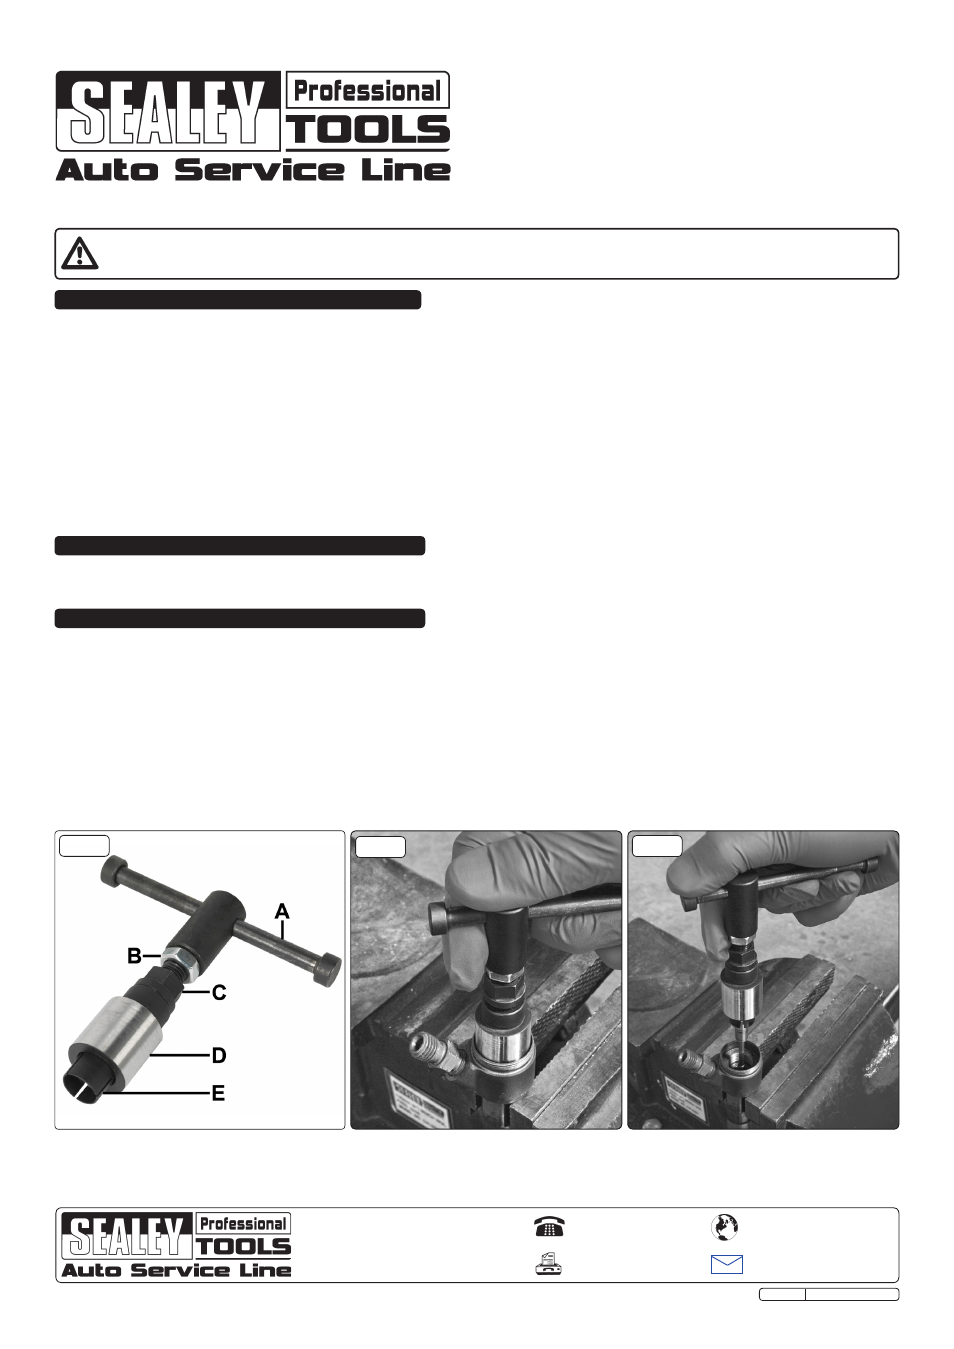
The tool is designed for working on an injector unit that has been removed from the engine.
3.1 remove the injector from the engine.
3.2 Insert the injector into a vice or another suitable holding device and unscrew and remove the injector solenoid.
3.3 To gain access to the injector nozzle head remove the internal spring assembly.
3.4 Screw the force nut (fig.1C) outward toward the lock nut (fig.1B).
3.5 Ensure the collar (fig.1D) is away from the clamp (fig.1E)
3.6 Insert the tool into the injector body so that the clamp (fig.1E) fits over the nozzle.
3.7 Screw down the force nut (fig.1C) finger tight. (See fig.2).
3.8 Use a 14mm spanner while holding the T-bar (fig.1A) to nip-up the force nut. DO NOT overtighten.
3.9 Hold the T-bar (fig.1A) and pull and turn to remove the injector nozzle. (See fig.3).
3.10 While holding the T-bar use a 14mm spanner to loosen the force nut to remove the injector nozzle from the tool.
fig.1
fig.2
fig.3