Operating the gauge - cars & vans, Operating the gauge - commercial vehicles – Sealey GA40 User Manual
Page 2
4. OPERATING THE GAUGE - CARS & VANS
NOTE:
CARS & VANS. Prior to use check vehicle manufacturers recommendations relating to loading. Check that tyre pressures are correct.
4.1. Ensure that the vehicle is on a smooth level surface with the wheels pointing straight ahead. Do not back the vehicle into position.
4.2. Position the periscope unit against the offside front wheel ( see fig. 3 ) and adjust the height of the contact bars by fixing them in which
ever of the five preset positions is closest to a horizontal line through the centre of the wheel. At the same time adjust the side to side
positioning of the contact bars so that they touch the sidewall of the tyre either side of the rim. Position the tips of the contact bars to
touch the centre of the sidewalls at the greatest point of curvature. Avoid any ribs or raised lettering on the tyre side wall.
3.2.1
Stand the complete gauge on a level, clean floor with contact bars touching as in fig. 1.
3.2.2
Adjust the mirror and periscope until the reflection of the target plate (fig. 1.4.) is visible through the periscope.
3.2.3. Sighting through the periscope move the pointer (fig. 1.5.) until the image reflects the hair line in the centre of the triangle between the
vertical lines as in (fig. 2.).
3.2.4. The pointer should now be at zero on the graduated scale (fig. 1.6.). If not slacken the two wing nuts holding the scale, adjust the
scale to zero and tighten the wing nuts. The gauge is now ready for use.
4.3. The contact bars of the mirror unit should now be set up to the same height and width as
the periscope unit. To do this remove the periscope unit from its position on the tyre and
place it in front of the mirror unit to make the necessary adjustments.
4.4. When the contact bar arrangements on both units match, proceed to calibrate the gauge.
( See calibration set - up 3.2.1 to 3.2.4. )
4.5. Set up both units as in (fig. 4.). Looking through the periscope adjust the pointer until the
hair line bisects the triangle between the two vertical lines.(fig. 2.) The amount of toe-in or
toe-out can now be read from the scale (fig. 6.) in degrees and minutes.
4.6. To allow for any possible lateral run out of the wheels and tyres the vehicle should be
moved forward until the wheels have rotated half a revolution (180
0
) and the operation
repeated. If a different reading is obtained the two results should be averaged.
4.7. The calculator (fig. 1.7.) allows conversion of the angle obtained to a linear measurement
in millimetres or fractions of an inch (Linear toe in or toe out). Set the large arrow on the
top dial to the specified width on the bottom dial. The specified width may either be the
nominal wheel diameter or a dimension equivalent to a diameter to the tyre sidewall e.g.
mid sidewall (or in accordance with the measuring position figures in the appropriate
workshop manual or handbook). Read the linear toe reading from the bottom dial,
opposite the angular toe reading from the top dial.
4.8. Any alignment necessary must be made strictly in accordance with the vehicle
manufacturers recommendations.
Fig. 3.
Fig. 4.
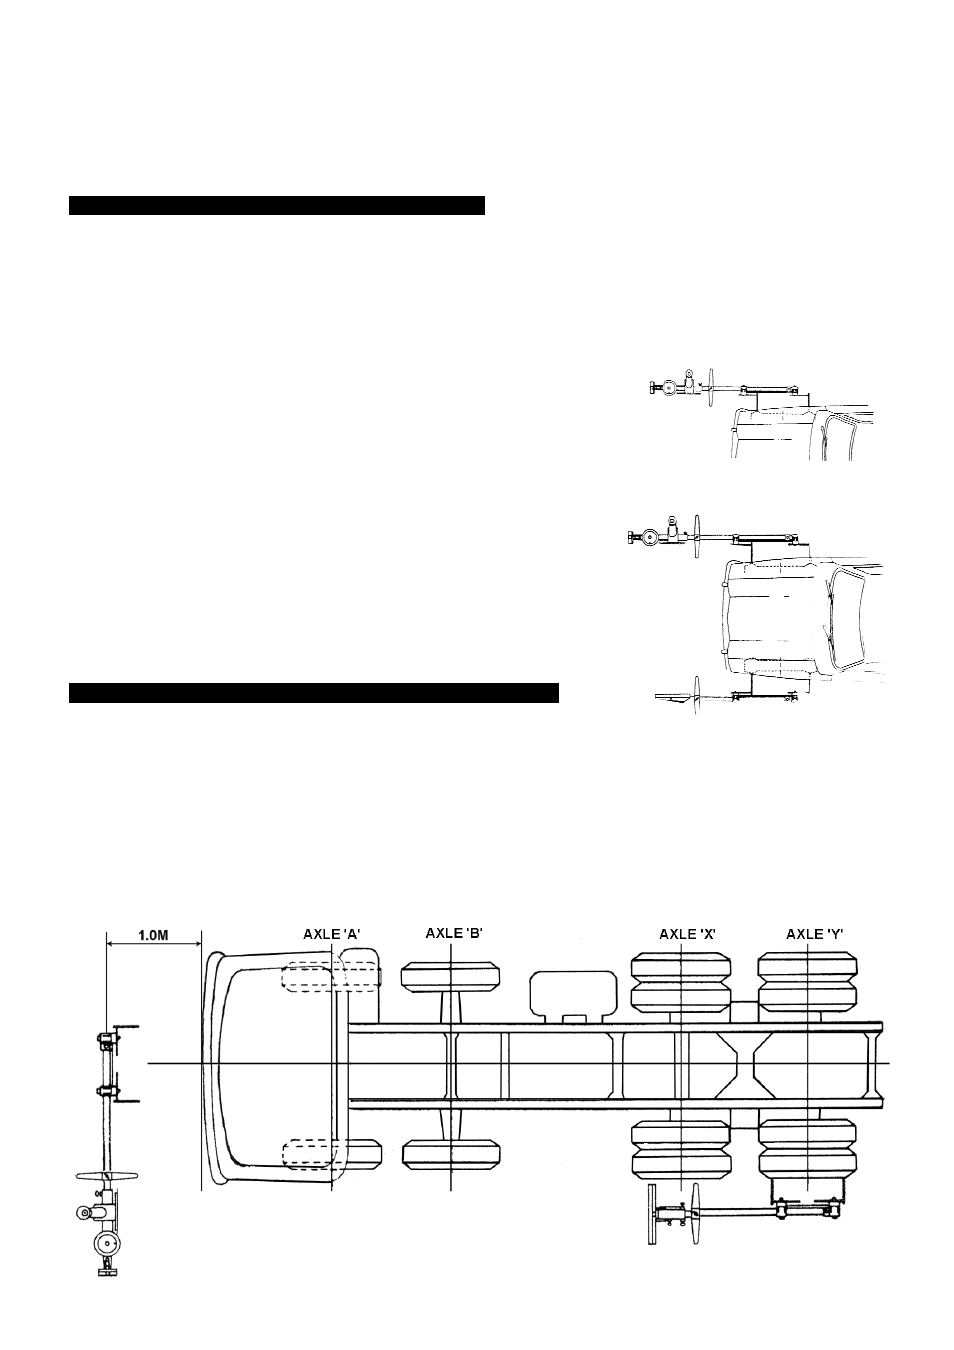
NOTE: COMMERCIAL
VEHICLES. The gauge is also designed to check wheel alignment on two, three or four axle vehicles. Before using
the gauge, the vehicle manufacturers recommendations in respect of loading, tyre pressures etc must be complied with. In the
absence of definite instructions, it is normal practice to check commercial vehicles when fully laden and with all wheels parallel.
When setting front end alignment, never make adjustments to drop arms or interconnecting links. Doing so could result in
serious tyre, wheel and steering problems.
5.1
Single Steering Axle : Procedure is the same as for cars and vans.
5.2
Twin Steering Axles : When checking wheel alignment on twin steering vehicles you will also need to use the optional equipment
package comprising larger mirror and frame. Order Item: GA43
5. OPERATING THE GAUGE - COMMERCIAL VEHICLES
Fig. 5.
GA40 - 1 - 080304