Sealey VS7027 User Manual
Page 3
Original Language Version
VS7027, VS7028, VS7029, VS7030 Issue No.1 - 02/08/12
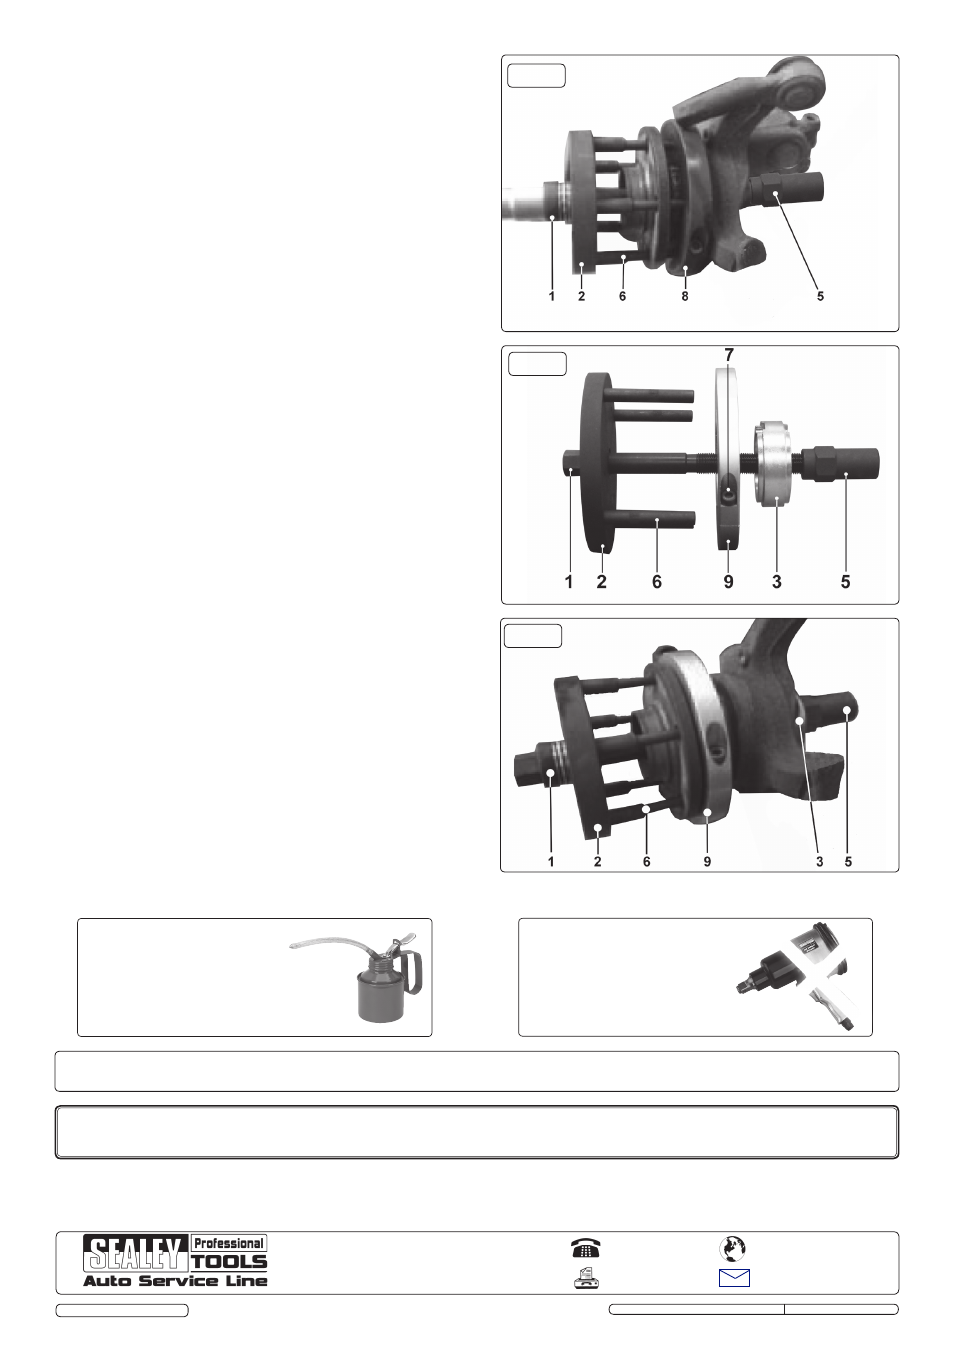
5.1.7 Screw the sleeved nut (5) over the force screw (1) so
that it sits against the bearing plate (4).
5.1.8 Use a socket on the force screw (1) and a spanner on
the sleeved nut (5) (fig.3). Draw the bearing from the
hub carrier.
5.2 Bearing Installation (fig.4 & fig.5)
WARNING! DO NOT fit a bearing with a damaged
retaining ring.
Note: The bearing must only be subjected to
force on the outer bearing race behind the
retaining ring during installation. Using a
workshop press on the hub flange to insert the
bearing will cause premature failure or destroy the
bearing during installation.
5.2.1 The silver hub clamp (9) sits in the space between
the rear of the hub flange and the retaining ring (fig.5).
Secure the hub clamp (9) with the hub clamp screws
(7).
5.2.2 Fit the hub guide pins (6) into the thrust plate (2) so
that the hub guide pins (6) align with the holes in the
hub flange. Place the hub guide pins (6) though the
holes in the hub flange so that they sit against the hub
clamp (9).
5.2.3 Lubricate the force screw (1).
5.2.4 Offer the bearing and assembled kit to the hub carrier.
Ensure that the bearing is sitting square to the hub
carrier before commencing installation.
5.2.5 Fit the force screw (1) through the thrust plate (2) and
through the bearing and hub carrier.
5.2.6 Place the silver bearing plate (3) over the force screw
(1) so that it sits on the outer edge at the rear of the
hub carrier.
5.2.7 Screw the sleeved nut (5) over the force screw (1) so
that it sits against the bearing plate (3).
5.2.8 Use a socket on the force screw (1) and a spanner on
the sleeved nut (5). Draw the bearing into the hub
carrier.
5.2.9 When the bearing is correctly installed, the retaining
ring will clip into the retaining groove.
fig.3
fig.4
fig.5
NOTE: It is our policy to continually improve products and as such we reserve the right to alter data, specifications and component parts without prior notice.
IMPORTANT: No liability is accepted for incorrect use of this product.
WARRANTY: Guarantee is 12 months from purchase date, proof of which will be required for any claim.
INFORMATION: For a copy of our latest catalogue and promotions call us on 01284 757525 and leave your full name and address, including postcode.
01284 757500
01284 703534
Sole UK Distributor, Sealey Group,
Kempson Way, Suffolk Business Park
,
Bury St. Edmunds, Suffolk,
IP32 7AR
www.sealey.co.uk
Web
Parts support is available for this product.
To obtain a parts list and diagram please log on to www.sealey.co.uk, email [email protected] or phone 01284 757500
ALWAYS KEEP FORCE SCREW
WELL LUBRICATED.
DO NOT USE AIR TOOLS
The force screws maximum load is 150Nm. Exceeding this load will shorten the life of the force screws The force screws are considered to
be consumable items and are NOT covered under warranty.
© Jack Sealey Limited 2012