Sealey VS721 User Manual
Vs721.v2, Fig.1 fig.2 fig.3
IMPORTANT: PLEASE READ THESE INSTRUCTIONS CAREFULLY. NOTE THE SAFE OPERATIONAL REQUIREMENTS, WARNINGS AND
CAUTIONS. USE THIS PRODUCT CORRECTLY AND WITH CARE FOR THE PURPOSE FOR WHICH IT IS INTENDED. FAILURE TO DO SO MAY CAUSE
DAMAGE AND/OR PERSONAL INJURY AND WILL INVALIDATE THE WARRANTY. PLEASE KEEP INSTRUCTIONS SAFE FOR FUTURE USE.
InstructIons for:
BUSH REMOVAL/INSTALLATION TOOL
- VAUXHALL / OPEL VECTRA
model no :
VS721.V2
WARNING! Ensure Health & Safety, local authority, and general workshop practice
regulations are adhered to when using this tool.
WARNING! familiarise yourself with the specific applications and limitations of this tool,
as well as any potential hazards.
this tool should be used in conjunction with inspection maintenance procedures
recommended in the vehicle manufacturer’s manual.
ensure that this tool is the correct tool for the task.
ensure that the vehicle is properly supported with axle stands before working under the
vehicle.
ensure that there is adequate lighting prior to using this tool.
A range of inspection lamps are available from your local sealey dealer.
Keep children and unauthorised persons away from the working area.
Keep the threaded rod well lubricated during operation to ease removal of bushes.
DO NOT use this tool
for any purpose other than that for which it is designed.
DO NOT use air tools with this tool.
DO NOT use this tool if any parts are missing or damaged, as this may cause failure and/or personal injury.
DO NOT use this tool
when you are tired, or under the influence of alcohol, drugs or intoxicating medication.
When not in use, store in a safe, dry location.
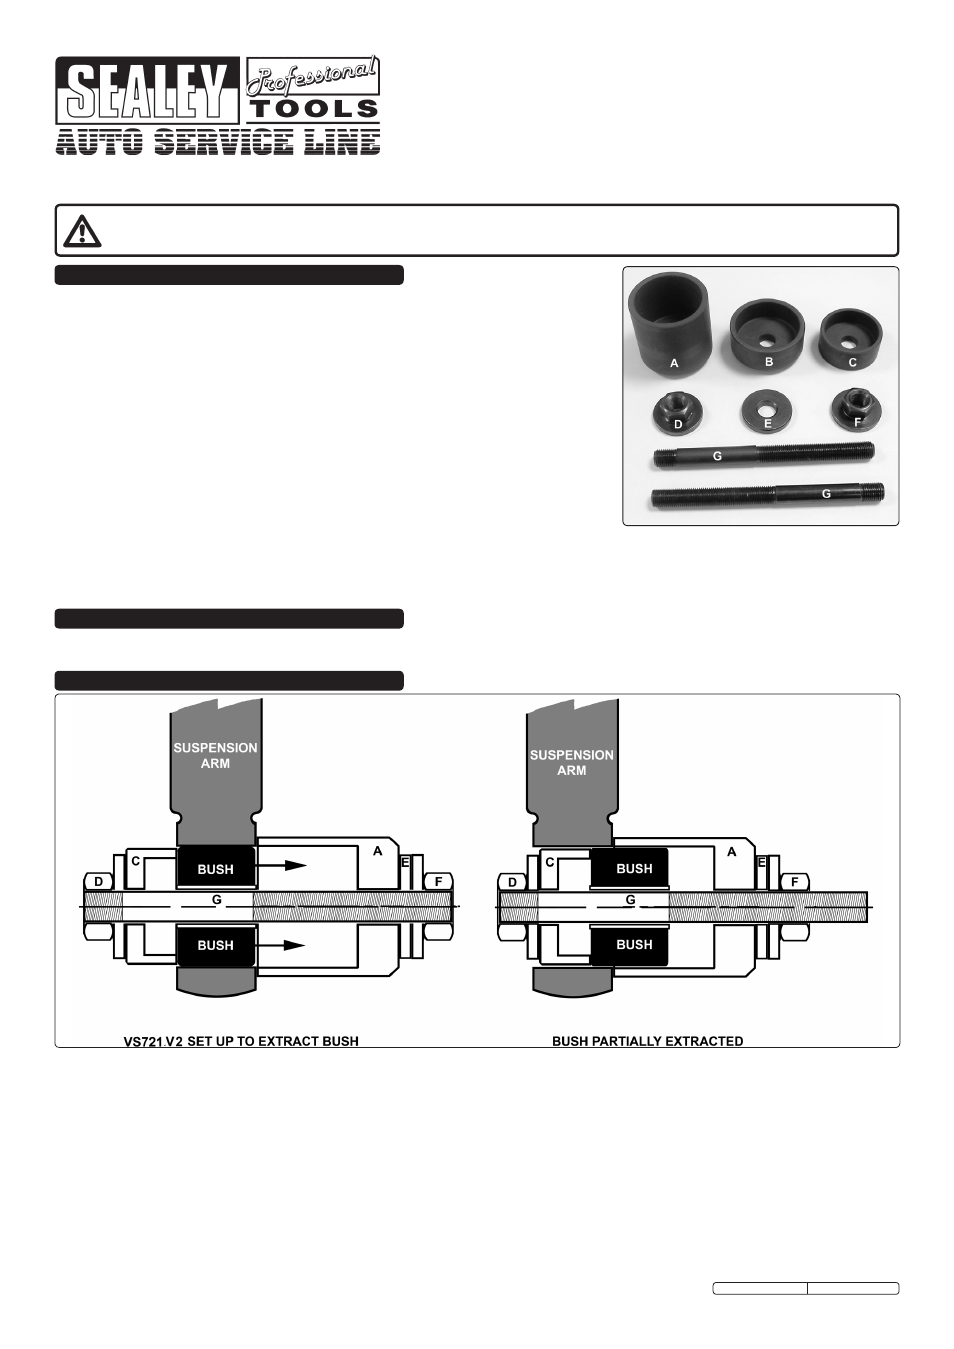
3.1. REMOVING A BUSH. (Figs 2 & 3)
3.1.1. screw the nut with washer attached (d) onto the short threaded portion of threaded rod (G). slide the pushing cup (c) onto
the threaded rod in the orientation shown above in fig.2.
3.1.2. Push the threaded rod through the centre of the bush to be removed until the pushing cup bears against the bush.
3.1.3. Hold the assembly in place and slide the large static cup (A) onto the rod until it bears against the surface of the suspension
arm as shown above in fig.2.
3.1.4. slide washer (e) onto the rod and retain the whole assembly by screwing the nut with washer (f) onto the threaded rod.
3.1.5. Hold nut d with a spanner and then place a second spanner over the nut with washer attached (f). this should preferably be a
ratchet ring spanner for ease of use and maximum accessability. As the nut is turned extraction will commence as indicated in
fig.3. some considerable pressure may need to be applied to initiate the first movement of the bush. As the bush leaves the
suspension arm ensure that the assembly is supported as it is likely to fall away from the suspension arm once the bush
becomes loose.
3.1.6. disassemble the extractor and dispose of the old bush in compliance with local authority waste disposal requirements.
Fig.1
Fig.2
Fig.3
Thank you for purchasing a Sealey Product. Manufactured to a high standard this product will, if used according to these instructions and properly
maintained, give you years of trouble free performance.
1. SAFETY INSTRUCTIONS
2. APPLICATION
3. OPERATION
Intended for the rapid removal / installation of Vauxhall / opel Vectra (95-02) upper and lower rear trailing arm bushes. Bushes are
quickly removed or installed with tool and 19mm spanners / ratchet spanners (not included).
Original Language Version
Vs721.V2 Issue: 2 - 23/08/11