Sealey TC970 User Manual
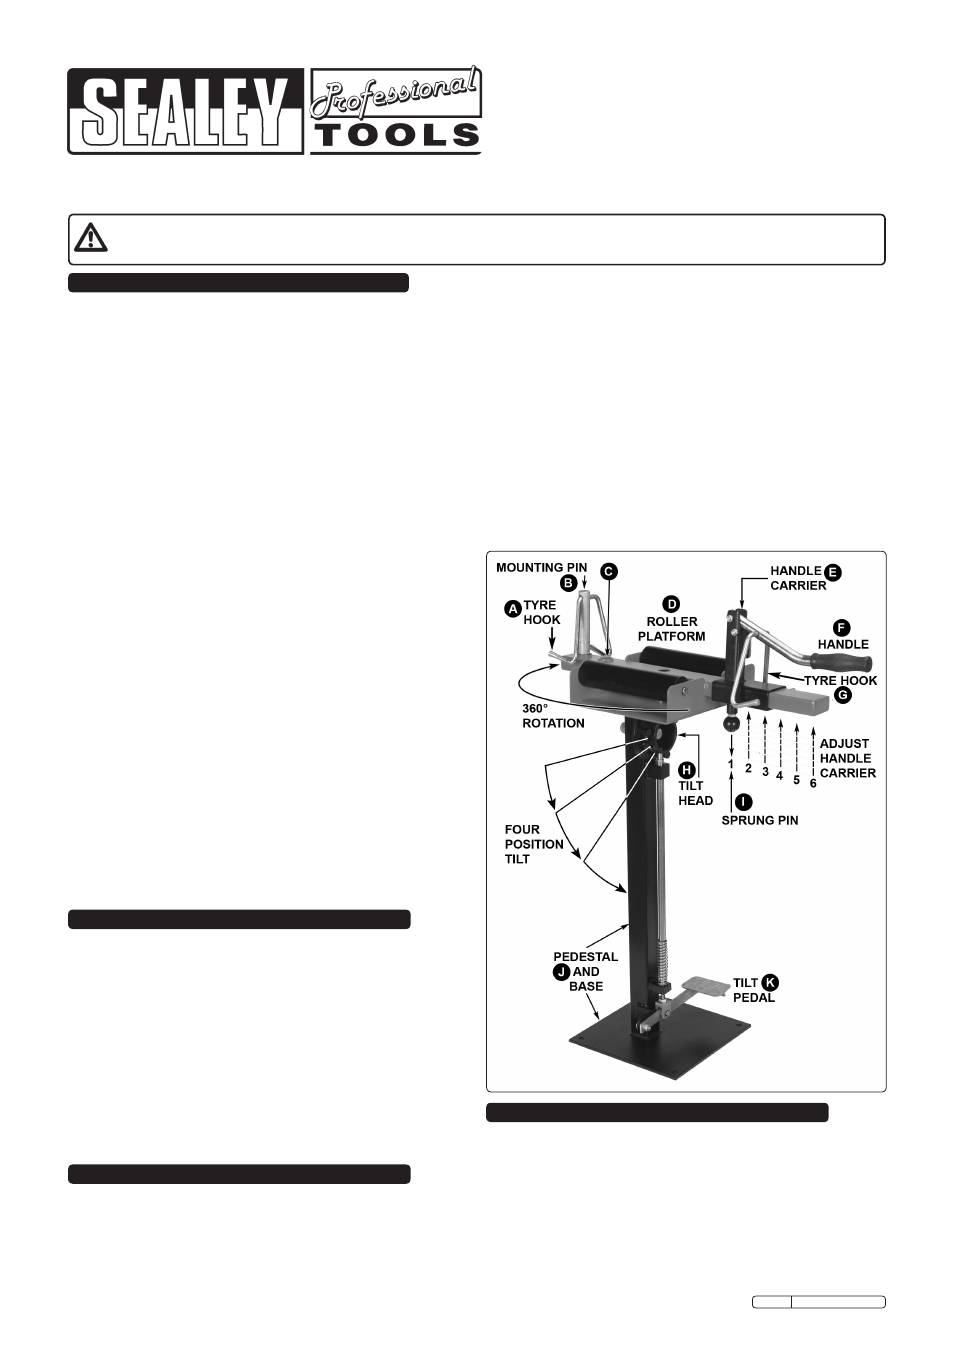
Tc970, Tyre spreader with stand - manual, Fig.1
InstructIons for:
TYRE SPREADER WITH STAND - MANUAL
Model no:
TC970
thank you for purchasing a sealey product. Manufactured to a high standard this product will, if used according to these instructions
and properly maintained, give you years of trouble free performance.
1. SAFETY INSTRUCTIONS
IMPORTANT: PLEASE READ THESE INSTRUCTIONS CAREFULLY. NOTE THE SAFE OPERATIONAL REQUIREMENTS, WARNINGS AND CAUTIONS.
USE THE PRODUCT CORRECTLY AND WITH CARE FOR THE PURPOSE FOR WHICH IT IS INTENDED. FAILURE TO DO SO MAY CAUSE
DAMAGE AND/OR PERSONAL INJURY AND WILL INVALIDATE THE WARRANTY. PLEASE KEEP INSTRUCTIONS SAFE FOR FUTURE USE.
2. INTRODUCTION & SPECIFICATION
3. ASSEMbLY
WARNING! Ensure Health & Safety, local authority and general
workshop practice regulations are adhered to when using this
equipment.
WARNING! Do not operate the tilt pedal at any time,
without first taking hold of the roller platform or a tyre
that is secured to it.
familiarise yourself with the applications, limitations and the
potential hazards of the tyre spreader.
Maintain the
tyre spreader in good condition (use an authorised
service agent).
replace or repair damaged parts. Use genuine parts only.
Unauthorised parts may be dangerous and will invalidate the
warranty.
WARNING! check regularly for damaged parts. Any part that is
damaged must be repaired or replaced before the equipment is
next used.
locate the tyre spreader in a suitable work area and keep area
clean and tidy and free from unrelated materials. ensure that there is
adequate lighting.
WARNING! use on a level surface, preferably concrete, to
which the tyre spreader must be bolted.
Keep the tyre spreader clean for best and safest performance.
Wear approved safety eye protection (standard spectacles are
not adequate).
Keep hands and feet well clear of the tyre spreader.
Maintain correct balance and footing. ensure the floor is not
slippery and wear non-slip shoes.
remove ill fitting clothing. remove ties, watches, rings and
other loose jewellery and contain and/or tie back long hair.
Keep children and unauthorised persons away from the work
area.
DO NOT use the tyre spreader for any purpose other than that
for which it is designed.
DO NOT operate the tyre spreader if any parts are damaged or
missing as this may cause failure and/or personal injury.
DO NOT allow untrained persons to operate the tyre spreader.
DO NOT stand on the tyre spreader.
DO NOT operate the tyre spreader when you are tired or under
the influence of alcohol, drugs or intoxicating medication.
floor standing unit for spreading vehicle tyres before carrying
out repairs. features rollers to rotate the tyre to the correct
position and fully adjustable platform. suitable for most cars and
light commercial vehicles.
Model No: ..........................................................................TC970
Height: .............................................................................. 870mm
Base size: ............................................................... 300 x 300mm
Maximum tyre Width: ........................ 230mm (Before spreading)
tyre spread: ....................................................................... 85mm
Platform swivel: ..................................................................... 360º
tilt: .......................................................4 Position (foot operated)
Maximum tilt: ........................................................................... 90º
spreader Position Adjustments: ................................................. 7
For assembly refer to fig.1.
3.1. Attach the roller platform (d) to the tilt head (H) using an
M16 x 30mm socket cap bolt, an M16 flat washer, M16 split
washer and an M16 nyloc type nut. slide the flat washer over
the hole in the centre of the platform. drop the bolt down
through the hole in the cross bar, through the washer and
4. OPERATION
Original Language Version
tc970 Issue:1 - 01/07/10
through the hole in the tilt head plate. from underneath,
position the split washer over the bolt and screw on the nyloc
nut. Hold the nut steady with a 12mm hex key and tighten
the bolt until it grips. Back the nut off slightly to allow the
platform to rotate on the tilt head.
3.2.
take the mounting pin (B) with tyre Hook (A) attached and
position a circlip in one of the top two grooves depending on
the size of tyre to be worked on. slide the mounting pin down
through one of the holes in the cross bar (see B or c) and
retain it underneath with another circlip.
3.3
slide the Handle carrier (e) onto the end of the cross bar.
Pull down on the sprung pin (I) and move the carrier fully onto
the cross bar. Position the carrier where required and release
the sprung pin to latch in one of the six positions shown below.
3.4
Position the tyre spreader in the required working area and bolt
it firmly to the floor. leave enough clearance around the unit to
allow for tilting and rotating the tyre.
fig.1
WARNING! Do not operate the tilt pedal at any time,
without first taking hold of the roller platform or a tyre
that is secured to it.
4.1
ensure the roller platform is in the horizontal position.
4.2
If necessary adjust the positions of the mounting pin (B) and
the handle carrier (e) to suit the tyre to be worked on.
4.3
Place the tyre to be repaired onto the platform rollers and
rotate it round until the repair area is accessible. rotate the
tyre hooks (A) and (G) over the rims of the tyre and take up
the tension with the handle as shown in fig.2.