Sealey STS01 User Manual
Sts01, Folding wheel step, Instructions for
Ensure the folding step is in good order and condition.
DO NOT use if damaged.
Apply vehicle handbrake and chock wheels before
attaching or using the wheel step (put automatics in
‘Park’).
Ensure that the vehicle is stable before using the
wheel step.
Ensure that the wheel step is mounted level on the
wheel/tyre.
DO NOT heavily load the vehicle causing the
suspension to depress whilst the wheel step is in place.
WARNING: The warnings, cautions and
instructions discussed in this manual cannot cover
all possible conditions and situations that may
occur. It must be understood that common sense
and caution are factors which cannot be built into
this product, but must be applied by the operator.
InstructIons for:
FOLDING WHEEL STEP
ModEl no:
STS01
thank you for purchasing a sealey product. Manufactured to a high standard this product will, if used according to these instructions and properly
maintained, give you years of trouble free performance.
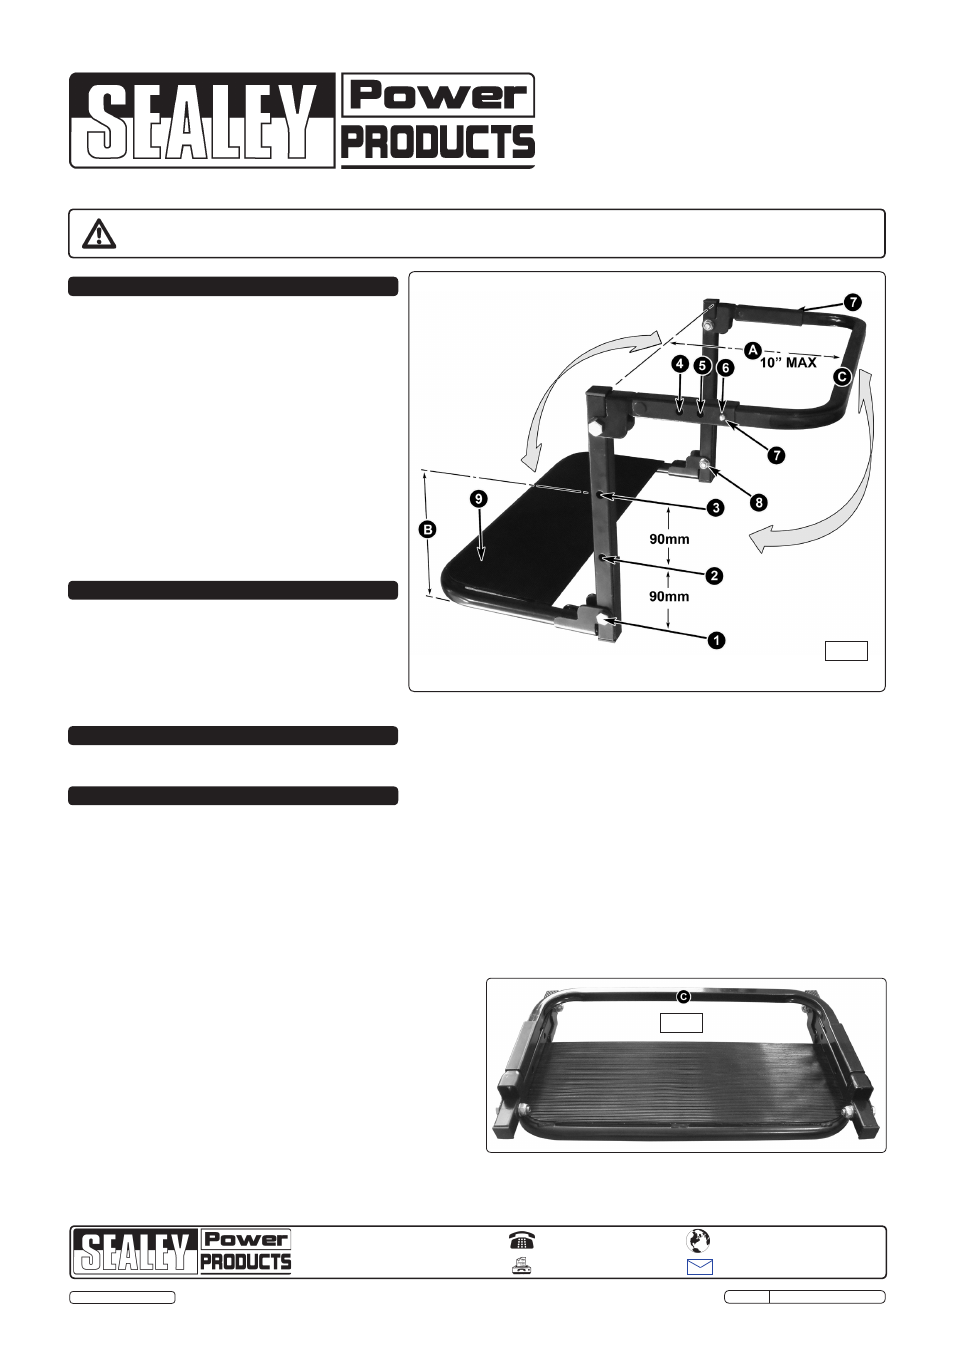
changed either before or after hanging the frame onto a
vehicle wheel/tyre.
4.4.
Hang frame on tyre: Ensure that the handbrake is on and
the wheels are chocked before positioning the wheel step.
4.4.1. check that there is sufficient clearance between the wheel
arch and the tyre and then insert bar (c) into the space
above the tyre and drop it down over the top of the tyre
ensuring that it is securely hooked over the back. If not,
adjust the position of bar (c). Ensure that the step is level
and the vertical parts of the frame are resting securely onto
the face of the wheel/tyre.
4.4.2. Adjust the height of the step if necessary.
4.4.3 When using the step be aware of your surroundings. do not
become so engrossed in what you are doing that you forget
you are standing on a step.
4.5.
Removing the step: remove the step immediately after use
and certainly before the vehicle is next used.
Heavy duty wheel step gives safe & easy access to
engine or top of vehicle, ideal for 4x4's. Heavy gauge all
steel construction folds for easy storage. Wheel capacity
Ø14" to 20" and will fit tyres up to 10" deep. rubber
topped platform for added grip and safety. Platform is
height adjustable (3 mounting points 90mm apart).
Weight capacity: 225kg.
3. SPECIFICATION
2. INTRODuCTION
4. OPERATION
IMPORTANT: PLEASE READ THESE INSTRuCTIONS CAREFuLLY. NOTE THE SAFE OPERATIONAL REQuIREMENTS, WARNINGS AND
CAuTIONS. uSE THIS PRODuCT CORRECTLY AND WITH CARE FOR THE PuRPOSE FOR WHICH IT IS INTENDED. FAILuRE TO DO SO MAY
CAuSE DAMAGE AND/OR PERSONAL INJuRY, AND WILL INVALIDATE THE WARRANTY. RETAIN INSTRuCTIONS FOR FuTuRE uSE.
Weight capacity: 225kg. step width : 560mm. step depth : 210mm.
01284 757500
01284 703534
www.sealey.co.uk
Web
NOTE: It is our policy to continually improve products and as such we reserve the right to alter data, specifications and component parts without prior notice.
IMPORTANT: no liability is accepted for incorrect use of product.
WARRANTY: Guarantee is 12 months from purchase date, proof of which will be required for any claim.
INFORMATION: for a copy of our latest catalogue and promotions call us on 01284 757525 and leave your full name and address, including
postcode.
WARNING: To prevent personal accident and/or damage
to the vehicle, it is imperative that the vehicle does not
move during the fitting or use of the wheel step. Chock
the wheels and ensure that the vehicle handbrake is on.
(Put automatics in 'park)
4.1.
unfold the step frame: take the step in its flat condition
as shown in fig.1 and pull the adjustable wheel bar (c) up
towards you until it reaches its stops
4.1.1 using bar (c), lift the whole frame away from the step into
the fully open configuration shown in fig.2.
4.2.
Adjust bar (C) to suit tyre depth (A): Bar (c) can be set to
one of three positions as indicated at 4, 5 & 6 in fig.2. these
holes occur on both sides of the frame. to move the bar to
the next set of holes, depress the sprung chrome buttons (7)
on either side into the frame and slide the frame in or out
until the buttons 'pop out' into the next set of holes.
4.3.
Adjust height of step (B): there are three positions for the
step as indicated at 1, 2, & 3 in fig.2. loosen and remove nut
(8) on both sides of the step. Withdraw the two bolts and
reassemble the step at the height required ensuring that the
nuts are not so tight as to prevent the hinges operating when
it is required to fold the frame flat. the step height can be
Sole uK Distributor, Sealey Group,
Kempson Way, Suffolk Business Park,
Bury St. Edmunds, Suffolk,
IP32 7AR
Original Language Version
© Jack sealey limited
sts01 Issue no.1 09/07/12
fig.1
fig.2
1. SAFETY INSTRuCTIONS