Sealey AFPL3 User Manual
Afpl3, Safety instructions 2. introduction, Specification
InstructIons for:
aluminium TElESCOPiC laDDER
4-way En131 aDJuSTaBlE HEiGHT
MoDEL no:
aFPl3
thank you for purchasing a sealey product. Manufactured to a high standard this product will, if used according to these instructions and properly
maintained, give you years of trouble free performance.
IMPORTANT: PlEaSE REaD THESE inSTRuCTiOnS CaREFully. nOTE THE SaFE OPERaTiOnal REQuiREmEnTS, waRninGS & CauTiOnS.
uSE THE PRODuCT CORRECTly anD wiTH CaRE FOR THE PuRPOSE FOR wHiCH iT iS inTEnDED. FailuRE TO DO SO may CauSE DamaGE
anD/OR PERSOnal inJuRy anD will inValiDaTE THE waRRanTy. PlEaSE KEEP inSTRuCTiOnS SaFE FOR FuTuRE uSE.
1. SaFETy inSTRuCTiOnS
2. inTRODuCTiOn
En 131 Approved four-way, four-section aluminium ladder with
mechanically swaged joints. can be used as a straight ladder, step
ladder, offset ladder and extension ladder. fitted with two robust
auto latching locking hinges for multi positioning. features extendable
legs providing increased climbing height.
3. SPECiFiCaTiOn
1.1.
GEnERal SaFETy.
DANGER! Take care when using and moving extended ladders in the vicinity of power cables - risk of potentially fatal electric shock.
waRninG! Ensure Health and safety, local authority, and general workshop practice regulations are adhered to when using this equipment.
familiarise yourself with the application and limitations of the ladder, as well as the potential hazards.
Maintain the ladder in good condition, replace or repair damaged parts. use genuine parts only. unauthorised parts may be dangerous and will invalidate the warranty.
Keep the work area clean, uncluttered and ensure there is adequate lighting.
waRninG! use ladder on level and solid ground and either have an assistant stand on the lowest rung or otherwise anchor the base of the ladder to prevent
slipping. Ensure that the surface the ladder is standing on is able to support both the weight of the ladder and yourself.
waRninG! DO nOT use the ladder on sloping ground. When viewed from the front, the top of the ladder section(s) must always be directly above the base.
for stability, place the ladder so that it is at an angle of 65° to 75° to the ground, the foot of the ladder should be 1 metre from the wall for every 3 metres of elevation.
Where possible, attach top of ladder to a fixture to prevent slipping.
waRninG! never over-reach when on the ladder - keep close to the centre line of the ladder..
Keep children and unauthorised persons away from the working area and
DO nOT allow children to climb the ladder.
DO nOT use the ladder for any purpose other than that for which it is designed.
DO nOT use the ladder if it is damaged or any parts are missing, as this may cause failure and/or personal injury.
DO nOT exceed the rated capacities of the ladder.
DO nOT climb higher than the second rung from the top of the ladder.
DO nOT use the ladder when you are tired or under the influence of alcohol, drugs or intoxicating medication.
take care when making adjustments to the ladder, ensuring that hands are kept clear of the rungs and hinges when adjusting it.
Wear slip resistant footwear, and ensure that the footwears' soles and the rungs of the ladder are free of oil or similar substances.
Hold on to the ladder at all times when climbing.
When not in use, ensure ladder is folded back to its original settings and store in a safe, dry, childproof location.
4. inSTRuCTiOnS FOR uSE
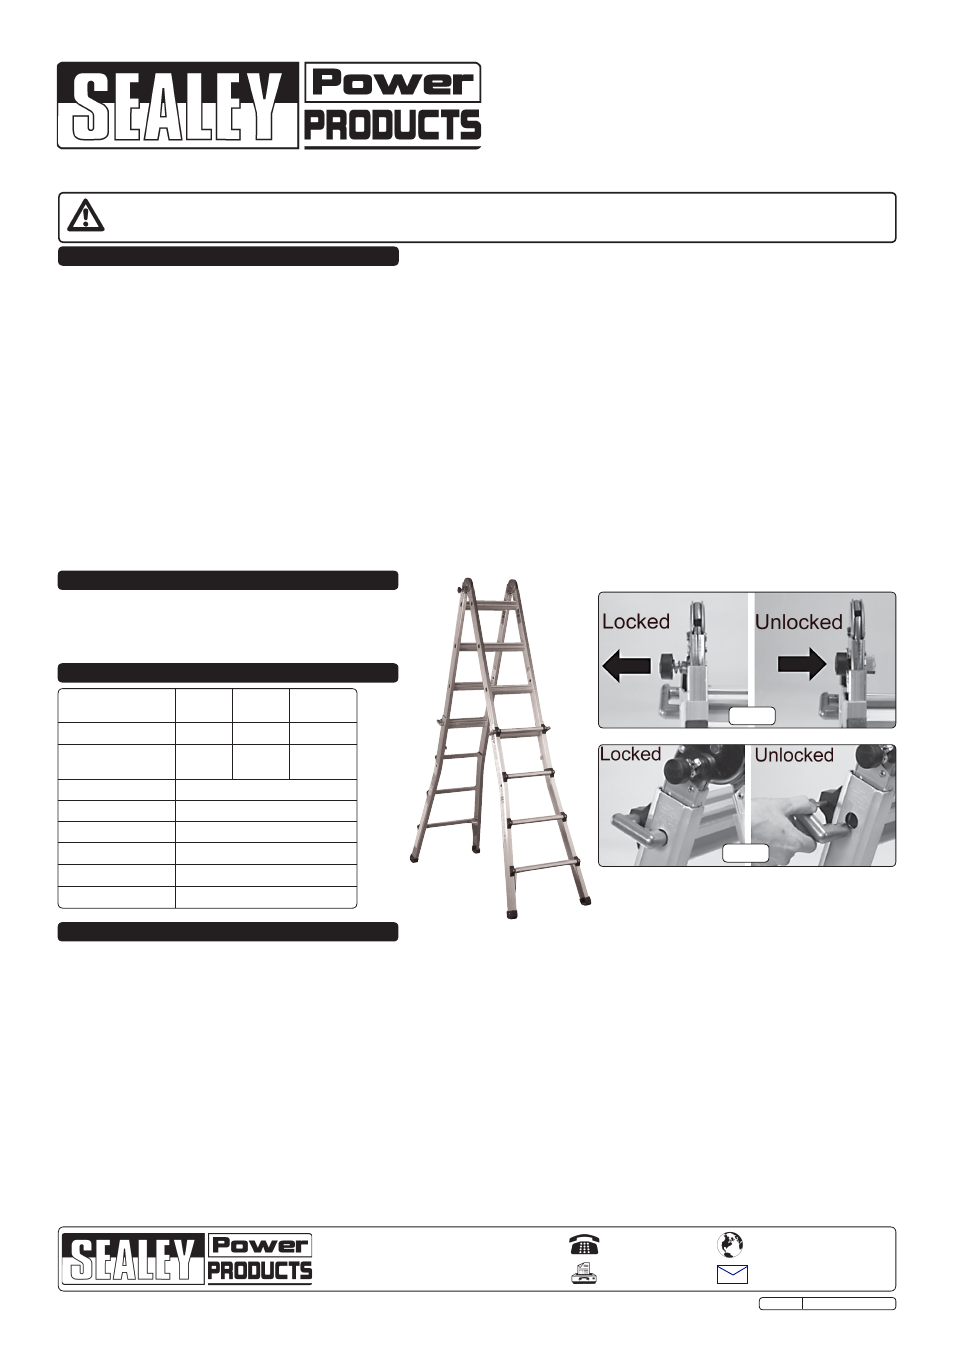
waRninG! Ensure all hinges and locks are fully engaged into their locking positions before using the ladder.
4.1
Straight / Extension ladder.
imPORTanT! always position the ladder at an angle of between 65° and 75° to the ground (see safety instructions above).
4.1.1. fold out the two sections of the ladder until the sprung hinge locks lock into their first position (step ladder), push in the two hinge locks (fig.1) and carry on
folding out the two sections of the ladder until it is aligned straight and ensure the hinge locks lock out into their second position.
4.1.2. to extend the ladder, pull the spring loaded locking arms outward (fig.2) and adjust the ladder length as required. Ensure the locking arms lock into position.
4.1.3. carefully manouvre the ladder into place, ensuring the correct angle and positioning for maximum stability.
4.2.
Step ladder.
4.2.1
fold out the two sections of the ladder until the sprung hinge locks lock into their first position (the two sections are approx. 45° apart).
4.2.2
If required, extend one side of the ladder at a time by pulling the spring loaded locking arms outward (fig.2) and adjust the ladder length as required.
Ensure the locking arms lock into position and that both sides are extended equally.
4.3.
Offset ladder.
4.3.1
set up the ladder as a step ladder first, but then extend one side of the ladder by one or two rungs more than the other side, depending on the height of the
steps that the ladder will be placed on.
4.3.2. the shorter side of the ladder
muST always be placed on the step, and the longer side placed on the ground.
Model no:
aFPl3
Offset
ladder
Step
ladder
Extension
ladder
Minimum Height:
1400mm 1320mm
2720mm
Maximum Extension: 2000mm 2200mm
4550mm
treads:
16
folded Depth:
190mm
folded Height:
1405mm
Width:
600mm
Maximum capacity:
150kg
Weight:
15.6kg
NOTE: It is our policy to continually improve products and as such we reserve the right to alter data, specifications and component parts without prior notice.
imPORTanT: no liability is accepted for incorrect use of this product.
waRRanTy: Guarantee is 12 months from purchase date, proof of which will be required for any claim.
inFORmaTiOn: for a copy of our latest catalogue and promotions call us on 01284 757525 and leave your full name and address, including postcode.
01284 757500
01284 703534
Sole uK Distributor, Sealey Group,
Kempson Way, suffolk Business Park
,
Bury st. Edmunds, suffolk,
IP32 7Ar
www.sealey.co.uk
Web
Original Language Version
AfPL3 Issue: 1 - 02/12/11
fig.1
fig.2