Fig.4 fig.5, Dry operation 7. wet operation – Sealey GV180WM User Manual
Page 4
Warning! Do not vacuum in areas with flammable gases, vapours or explosive dusts in the air. flammable gases include, but are not
limited to: lighter fluid, solvent type cleaners, oil based paints, gasoline, alcohol or aerosol sprays. Explosive dusts include, but are not limited
to: coal, magnesium, grain or gun powder. to reduce the risk of health hazards from vapours or dust,
Do not vacuum toxic materials.
6.1.
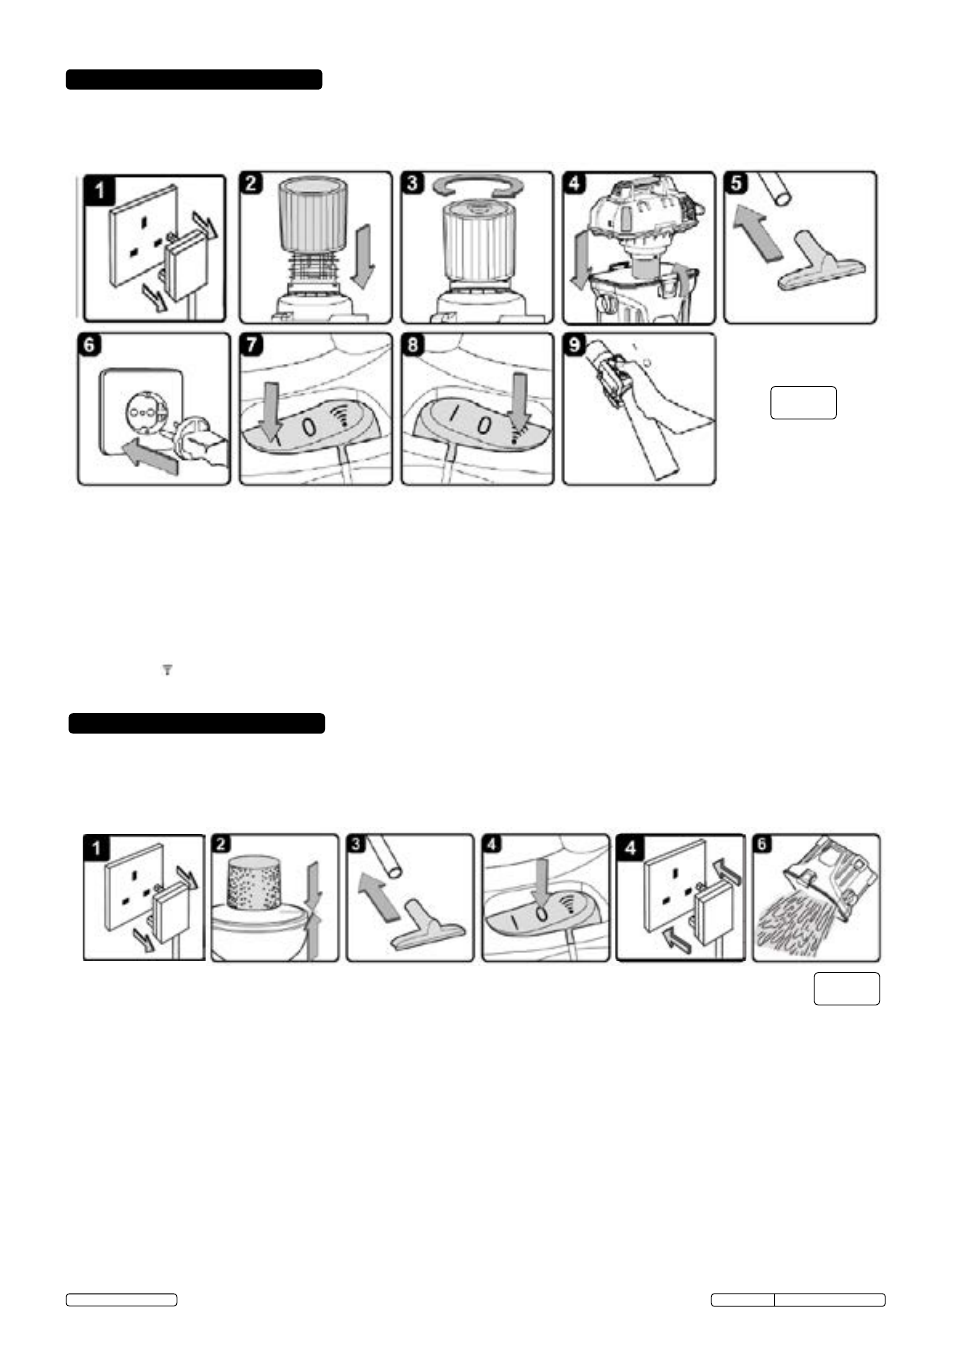
BeFore DrY vacuuming
6.1.1. Make sure the power cord is disconnected from the outlet. (fig.4.1 & 4.1.2). Verify that the cartridge filter is securely mounted. Make
sure that the filter is pushed in until it stops against the power head. (fig.4.2).
6.1.3. Place the filter retainer on top of the cartridge filter and tighten by turning the retainer handle clockwise. (fig.4.3).
6.1.4. Place the power head back on the container, aligning the top section with the latches, and lock it into place. (fig.4.4).
6.2.
DrY vacuuming
6.2.1. insert the locking end of the hose into the vacuum port and lock in place. Push the required attachment onto the free end of the hose or
extension. (fig.4.5).
6.2.2. Plug power cord into the outlet and hang the vacuum on the rack or use off the rack. (fig.4.6).
6.2.3. Turn the motor on by flipping the switch to the 'I' ON position. (fig.4.7). For remote control use, set the power switch to remote control
position
and turn the vacuum on by pressing the 'I' ON button on the remote control. (figs 4.8 & 4.9).
6.2.4. Once you have finished vacuuming, flip the switch to the 'O' OFF position or press the 'O' OFF button on the remote control for at least
one second.
Warning! Do not use the cartridge filter for wet vacuuming.
Warning! Do not plug in the power cord to the power outlet. Make sure the plug is disconnected before assembling the unit for wet
or dry use.
Warning! When vacuuming large quantities of liquids, remove the vacuum from the mounting rack and put it on the floor. the
vacuum can be heavy when full of liquids and may be difficult to remove from the rack.
7.1.
BeFore Wet vacuuming
7.1.1. check that the power cord is disconnected from the outlet. (fig.5.1)
7.1.2. check that the container is clean and free of dust and dirt.
7.1.3. remove cartridge filter and dust collection bag, then carefully install the foam filter over the filter cage and place the power head back
on the container. (fig.5.2) see filter installation instructions 5.4.
Do not use the cartridge filter or dust collection bag for liquid vacuuming.
7.2.
Wet vacuuming
7.2.1. fit the desired nozzle to the vacuum hose. (fig.5.3).
7.2.2. Check that the switch is in the 'O' OFF position before plugging the power cord into the outlet. (fig.5.4 & 5.5)
7.2.3. Turn the motor on by flipping the switch on the power head to the 'I' ON position or flip the switch on the remote control position and
use the 'I' ON button on the remote control.
Warning! Do not submerge the remote control in liquids.
7.2.4. After wet vacuuming turn the machine off and remove plug from the power supply. to prevent the risk of mildew, empty the container,
clean and dry the inside and outside of the container, remove the foam filter and allow to dry before storage. (fig.5.6).
imPortant: When vacuuming large quantities of liquids, Do not immerse the nozzle completely in the liquid; leave a gap at the tip of the
nozzle to allow air inflow. the machine is fitted with a float valve that stops the suction action when the container reaches its maximum capacity.
You will notice an increase in motor speed. When this happens, turn off the machine, disconnect from the power supply and empty the
container into a suitable receptacle or drain. to continue vacuuming, refit the power head to the container. After wet vacuuming, turn the
machine off and remove from the power supply. to prevent the risk of possible mildew refer to 7.2.4.
imPortant: the foam filter must be removed after wet vacuuming and a cartridge filter must be installed before dry vacuuming again.
fig.4
fig.5
6. DrY oPeration
7. Wet oPeration
Original Language Version
GV180WM issue no.2(i) 02/04/15
© Jack sealey Limited