Sealey BB8 User Manual
Multi-charge battery bus bar, Model, Fig. 1
p
WARNING! Ensure that you read, understand and apply the safety and operational instructions before connecting the charger or batteries to
the bus bar. Only when you are sure that you understand the procedures is it safe to proceed with the charging process.
3.1.
Preparation of each battery
3.1.1.
Confirm that battery is 12 volt (see para. 3.3.). Check casing for cracks or leakage and clean terminals.
3.1.2.
If possible, check electrolyte levels and top up with distilled water as necessary.
3.2.
Connection
p
WARNING! Charging must take place in a well ventilated area.
3.2.1.
Ensure that all sixteen clamps (eight red and eight black) are safely stowed (see para. 2.2.6).
3.2.2.
Connect the charger positive (red) clamp to the positive (+) spacer support and the negative (black) clamp to the negative (-) spacer support.
Switch on the charger. If the connections are correct the green LED will light. If the connections are wrong the LED will not light, in which
case switch off charger and reverse connections.
3.2.3.
Ensure charger is switched off. Connect a red clamp to battery positive (+) terminal and a black clamp to the negative (-) terminal. If the
connections are correct the green LED will light. If the connections are wrong the LED will not light, in which case reverse connections.
Remove red clamp from battery terminal and return to stowed position.
3.2.4.
Repeat 3.2.3. for each battery to be charged. When all battery connections have been individually checked re-connect the
red clamps to all the batteries.
3.2.5.
Switch on charger to commence battery charging and follow charger and battery manufacturers instructions.
3.2.6.
When charging is complete switch off charger before disconnecting clamps from battery terminals. Stow clamps.
3.3.
6 volt batteries
3.3.1.
6 volt batteries may be connected to a 12 volt charger in series pairs only (fig. 3). The two batteries should be of similar
capacity and at similar levels of discharge to ensure successful charging.
1.1. PERSONAL PRECAUTIONS
3
Ensure that there is another person within hearing range of your voice and close enough to come to your aid, should a problem arise when working
near a lead-acid battery.
3
Wear safety eye protection and protective clothing. Avoid touching eyes while working with lead-acid batteries.
3
Have fresh water and soap nearby in case battery acid contacts skin, clothing or eyes. If skin or clothing do come into contact with acid wash
immediately with soap and water. If acid enters eye, flush eye immediately with cool, clean running water for at least 15 minutes and seek immediate medical attention.
3
Remove personal metallic items such as rings, bracelets, necklaces and watches. A lead-acid battery can produce a short-circuit current high enough to weld a ring or the like to metal,
which would cause severe burns.
3
Ensure that hands, clothing (especially belts) are clear of fan blades and other moving or hot parts of the engine, remove ties and contain long hair.
7
DO NOT smoke or allow sparks or flame in the vicinity of batteries.
1.2. GENERAL SAFETY INSTRUCTIONS
3
Familiarise yourself with the application, limitations and potential hazards of the bus bar. IF IN ANY DOUBT CONSULT AN ELECTRICIAN.
3
Ensure that the bus bar is in good condition before use. If in any doubt remove from service and consult a service agent.
3
Only use recommended attachments and parts. To use unapproved items may be dangerous and will invalidate your warranty.
3
Ensure that the charger has sufficient output for the number and capacity of batteries that require charging.
3
Ensure that the charger is switched off before attaching/detaching the power clamps to/from the battery terminals.
3
Keep tools and other items away from the charger and battery terminals.
3
Confirm that the battery to be charged is 12 volt and not 24 volt before attaching clamps to battery terminals (6 volt batteries may be charged in pairs, see Section 3).
3
If the battery terminals are corroded or dirty clean them before attaching the clamps.
3
Keep children and unauthorised persons away from the work area.
p
WARNING! To prevent the risk of sparking, short circuit and possible explosion DO NOT drop metal tools in the battery area, or allow them to touch battery terminals.
7
DO NOT cross connect leads from bus bar to battery. Ensure positive (+/RED) clamp is attached to positive battery terminal and negative (-/BLACK) clamp is attached to negative terminal.
7
DO NOT pull the cables or clamps from the battery terminals.
7
DO NOT use the bus bar outdoors, or in damp, or wet locations and DO NOT use within the vicinity of flammable liquids or gases.
3
Ensure that there is effective ventilation to prevent a build-up of the explosive gases emitted from batteries on charge.
7
DO NOT use the bus bar for a task for which it is not designed.
INSTRUCTIONS FOR:
MULTI-CHARGE
BATTERY BUS BAR
MODEL:
BB8
Thank you for purchasing a Sealey product. Manufactured to a high standard this product will, if used according to these instructions and properly maintained, give you years of trouble free performance.
1.
SAFETY INSTRUCTIONS
IMPORTANT: PLEASE READ THESE INSTRUCTIONS CAREFULLY. NOTE THE SAFE OPERATIONAL REQUIREMENTS, WARNINGS & CAUTIONS. USE THE PRODUCT
CORRECTLY AND WITH CARE FOR THE PURPOSE FOR WHICH IT IS INTENDED. FAILURE TO DO SO MAY CAUSE DAMAGE AND/OR PERSONAL INJURY AND WILL
INVALIDATE THE WARRANTY. PLEASE KEEP INSTRUCTIONS SAFE FOR FUTURE USE.
DANGER! BE AWARE, LEAD-ACID BATTERIES GENERATE EXPLOSIVE GASES DURING NORMAL BATTERY OPERATION. FOR THIS
REASON, IT IS VERY IMPORTANT TO READ AND FOLLOW THESE INSTRUCTIONS CAREFULLY, EACH TIME YOU USE THE BUS BAR.
Follow these instructions and those published by the battery and charger manufacturers and the maker of any equipment you intend to use in the
vicinity of batteries. Remember to review warning marks on all products and on engines.
2.1.
Introduction
The BB8 is a 12 volt bus bar which allows up to eight lead - acid batteries to be simultaneously charged from a single
battery charger. The unit has a green LED which indicates when the charger and the batteries are correctly connected.
p
WARNING! Refer to your chargers specifications to ensure that it has sufficient output to allow eight batteries to be charged simultaneously.
2.2.
Assembly and mounting
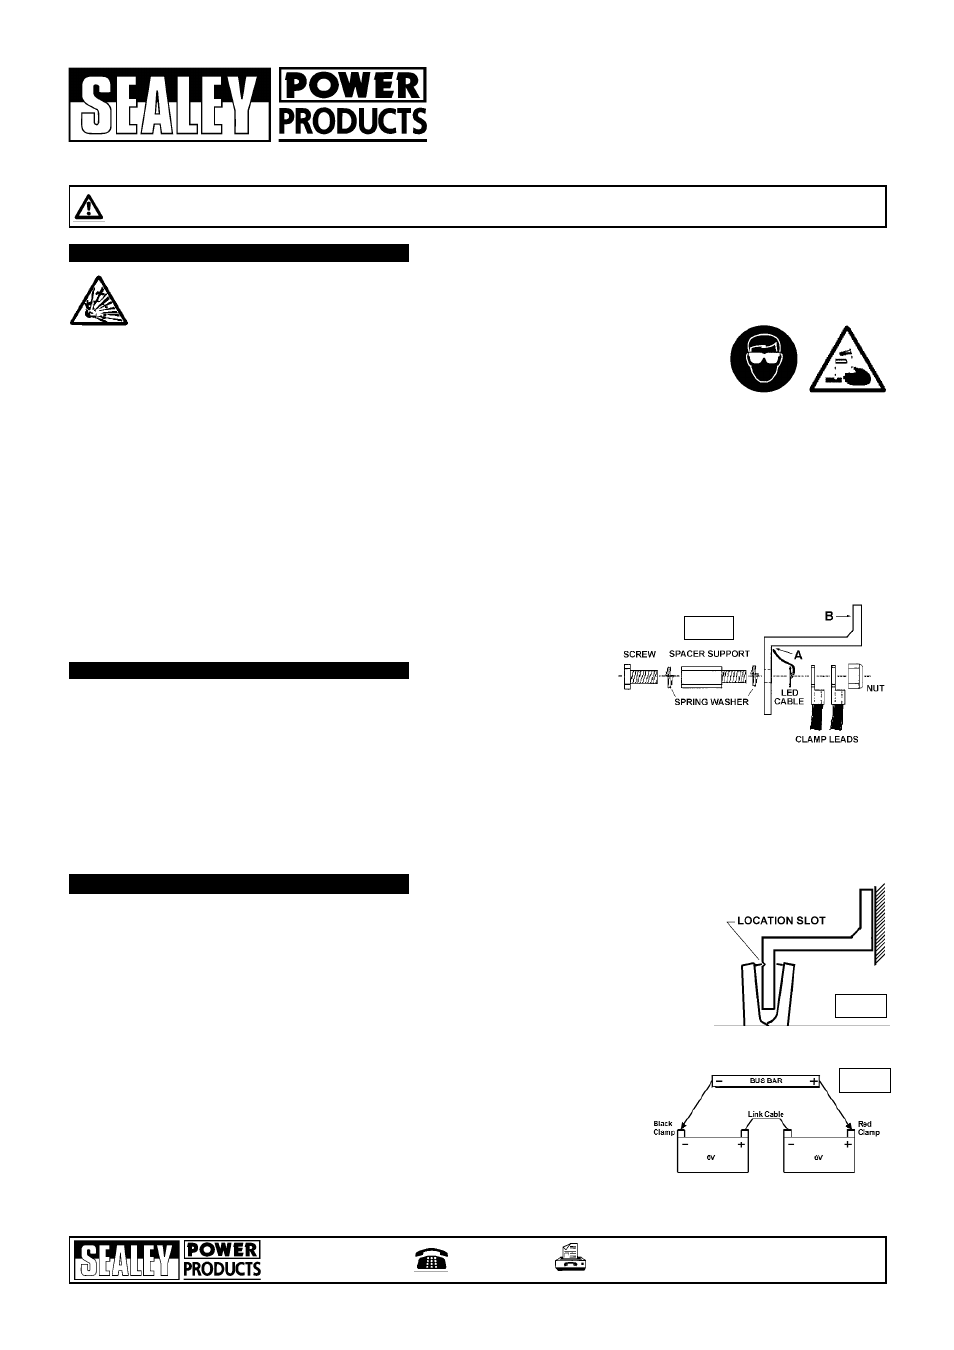
2.2.1.
Locate the spacer support holes at either end of the bus bar. The hole at the left-hand end is marked - NEG and the hole at the right-hand end is marked + POS.
2.2.2.
Using the components supplied connect the clamp cables and LED cables to the spacer supports, through the above holes, as shown in fig. 1.
2.2.3.
Ensure that the cables to the red (+) clamps are connected to the spacer support which is through the + POS hole and that the cables to the black (-) clamps are connected to the
spacer support which is through the - NEG hole.
2.2.4.
Before tightening the nuts ensure that the LED cable terminals are so angled that the cables run tight in corner A (fig. 1).
2.2.5.
Face B (fig. 1) has three holes for mounting the bus bar with the screws and washers provided. If wall mounting it should be at least 500mm from the floor. Alternatively the bus bar
may be mounted to a workbench. Always leave sufficient space below the unit for stowing the clamps (see fig. 2).
2.2.6.
Once the bus bar is mounted the battery clamps should be stowed ready for use as shown in fig. 2. To prevent shorting between positive and negative clamps it is important to ensure
that the eight red (+) clamps are stowed on the right-hand (+) side of the bus bar and the eight black (-) clamps on the left-hand side (-).
3.
OPERATION
2.
INTRODUCTION, ASSEMBLY & MOUNTING
fig. 1
BB8 - 1 - 120104
fig. 2
01284 757500
01284 703534
E-mail: [email protected]
Web: www.sealey.co.uk
NOTE: It is our policy to continually improve products and as such we reserve the right to alter data, specifications and component parts without prior notice.
IMPORTANT: No liability is accepted for incorrect use of this equipment.
WARRANTY: Guarantee is 12 months from purchase date, proof of which will be required for any claim.
INFORMATION: For a copy of our latest catalogue and promotions call us on 01284 757525 and leave your full name and address, including postcode.
Sole UK Distributor,
Sealey Group,
Bury St. Edmunds, Suffolk.
fig. 3