Sealey LED120 User Manual
Led120, Fig.2 fig.1, Safety instructions 3. installation & use
instructions for:
led floodlight with wall
bracket 20w - 230V
MoDEL no:
led120
thank you for purchasing a sealey product. Manufactured to a high standard this product will, if used according to these instructions and
properly maintained, give you years of trouble free performance.
IMPORTANT: PleaSe read theSe iNStrUctioNS carefUllY. Note the Safe oPeratioNal reQUireMeNtS, warNiNgS, aNd
caUtioNS. USe thiS ProdUct correctlY, aNd with care for the PUrPoSe for which it iS iNteNded. failUre to do So
MaY caUSe daMage, or PerSoNal iNJUrY, aNd will iNValidate the warraNtY.
1. SafetY iNStrUctioNS
3. iNStallatioN & USe
1.1. electrical .
p
warNiNg! it is the user’s responsibility to read,
understand and comply with the following:
p
warNiNg! thiS ProdUct MUSt be iNStalled bY a
QUalified electriciaN.
You must check all electrical equipment and appliances to
ensure they are safe before using. You must inspect power
supply leads, plugs and all electrical connections for wear and
damage. You must ensure the risk of electric shock is
minimised by the installation of appropriate safety devices. An
rccB (residual current circuit Breaker) should be
incorporated in the main distribution board.
You must also read and understand the following instructions
concerning electrical safety:
1.1.1. Ensure the light is connected to an appropriate electrical on/off
switch.
1.1.2. Ensure the insulation on all cables and the product itself is
safe before connecting to the mains power supply.
1.1.3. Ensure that cables are always protected against short circuit
and overload.
1.1.4. regularly inspect power supply, leads, plugs and all electrical
connections for wear and damage, especially power
connections, to ensure that none are loose.
1.1.5. Important: Ensure the voltage marked on the product is the
same as the electrical power supply to be used.
1.1.6.
do Not pull power cable once installed.
1.1.7.
do Not pull power plugs from sockets by the power cable.
1.1.8.
do Not use worn or damaged leads, plugs or connections.
immediately replace or have repaired by a qualified Electrician.
1.1.9 Ensure the unit is correctly earthed and wired according
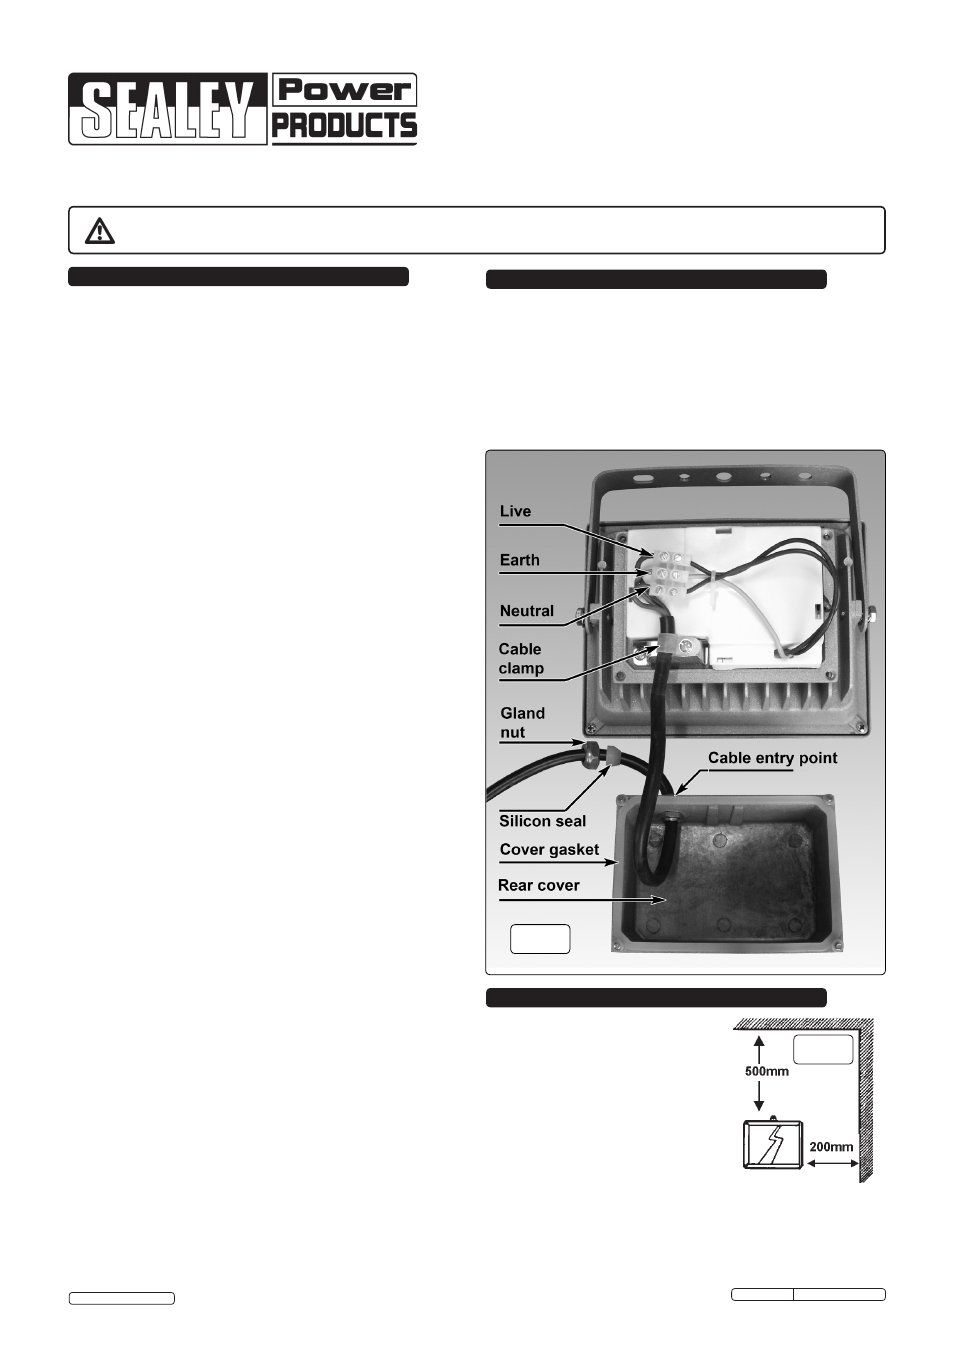
to fig.1 to the right.
Slide the gland nut and silicon cable seal over the cable
before inserting it through the cable entry gland in the
base of the rear cover. Before making the connections,
pass the cable through the cable clamp and tighten it as
shown in fig.1.
a) Connect the gREEN/YEllOw earth wire to the earth
terminal ‘E’.
b) Connect the BROwN live wire to live terminal ‘l’.
c) Connect the BluE neutral wire to the neutral terminal ‘N’.
After wiring, check there are no bare wires, that all wires
have been correctly connected and that the cable clamp
and cable entry gland nut are tight.
1.2. geNeral SafetY.
p
warNiNg! turn off the mains power supply before
servicing or performing any maintenance.
3
Maintain the light in good condition (repairs must only be
undertaken by a qualified electrician).
3
replace or repair damaged parts. use recommended parts
only, non authorised parts may be dangerous and will invalidate
the warranty.
3
Ensure the light is installed correctly in accordance with these
instruction.
3
only install the light on a vertical surface.
do Not fix the light
on any horizontal surface, i.e. to the ceiling or an overhang.
p
daNger! do Not direct the light into a person's eyes.
this unit has a very intensive light output, which if
incorrectly used could cause eye damage.
7
do Not install the light where it is likely to be knocked or hit.
7
do Not install in bathrooms, shower rooms, sauna or such
locations.
7
do Not use the light without the front glass shield.
Original Language Version
LED120 issue: 1 - 17/07/12
2. iNtrodUctioN & SPecificatioN
Mounted in die-cast powder coated aluminium housing with wall
bracket. state of the art LED chip technology allows ultra bright
illumination whilst still keeping costs lower than traditional halogen
bulbs. Even spread of light across a 120° angle. supplied without
mains cable and suitable for outdoor mounting.
Power . . . . . . . . . . . . . . . . .20W
Lumen output . . . . . . . . 1200lm
supply. . . . . . . . . . . . . . . . 230V
© Jack sealey Limited
3.1. iNStallatioN.
p
warNiNg! ensure the unit is
not connected to the mains
power supply before installation.
3.1.1. consider the position of unit to
ensure you obtain maximum
benefit from the lighting, and that
an appropriate electrical power
source can be provided.
3.1.2. the light must be mounted
vertically only i.e. on a wall etc.
do Not mount horizontally
i.e.ceiling or overhang,
do Not mount so that the face of the
lamp is pointing upwards, or is facing towards the mounting
surface.
fig.2
fig.1