Fig.2 – Sealey SAC41 User Manual
Page 3
Original Language Version
SAC41.V2 Issue: 2(L) - 31/12/13
3.2.
Preparing the unit for cooling
3.2.1. The unit produces a cooling effect by evaporating water which is contained in a tank in the base of the unit. Before using as a cooler, the
water tank must be filled. Ensure that the unit is unplugged from the mains supply before topping up with water. Open the water tank aperture
on the side of the unit (fig.1), and pour water into the tank. Check the level of water in the tank through the water level sight at the front of the
unit. The level should be between ‘min’ and 'max’. Close the cover. For an increased cooling effect, additionally place ice directly into the tank.
3.2.2. Plug the unit into the mains supply.
3.2.3. Switch the unit on by pressing the Power switch on the side of the unit.
3.2.4. Press the On/Off button on the control panel.
3.3.
Using the unit for cooling
3.3.1. Make sure that the air flow control lever is moved to the COOL position.
3.3.2. Press the COOL button once to activate the cooling function.
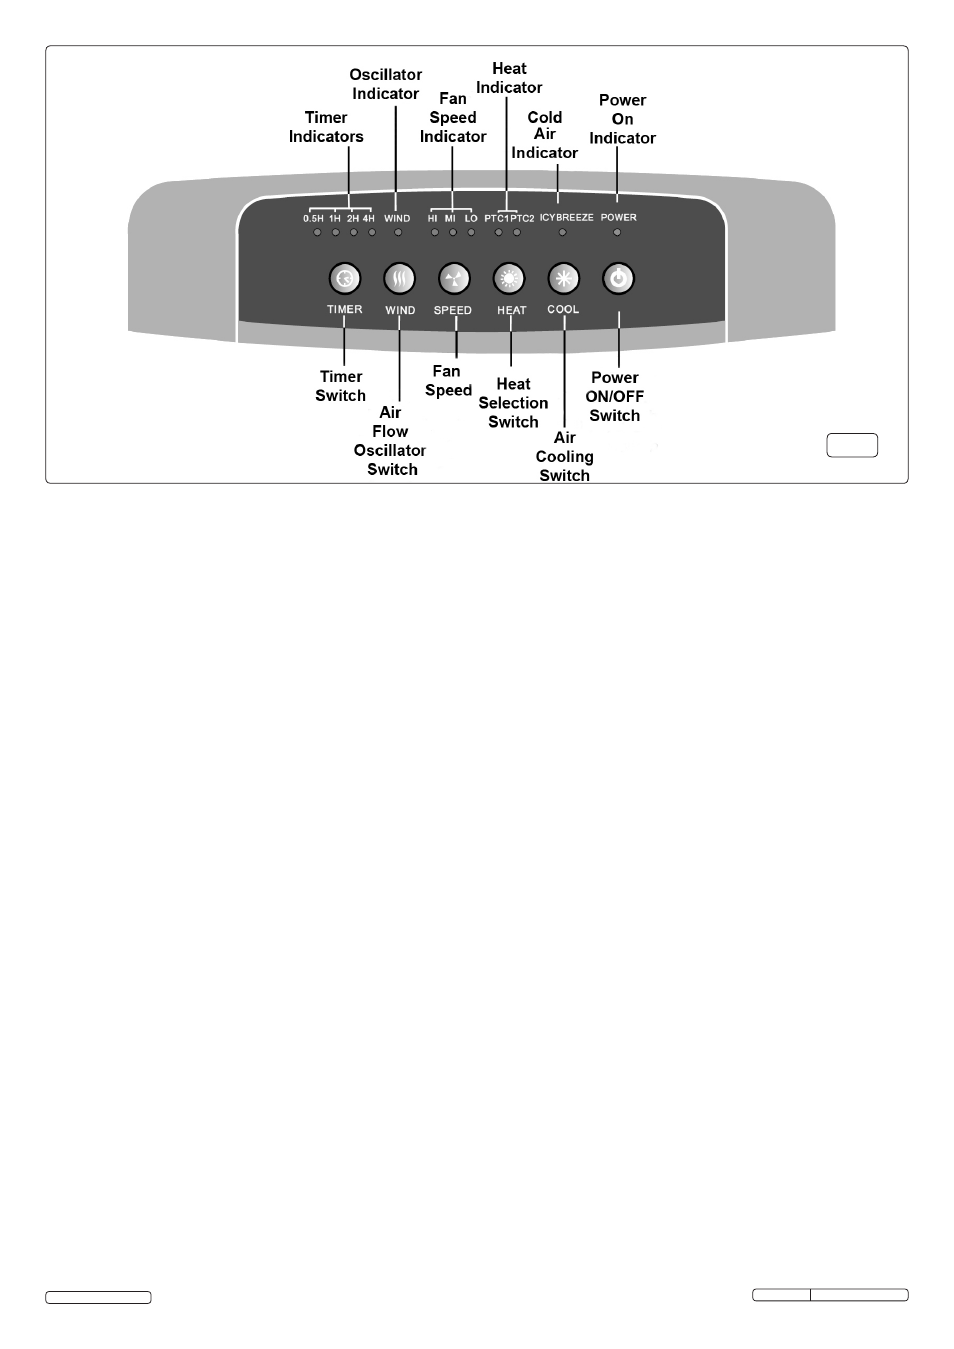
The ‘Icy Breeze’ indicator light above the button will illuminate. The fan will start to run at the speed last set.
3.3.3. Adjust the speed of the fan if required using the SPEED button.
3.3.4. Activate the louvre oscillation if required using the WIND button. Adjust the airflow up or down manually via the horizontal louvres.
3.3.5. Set the timer if required using the TIMER button.
3.3.6. To stop the cooling function press the COOL button again and the indicator light will go out.
3.4.
Using the unit for heating
3.4.1. Make sure that the air flow control lever is moved to the HEAT position.
3.4.2. Press the HEAT button once or twice to select the required heating level. The indicator lights above will show the heating level selected. The
fan will start to run at the speed last set.
3.4.3. Adjust the fan speed if required using the SPEED button.
NOTE: Only two fan speeds are available: Medium and Low.
3.4.4. Activate the louvre side oscillation if required using the WIND button. Adjust the air flow up or down manually via the horizontal louvres.
3.4.5. Set the timer if required using the TIMER button.
3.4.6. To stop the heating function press the HEAT button until the indicator lights go out.
3.4.7. When the unit is switched OFF, using the ON/OFF button, the fan will continue to run for about 30 seconds. During this time the power light
will flash until the unit shuts down.
3.5.
Using the unit to humidify
3.5.1. In a dry and warm atmosphere the cooling action of the unit naturally adds humidity to the air due to the fact that the cooling action is provided
by the evaporation of water.
3.6.
Using the unit to filter and purify
3.6.1. The air for both heating and cooling is drawn into the unit through an activated carbon filter
and thus cleans the air of dust and other particles.
3.6.2. The unit also contains a negative ion generator which produces cleaner, fresher air and reduces airborne odours. The ion generator starts to
work as soon as the unit is switched on and works in both heating and cooling modes.
3.7.
Using the unit as a fan only
3.7.1. If neither heating or cooling is selected on the control panel the unit will act as a 3 speed fan. In this mode both the TIMER and WIND
functions can be used.
3.8.
Remote control operation
The remote control handset provides the same functionality as the main control panel on the unit.
Note: the Heat/Cool Air Flow Control Lever must still be moved manually on the unit.
3.8.1. Insert two AAA batteries into the compartment in the back of the handset, ensuring that they are correctly inserted.
3.8.2. Ensure that the unit is plugged into the mains supply.
3.8.3. Set the Warm/Cool Air Flow Control lever on the unit to the desired position.
3.8.4. Point the handset at the main control panel on the unit.
3.8.5. Turn the unit on by pressing the ON/OFF button on the handset, and then control from the handset as per the normal settings above.
fig.2
© Jack Sealey Limited