Fig.5 fig.4, Maintenance – Sealey SDH20 User Manual
Page 3
3.3.
Dry Clothes Mode
3.3.1.
Set the air vent in either the upward or downward position or open the spot air outlet as required.
3.3.2.
Press On/Off button to turn unit on.
3.3.3.
Press Mode button to select Dry Clothes.
3.3.4.
If required set the timer by pressing the Timer button - the order is 2 hours, 4 hours, 8 hours, Off, 2 hours......etc.
3.4.
Air Clean Mode
This unit is not intended for use exclusively as an air cleaner. Air cleaning function will not work if the air cleaning filter is dirty, clogged or in
need of replacement (see 4.2. and 4.3. below).
3.4.1.
Set the air vent in either the upward or downward position or open the spot air outlet as required.
3.4.2.
Press On/Off button to turn unit on.
3.4.3.
Press Mode button to select Air Clean.
3.4.4.
If required set the timer by pressing the Timer button - the order is 2 hours, 4 hours, 8 hours, Off, 2 hours......etc.
3.5.
Defrosting Operation
The evaporator within the dehumidifier frosts during the dehumidifying operation at a room temperature of approximately 15°C or less. To
remove frost, the defrosting device works automatically at an interval of approximately every 30 minutes for a duration of approximately
5 minutes. Both the dehumidifying function and the air cleaning function stop during the defrosting operation. Do not disconnect the plug or
turn off the unit during the defrosting operation.
3.6.
Continuous Draining
3.6.1.
If there is a suitable draining point, which must be lower than the dehumidifier, continuous draining can be carried out. The continuous
operation enables the dehumidifying operation to continue uninterrupted for long periods of time.
3.6.2.
Turn off the dehumidifier, disconnect the plug and remove the water collection tank.
3.6.3.
The hose length required for draining is the distance to the place for draining plus approx. 40cm for feeding through the dehumidifier. Select
a hose of appropriate diameter for a tight fit on the internal drain pipe outlet.
3.6.4.
To make the opening in the rear of the dehumidifier, remove the cover carefully by means of a screwdriver or knife.
3.6.5.
Feed the pipe through from the rear of the unit and securely push the pipe over the drain pipe outlet. Refit the water collection tank (the unit
will not operate unless the tank is in place).
3.6.6.
Continue to use the dehumidifier as normal.
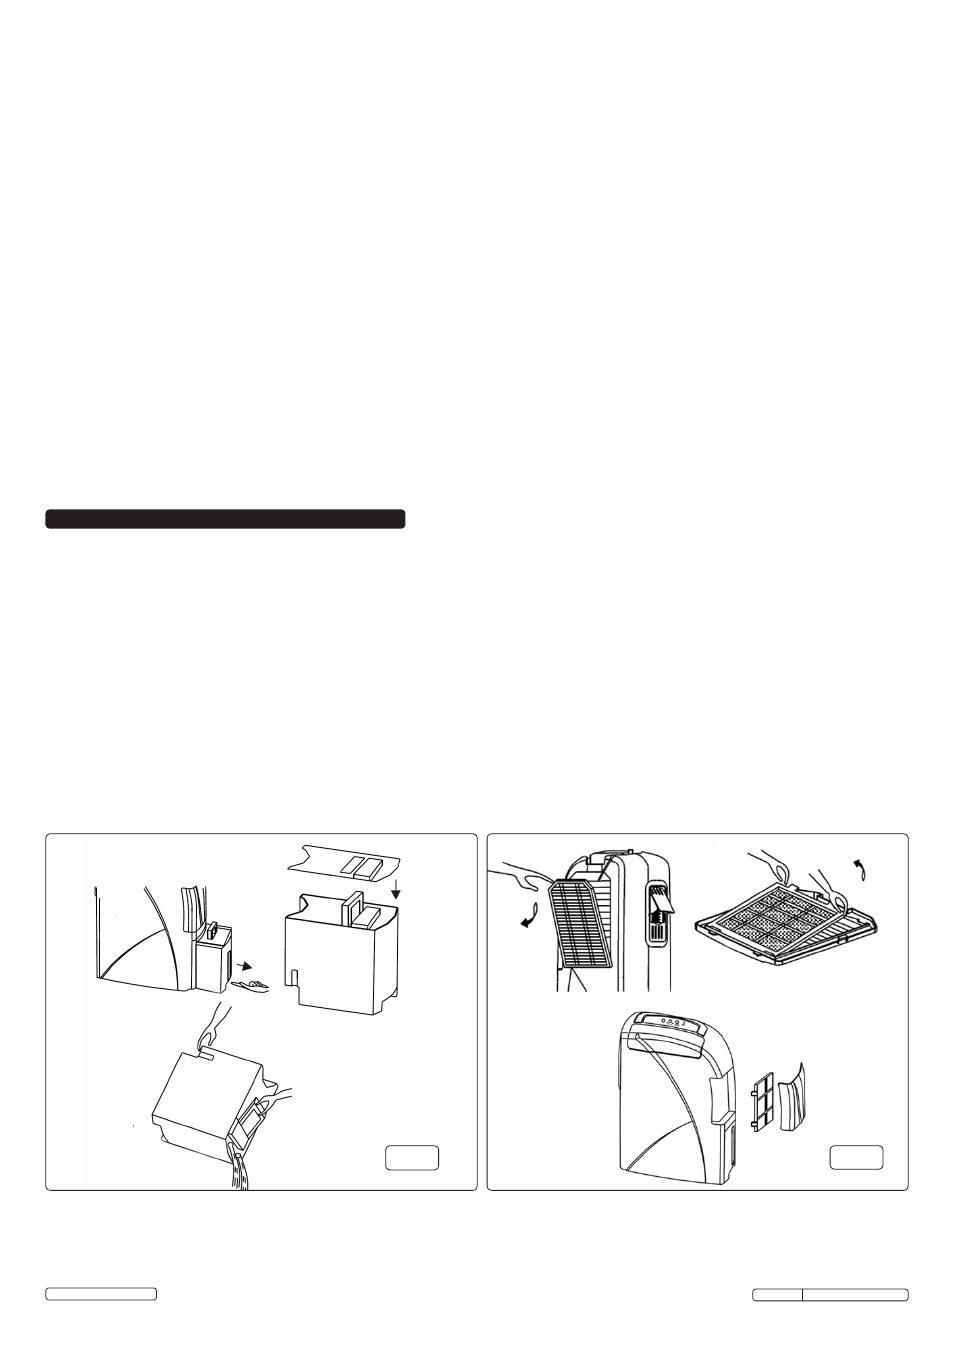
fig.5
fig.4
Original Language Version
SDH20.V3 Issue: 2(SP) - 17/02/14
4.3.
Replacing the Air Filter (every 6 months)
The life span of the air cleaning filters is approximately 6 months depending on the air conditions where the dehumidifier is located.
Use genuine Sealey filters - Front Filter - Part No: SDH20.V3-38 and Large Rear Filter - Part No: SDH20.V3-02 (see parts list).
Refer to 4.2. above to remove/re-install air filters. Do not deform or damage the new filters when installing them.
4. MAINTENANCE
4.1.
Emptying the Water Collection Tank
During the dehumidifying operation, water is collected in the water collection tank. When the tank is full of water, the dehumidifier stops
operating automatically, the warning indicator will light and the buzzer will sound. The unit will not restart until the water collection tank
has been emptied.
4.1.1.
Remove water collection tank from the dehumidifier by pulling it gently outwards (fig.4).
4.1.2.
Hold the tank by the handle and carry it carefully to an emptying point.
4.1.3.
Tilt the tank in the direction as shown (fig.4) and slowly empty the water out of the tank (
DO NOT re-use the water for any other purpose).
4.1.4.
Refit the tank in the dehumidifier, making sure it is properly located as the unit will not restart if it is not fitted properly.
4.2.
Cleaning Air Filters (every 2 weeks)
The dehumidifying capacity is lowered when the air cleaning filters become dirty and clogged.
4.2.1.
To remove small front filter, remove the front cover above the water tank from the unit by gently unclipping it. Ease the filter gently away
from the unit (fig.5).
4.2.2.
To remove large filter, remove the back cover by opening it at the top first, then pulling it away from the unit then lifting it up from it's locators.
4.2.3.
Remove the holder from the back cover by unclipping it gently and then lift the filter away from the back cover (fig.5).
4.2.4.
To dislodge dust from the filters, tap them lightly or carefully use a vacuum cleaner.
4.2.5.
If the filters are very dirty, wash them carefully in water with a neutral detergent, then rinse well with clean water and leave until dry.
4.2.6.
Refit the air filters by reversing the procedures above, taking care when refitting the larger filter's holder by gently bending it so it will fit
under it's retaining clips.
© Jack Sealey Limited