Fi g.1, Mounting installation, Introduction & specification – Sealey IFSH2003 User Manual
Page 2: Operation
Model No
IFSH2003
Power:
2000W
Input supply:
230V 13A
Dimensions (W x H x D):
485 x 170 x 250 mm
Minimum / Maximum Height:
1530mm / 1850mm
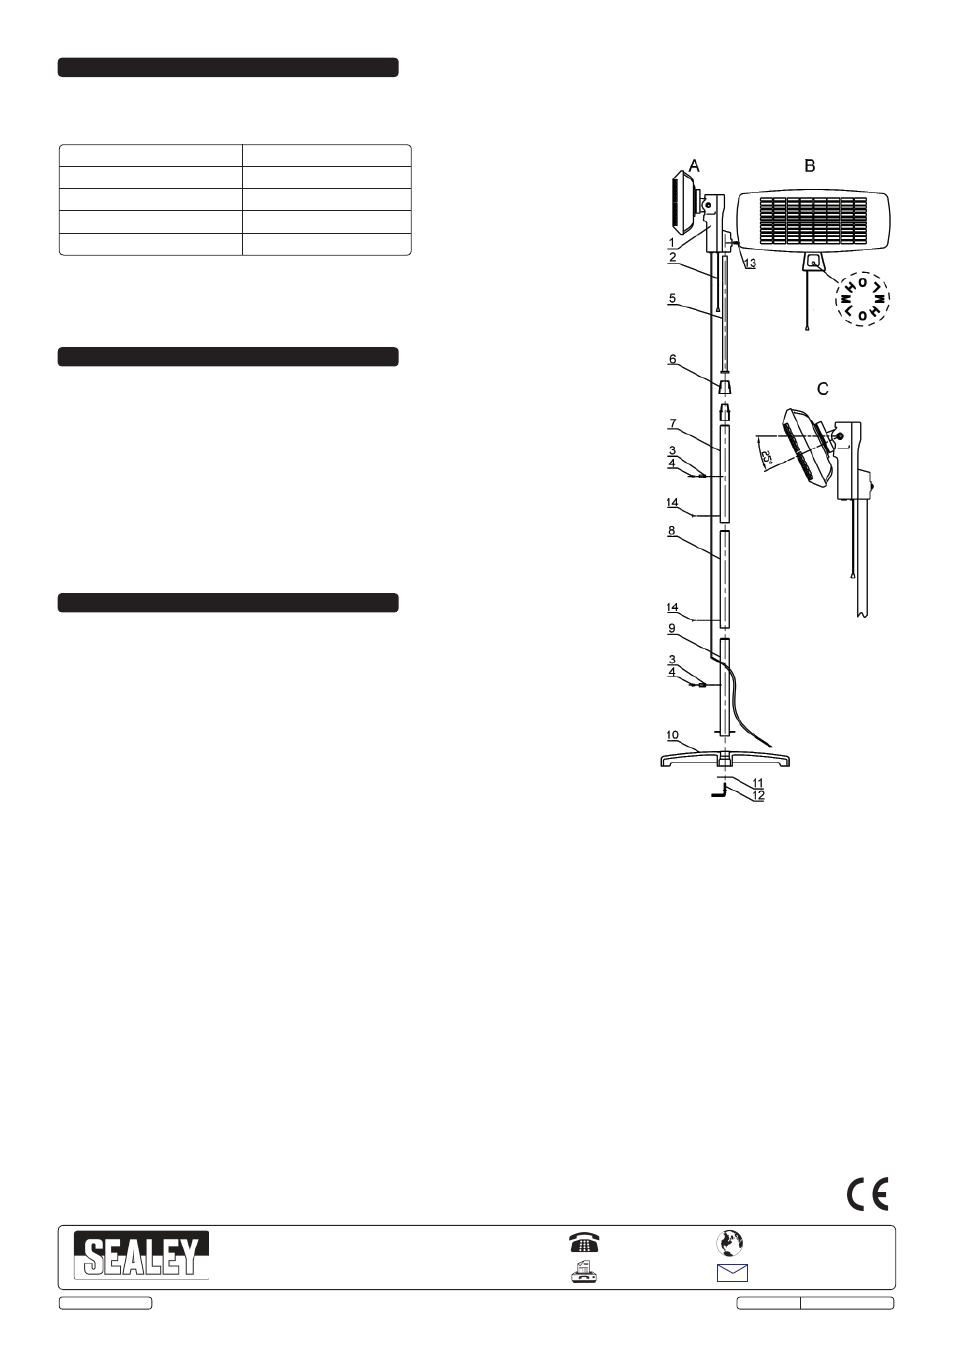
3. MOUNTING
INSTALLATION
3.1
Assembly (fig.1).
3.2
Insert the welded plate end of section 9 into the base 10 and secure using washer 11 and
screw
12.
3.3
Silde section 8 onto section 9 and secure using screw 14. Slide section 5 upwards from inside
of section 7, turn lock screw 6 clockwise to secure and then slide section 7 onto section 8 and
secure using screw 14.
3.4
Insert the end of section 5 into the base of the heater (1) and secure with screw 13.
3.5
Align Clip 3 to the holes in sections 7 and 9 and secure with screw 4.
2. INTRODUCTION & SPECIFICATION
A totally dry heat, no condensation, no gas, no fumes and no smell. Reaches maximum heat output within seconds of being turned on. Highly polished
aluminium reflector for maximum heat efficiency. Adjusts horizontally through 25° while mounted. Three settings, controlled by pull cord, allowing unit to
be on full, half or low power. Ideal for industrial or domestic applications. Suitable for indoor and outdoor use, if weather protected (Heater is IP24 rated).
4. OPERATION
WARNING! Ensure you read, understand and apply the safety instructions in Section 1
before using the heater.
4.1
Ensure the heater is at least 1m from any object, 300m from the ceiling. The heater can be tilted
from 0° to 25°, set it to the required angle before switching the heater on.
4.2
Plug in the heater and switch it on using the pull chord on the heater head.
4.3
The heater will start on the low setting, each pull of the chord will cycle the heater onto the
medium setting, high setting and then back to off. (fig.1B)
4.4
When the heater is no longer required, switch to the off position and unplug the unit.
4.5
Make sure the heater plug is disconnected from the mains supply before any cleaning is
attempted. Also allow the heater to cool completely.
DO NOT use harsh abrasive cleaners to clean the heater.
DO NOT touch the glass elements with fingers as this may damage the tube.
4.6
Clean the exterior with a soft damp cloth with some mild detergent.
4.7
To replace any of the elements, contact your authorised Sealey dealer.
4.8
The heater has a built in tilt switch safety mechanism that switches off the unit if it is tilted beyond 25° either forwards or backwards. This
prevents fire in the event of the unit being knocked over. If the unit does not turn on again when returned to the vertical, tip it
approximately 25° in the opposite direction until you hear the internal switch operate. As the heater switches on return it to the vertical
position.
fi g.1
NOTE: It is our policy to continually improve products and as such we reserve the right to alter data, specifications and component parts without prior notice.
IMPORTANT: No liability is accepted for incorrect use of this product.
WARRANTY: Guarantee is 12 months from purchase date, proof of which will be required for any claim.
01284 757500
01284 703534
Sole UK Distributor, Sealey Group,
Kempson Way, Suffolk Business Park,
Bury St. Edmunds, Suffolk,
IP32 7AR
www.sealey.co.uk
Web
Original Language Version
© Jack Sealey Ltd.
IFSH2003 Issue: 3L - 05/12/14