Fig.5 – Sealey SAC2420E User Manual
Page 3
6. MAiNtENANCE
6.3. OPERAtiONS tO BE CARRiEd OUt EvERY 100 HOURS:
(or more frequently, if the compressor operates in a very dusty
atmosphere):
a) check oil level and, if necessary, top it up.
b) remove the air filter element by unscrewing the filter
holder (fig.4) and prising open the holder. clean it by blowing
through with an air line at low pressure, from the clean side.
Alternatively, wash it in soapy water, rinse and dry. do not
operate the compressor without the filter as foreign bodies or
dust could seriously damage the pump.
c) check for oil leaks.
6.4. OPERAtiONS tO BE CARRiEd OUt EvERY 200 HOURS:
a) replace the lubricating oil. remove the oil filler/breather
and unscrew the drain bolt (fig.3), drain the oil into a
suitable container. drain when the compressor is hot so that
the oil drains rapidly and completely. Incline the compressor
to ensure complete drainage. replace the drain bolt and refill
with fresh oil through the filler aperture. do not overfill.
replace oil filler/breather (fig.3).
Recommended oil:
suitable for room temperatures ranging from +5ºc to +25ºc:
seAleY cPo or equivalent sAe 40 compressor oil.
room temperature below +5ºc: sAe 20 compressor oil.
WARNiNG! Never mix different oils and do not use
non-detergent/low quality oils as the compressor may be
damaged. dispose of waste oil only in accordance with
local authority requirements.
b) check the automatic cut-out at maximum pressure and the
automatic cut-in at 2 bar below that.
6.5.
OPERAtiONS tO BE CARRiEd OUt EvERY 500 HOURS:
a) replace air filter.
b) check all tube fittings and electrical connections.
iMPORtANt! Failure to carry out maintenance tasks may
invalidate the warranty on your compressor.
6.6.
iMPORtANt WARNiNG - Air contaminants taken into the
compressor will affect optimum performance. example: Body
filler dust or paint overspray will clog the pump intake filter
and may cause internal damage to pump/motor components.
Please note that any parts damaged by any type of
contamination will not be covered by warranty.
6.7. Scheduled maintenance table.
WARNiNG! Before performing any maintenance operation,
switch off the compressor, disconnect from electricity supply
and release all air from the tank. In order to keep the
compressor in good working condition, periodical
maintenance is essential.
6.1. After the first 50 working hours replace the lubricating
oil - see para 6.4.
6.2.
OPERAtiONS tO BE CARRiEd OUt dAiLY:
a) drain condensation, place a container under the valve and
open the valve by turning anti-clockwise (fig.1). retighten the
valve.
b) check that all nuts and bolts are tight, particularly those
retaining the crankcase and cylinder head.
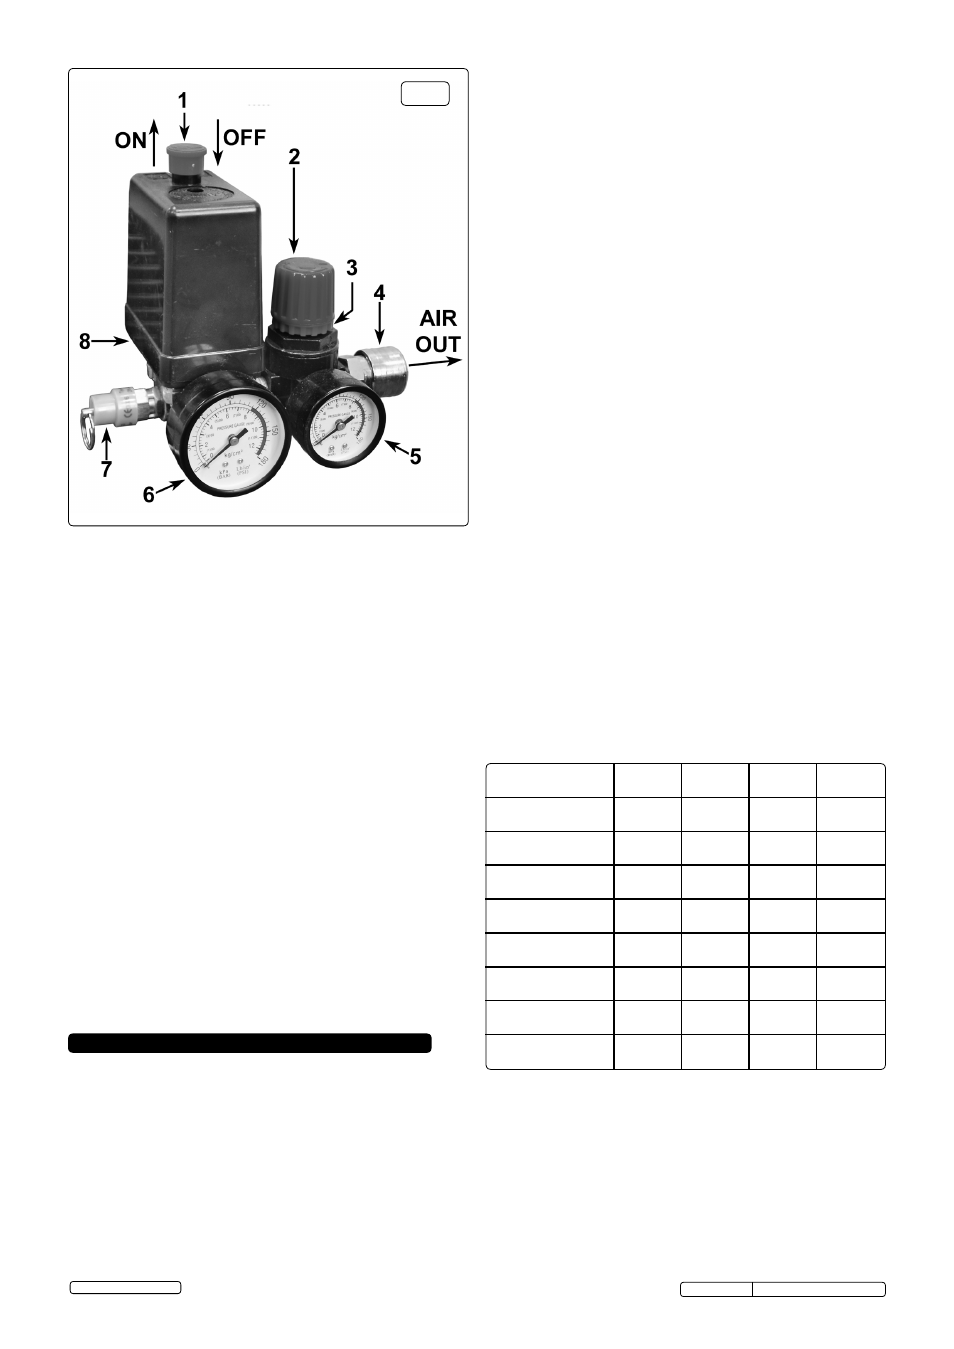
fig.5
When the compressor is not being used set the regulated
pressure to zero so as to avoid damaging the pressure
regulator.
5.9.
to stop the compressor press down the main switch (fig.5.1).
When the compressor stops there will be a whistling sound
as compressed air is vented from the compressor head.
dO
NOt, other than in an emergency, stop the compressor by
switching off the mains power, or by pulling the plug out, as
the pressure relief will not then occur and motor damage
may result upon restart.
5.10. When you have finished using the compressor unplug the
unit from the mains power supply.
5.11. set the outlet pressure on the regulator to zero.
5.12. remove the air line and air tool.
5.13. the tank must now be drained. this will release the air left in
the tank and drain away condensation that may have formed
within the tank. choose a suitable location for this operation
and/or make provision to collect the condensation.
Wear ear
and eye protection. open the tank drain valve (fig.1)
slowly, allowing air and moisture to bleed from the tank.
After bleeding, close the drain valve to prevent debris building
up in the valve.
WARNiNG! Water that is allowed to remain in the tank
during storage will corrode and weaken the air tank,
which could cause the tank to rupture. to avoid serious
injury, drain the tank on a daily basis.
5.14. SAFEtY FEAtURES
thermal cut out: If the unit overheats the thermal cut out
will operate and shut the unit down. Allow the unit to cool
down then press the reset button, located just inside the
pump cover (fig.7).
Maintenance
Operations
daily
100 hrs.
200 hrs.
500 hrs.
drain condensation
•
check oil level
•
clean intake filter
•
check for oil leaks
•
check cut-out
•
replace oil
•
replace air filter
•
check tube fittings and
electrical connections
•
6.8.
inspection of pressure tank both inside and out.
under the Pressure sYstems sAfetY reGulAtIons
2000 it is the responsibility of the owner of the compressor to
initiate a system of inspection that both defines the frequency
of the inspection and appoints a person who has specific
responsibility for carrying out the inspection.
© Jack sealey limited
Original Language Version
sAc2420e.V2 Issue no: 3 (sP) - 25/06/14