Fig.6 fig.7, Maintenance (washer) 5. operation – Sealey PWDM3600 User Manual
Page 4
6. MAINTENANCE (WASHER)
5. OPERATION
WARNING! RISK OF FLUID INJECTION. This washer
operates at fluid pressures and velocities high enough to
penetrate human and animal flesh. If there is an
occurrence of fluid injection seek medical help
immediately.
WARNING! Ensure you read, understand and apply
Section 1 safety instructions.
WARNING! Dry running can seriously damage the unit.
WARNING! DO NOT leave motor running for more than
2 minutes without operating the trigger, as temperature/
pressure increase may damage sealing system.
WARNING! If the engine switch is left switched to the ’ON’
position
when not in use, a drain on the battery will
occur over long periods of time. To prevent this the switch
must be switched to ‘OFF’ when the unit is not in use.
5.1.
MANUAL STARTING PROCEDURE.
5.1.1. Check engine oil level before each use.
5.1.2. Check that the mains water feed hose is laid straight, and
then fully open the water tap. Check to ensure there are no
leaks from hoses or connections.
5.1.3. Release gun trigger safety catch and depress trigger to allow
any air left in the system to escape, hold for 10 seconds and
release.
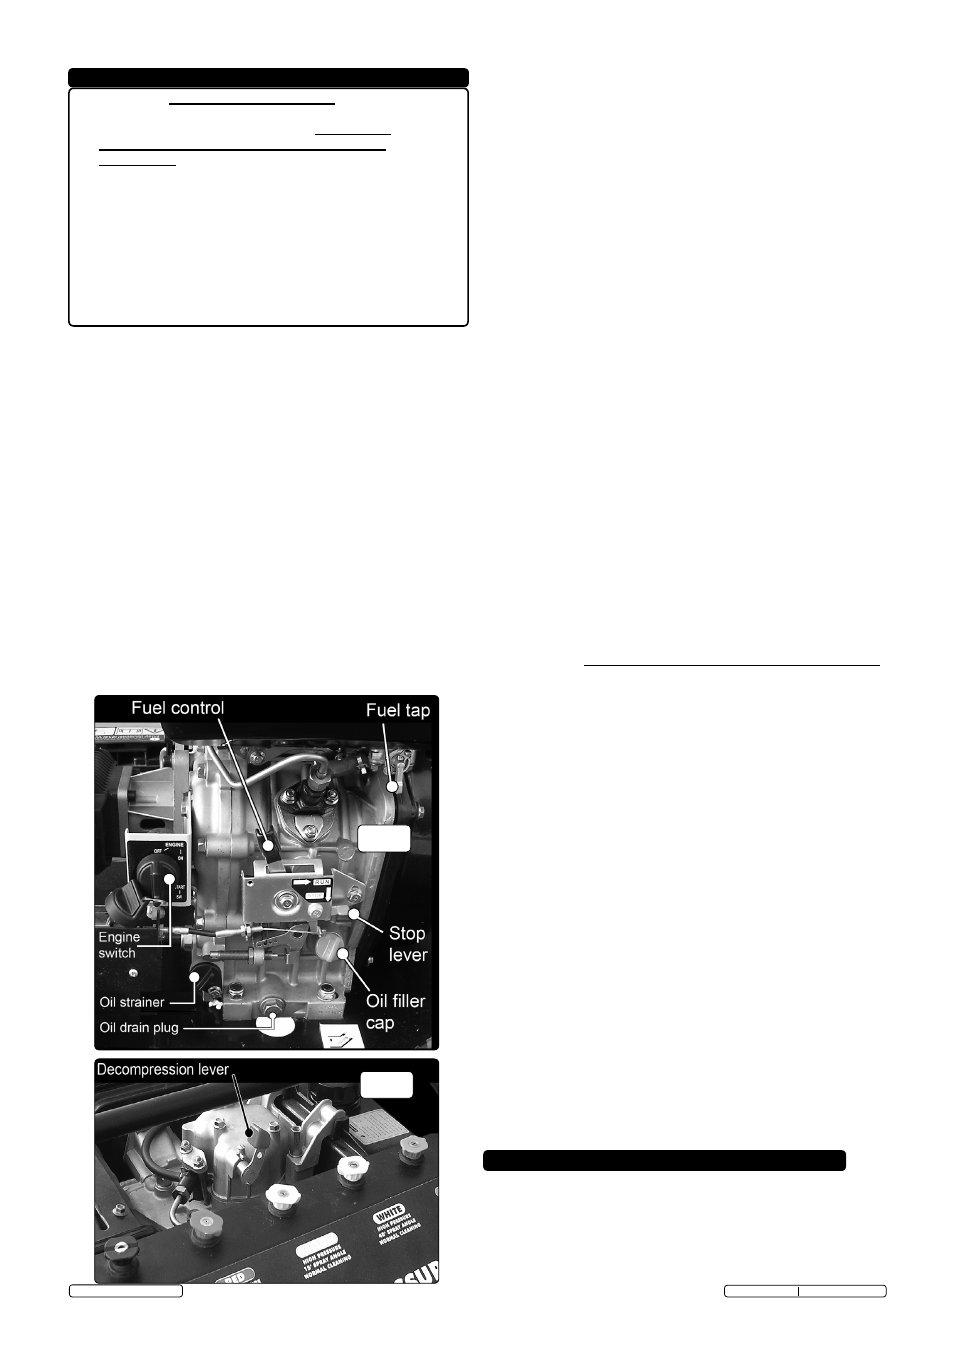
5.1.4. Rotate the engine switch clockwise to the ON position. See fig.6.
5.1.5. Fig.6 shows the fuel tap in the OFF position. Push the
fuel tap up to the left to the open position.
5.1.6. Move the fuel control lever to the ‘RUN’ position where it will
latch.
5.1.7. Take hold of the recoil starter handle (see fig.1) and pull it
slowly until you feel resistance, then let it return slowly.
5.1.8. Push the decompression lever down and release it. (see fig.7).
5.1.9. Now pull the starting handle hard and fast all the way out. Use
two hands if necessary.
5.1.10. If the engine doesn’t start repeat the process from 5.1.8.
5.1.11. NOTE: The engine is fitted with a cold start device. When
starting in low temperature conditions, press the heater
switch and hold for 20 to 30 seconds. Release the button
and perform sections 5.1.4. to 5.1.9. inc.
fig.6
fig.7
5.2.
ELECTRIC STARTING PROCEDURE.
5.2.1 Check engine oil level before each use.
5.2.2 Check that the mains water feed hose is laid straight, and
then fully open the water tap. Check to ensure there are no
leaks from hoses or connections.
5.2.3 Release gun trigger safety catch and depress trigger to allow
any air left in the system to escape, hold for 10 seconds and
release.
5.2.4 Fig.6 shows the fuel tap in the OFF position. Push the fuel tap
up to the left to the open position.
5.2.5 Move the fuel control lever to the ‘RUN’ position where it will
latch.
5.2.6 Rotate the engine switch clockwise to the ON position. See fig.6.
5.2.7 When you are ready, turn the key to the ‘START’ position and
hold it there until the engine starts. Release the key as soon
as the engine starts. If the engine does not start within ten
seconds release the key. Wait 15 seconds before attempting a
restart.
5.2.8 Once the engine is running the speed is automatically
adjusted according to the amount of load placed on it. The
speed setting is factory set. If a running speed problem arises
the unit should be returned to your Sealey dealer for
adjustment by a qualified service engineer.
5.3. CLEANING.
5.3.1. Only apply detergent using the black low pressure nozzle.
5.3.2. Depress the trigger to apply the detergent to the dry surface
which is to be cleaned.
Vertical surfaces must be cleaned from the bottom upwards.
5.3.3 When detergent application is complete remove the syphon
tube from the detergent container and place it in a container
of clean water. Run the washer at low pressure to purge the
gun of detergent.
5.3.4. Leave the detergent to act for 1-2 minutes, but
DO NOT allow
the surface to dry.
5.3.5. The detergent should be rinsed off using either the YELLOW,
WHITE or GREEN high pressure nozzles depending on the
spray angle required.
DO NOT use the RED nozzle as the
aggressive spray action may erode the surface being
cleaned. Always lock the gun trigger before changing nozzles.
5.3.6. Hold the gun firmly and position the nozzle at least 30cm
(12”) from the surface and commence washing with high
pressure clean water. Work from the bottom upwards, and
avoid the water running onto unwashed surfaces.
5.4.
SHUT DOWN PROCEDURE.
5.4.1. When cleaning has finished and the unit is no longer
required allow the engine to run unloaded for 3 minutes
before shutting down.
5.4.2. Stop the engine by pushing the red stop lever downwards.
(See fig.6)
5.4.3. Turn the engine switch to the OFF position and remove the
key. (See fig.6)
WARNING! If the engine switch is left switched to the
’ON’ position when not in use, a drain on the battery will
occur over long periods of time. To prevent this the
switch must be switched to ‘OFF’ when the unit is not in
use.
5.4.4. Turn off the fuel tap. (See fig.6)
5.4.5. Turn off the mains water supply.
5.4.6. Discharge residual pressure from the washer by pressing the
trigger until no more water comes out of the nozzle.
5.4.7. Engage the gun trigger safety catch.
CAUTIONS!
a) Avoid sudden bursts of water as this will cause the
water pressure to drop and put extreme pressure on the
hoses and connections.
b) If another person is using water from the same supply as
the washer, the water pressure will drop and the washer will
not operate correctly. Switch the engine off immediately
and wait until the pressure is restored.
Maintenance should only be performed with the engine turned
off and the unit disconnected from the mains water supply.
6.1.
CLEANING THE NOZZLES. Pull back the brass sleeve on
the end of the lance and pull out the nozzle. Clean the nozzle
with wire provided (fig 8). If this does not improve the flow
from the nozzle it should be replaced.
Original Language Version
© Jack Sealey Limited
PWDM3600 Issue: 1 - 08/05/13