Fig.5, Fig.6 fig.8 fig.7, Fig.9 – Sealey LS1050V User Manual
Page 3: Operating instructions
WaRNING! Ensure you read, understand and apply the safety
instructions before use.
WaRNING! This system has been designed to prevent the
operator from handling the log during the splitting process. for
safety reasons the operator must not ask a second person to
place or handle the log. The system is designed to be operated
by one person only.
5.1
ensure that the power supply cable to the log splitter is routed so as not
to be a tripping hazard or be positioned in such a way as to be prone to
damage or pulling.
5.2
In low temperature conditions preheat the hydraulic oil by running the
motor under no load for 15 minutes prior to commencing work.
5.3
Before splitting any logs you must check that the control levers are
functioning properly by doing the following tests:
5.3.1 Push down on both control levers. the splitting wedge should lower to
approximately 50cm above the highest table position.
5.3.2 If either control lever is released the splitting wedge should remain in the
lowered position.
5.3.3 When both levers are released the ram should rise to its highest position
automatically.
5.4
When many logs of approximately the same length are to be split, the
ram stroke can be set to avoid having to wait for the ram to operate
through it full stroke every time. see fig.9 below.
5. OPERaTING INSTRUcTIONS
4.2.3 Insert worktable (c) into one of the three sets of brackets (l) as shown
in fig.4. At each position there is a locking knob (K) which should be
turned clockwise so that its threaded portion passes into the hole in
the table (c) thus locking it in position.
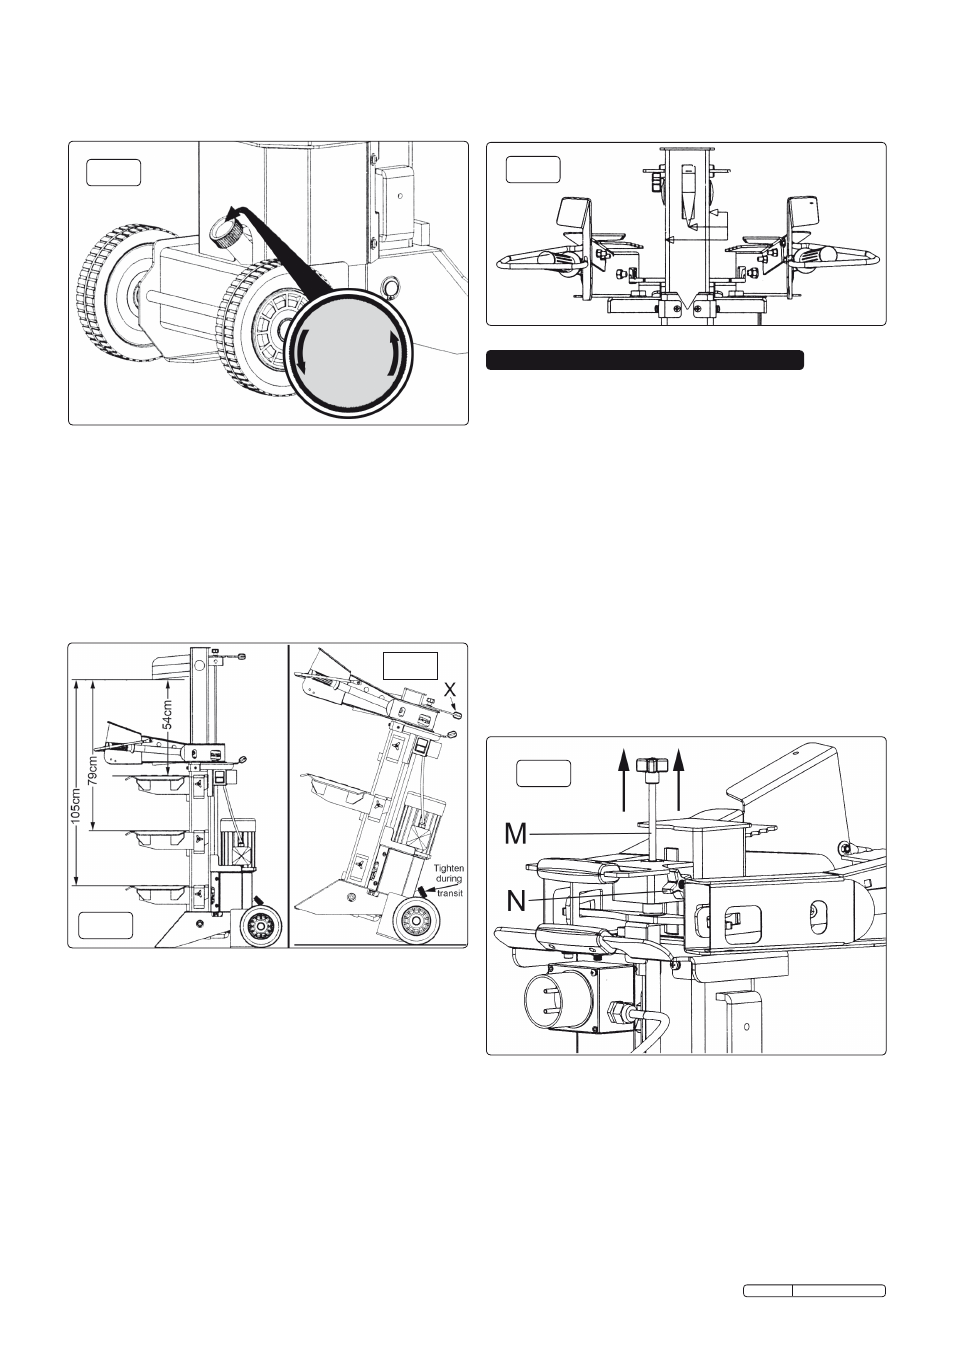
fig.5
4.3
Bleeding. the filler cap on the hydraulic oil tank also acts as a means
of bleeding air from the system. see fig.5 above. Before operating the
log splitter the filler cap should be opened by 4 turns to allow air to
pass in and out of the oil tank. Air flow through the filler cap should be
detectable during operation. When moving the log splitter close the filler
cap to avoid spilling oil.
Remember to open it again before the next
operation.
WaRNING! Failure to open the bleed screw will trap air within
the system. The continued compression and decompression of
this air will blow out the seals of the hydraulic system and cause
permanent damage to the log splitter thus invalidating your
warranty.
4.4
Transportation. Prior to transportation tighten the hydraulic oil tank cap
to prevent spillage of oil. tip the log splitter back onto its wheels using
the handle (see 'X' in fig.6 above) to transport it short distances.
remember to loosen the cap again before operating the log splitter.
WaRNING! If using a crane to move the log splitter do not use the
handle as a lifting point. If using slings they should be placed
around solid items such as the hydraulic tank or the main upright
steel section with due regard to the centre of gravity when the unit
is lifted. Slings should not be placed under the front foot as they
may damage hydraulic pipes in that area. Neither should slings be
placed under the work table or under the control arms as they are
not designed to support the weight of the whole machine.
4.5
Work site preparation. Work safely and save effort by planning your
work site beforehand. Have the logs positioned where they can easily
be reached. Have a site located to stack the split wood or load it
directly into a suitable vehicle or trailer.
4.5.1 When cutting up wood for splitting bear in mind the capacity of the
machine for each table height being 54cm, 79cm and 105cm. decide
which table capacity is most appropriate (see fig.7) and cut the wood
slightly shorter than the stated length. Insert the table into the chosen
position and turn the locking knob fully clockwise to lock it.
Be
fo
re
O
pe
ratio
n, Ble
ed
a
ir O
ut
Loosen
the
cover
fig.6
fig.8
fig.7
5.4.1 Hold down both control levers and move the splitting wedge down to the
desired starting position being 3 to 5cm above the log to be split.
5.4.2 release one of the control levers and switch the motor off. the splitting
wedge should remain where it is.
5.4.3 release the locking knob (n) and raise the adjusting rod (m) using the
knob on its end until spring resistance is felt. tighten the locking knob (n).
5.4.4 When the motor is switched on the splitting wedge should remain in the
position set.
5.4.5 When both control levers are held down the splitting wedge will move
down to split the log and then return to the position set when both levers
are released. see also fig.10.
WaRNING! always split a log along its grain. Never attempt to split a
log laid across the machine as this could be dangerous for the
operator and could seriously damage the machine.
fig.9
4.6
Lubrication. to aid smooth operation and prolong the working life of
the unit apply a thin coat of grease to the four surfaces of the upper
moving steel section and also to the splitting wedge as indicated in fig.8
below.
Original Language Version
ls1050V Issue: 3 - 13/04/10