Fig.5 fig.6, Fig.4 – Sealey AK467D User Manual
Page 2
AK467D, AK467DXP Issue No.1 09/10/09
Original Language Version
4.1
preparation:
4.1.1 When positioning the drainer ensure that there are no spills
of oil on the floor both prior to draining and afterwards. All
spills should be cleaned up immediately to prevent them
becoming a slipping hazard.
4.1.2 When positioning the drainer beneath the vehicle
consideration should be given to accessing the sump plug. If
necessary loosen the plug before siting the drainer.
Remember that once the sump plug has been removed the
escaping oil may be hot.
4.2
Collection of waste oil
4.2.1 If unit has been used to drain a previous vehicle check to
ensure that there is sufficient spare capacity within the pan
before you drain the next vehicle.
4.2.2 Place the pan under the vehicle’s sump, remove the sump
plug and put to one side. Allow the engine to drain.
4.2.3 When draining is complete, remove the pan and wipe up any
spillage. Remember to replace and tighten the sump plug
using a new sump washer.
4.3
Evacuation of waste oil from pan unit.
wARNING! dispose of all waste in accordance with
local regulations.
4.3.1 GRAVITY DISCHARGE (AK467D) Attach the discharge hose
(see fig.1) to the outlet valve at the rear end of the drainer
and secure it with the worm drive clip provided. See fig.6.
Place the other end of the pipe into a suitable container set
at a lower level than the drainer pan and open the outlet
valve. When the drainer pan is empty close the valve.
4.3.2 MANUAL PUMP DISCHARGE (AK467DXP) Attach the
discharge hose (see fig.5) to the outlet connection on the top
of the pump and secure it with the worm drive clip provided.
Place the other end of the pipe into a suitable container and
proceed to turn the pump handle clockwise. When the
drainer pan is empty cease turning the handle.
4.4
After use thoroughly clean the exterior of the drainer and
clear up any spills in the work area. Store the drainer in a
suitable clean dry place where it will not be a hazard.
4. OpERATING INSTRUCTIONS
01284 757500
01284 703534
www.sealey.co.uk
Web
NOTE:
It is our policy to continually improve products and as such we reserve the right to alter data, specifications and component parts without prior notice.
IMpORTANT: No liability is accepted for incorrect use of this product.
wARRANTY: Guarantee is 12 months from purchase date, proof of which will be required for any claim.
INFORMATION: For a copy of our catalogue and latest promotions call us on 01284 757525 and leave your full name, address and postcode.
Sole Uk distributor,
Sealey Group, Kempson Way,
Suffolk Business Park,
Bury St Edmunds, Suffolk, IP32 7AR
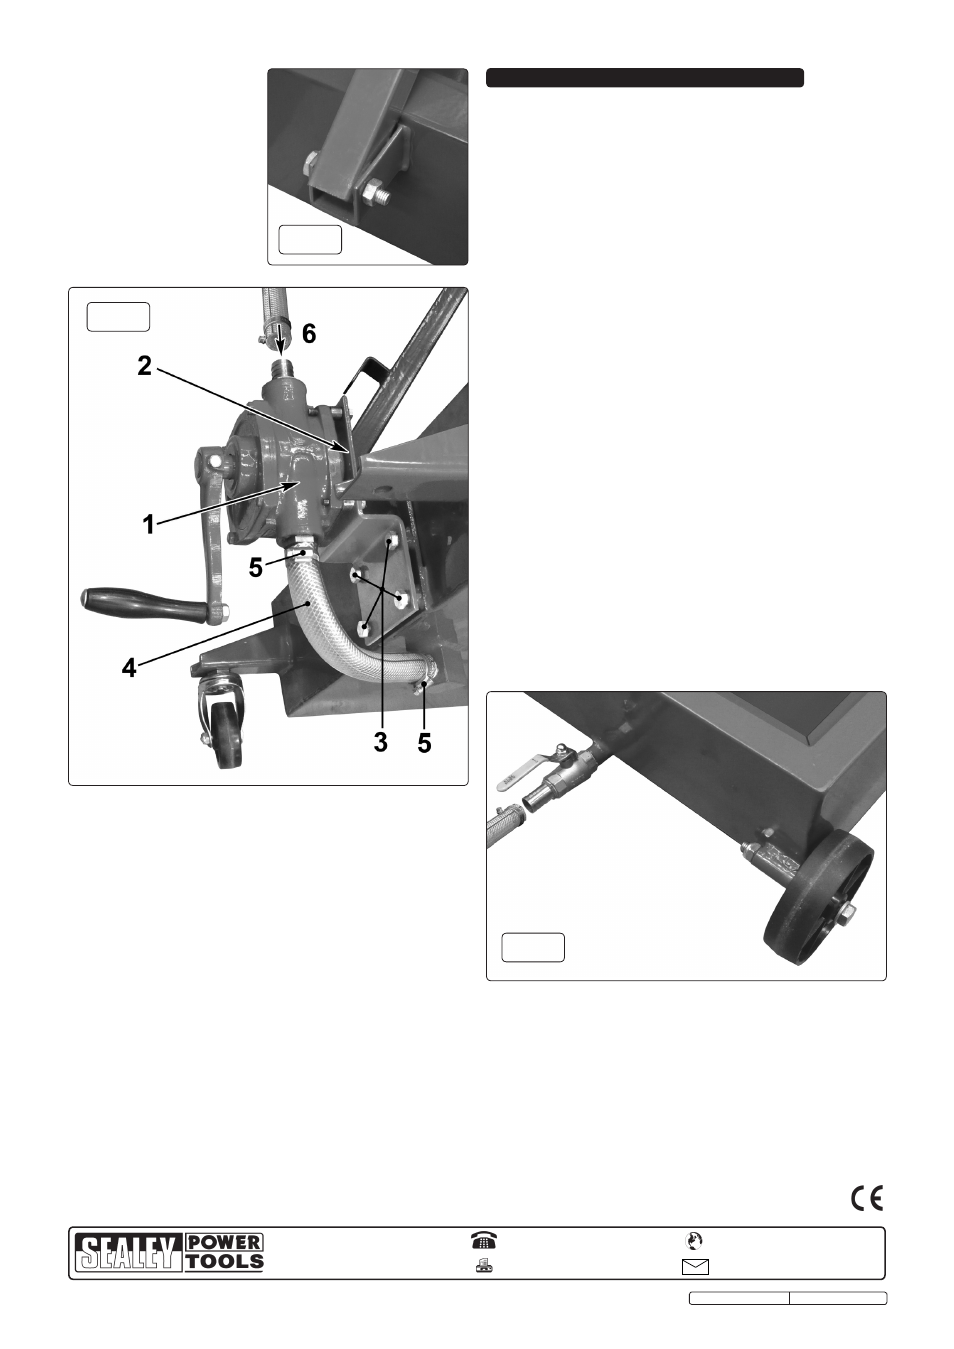
fig.5
fig.6
3.1.3 HANDLE. Place the
handle into the bracket
situated centrally between
the two castor brackets.
Align the hole in the end
of the handle with the
hole in the bracket and
insert the Ø8mm x 40 bolt
through both parts.
Secure with the M8
nut provided. See fig.4.
3.1.4 PUMP (AK467DXP ONLY). See fig.5. The pump (1) comes
attached to the pump bracket (2). Attach the pump bracket to
the castor end of the oil drainer in the position indicated above
using the four M8 x 16mm bolts (3) provided. Each bolt
must have a split lock washer under the head and should be
tightened using a 14mm spanner.
3.1.5 Connect the sump outlet to the underside of the pump using
the short length of tube provided. Slide the worm drive clips
provided over the tube first then push the tube onto the fittings
and secure with the worm drive clips as shown above in fig.5.
3.1.6 Place the black filter screen into the shallow recess in the top
of the pan.
fig.4