Sealey CST801 User Manual
Sack truck, Cst801, Instructions for
3.1
Wheels.
3.1.1
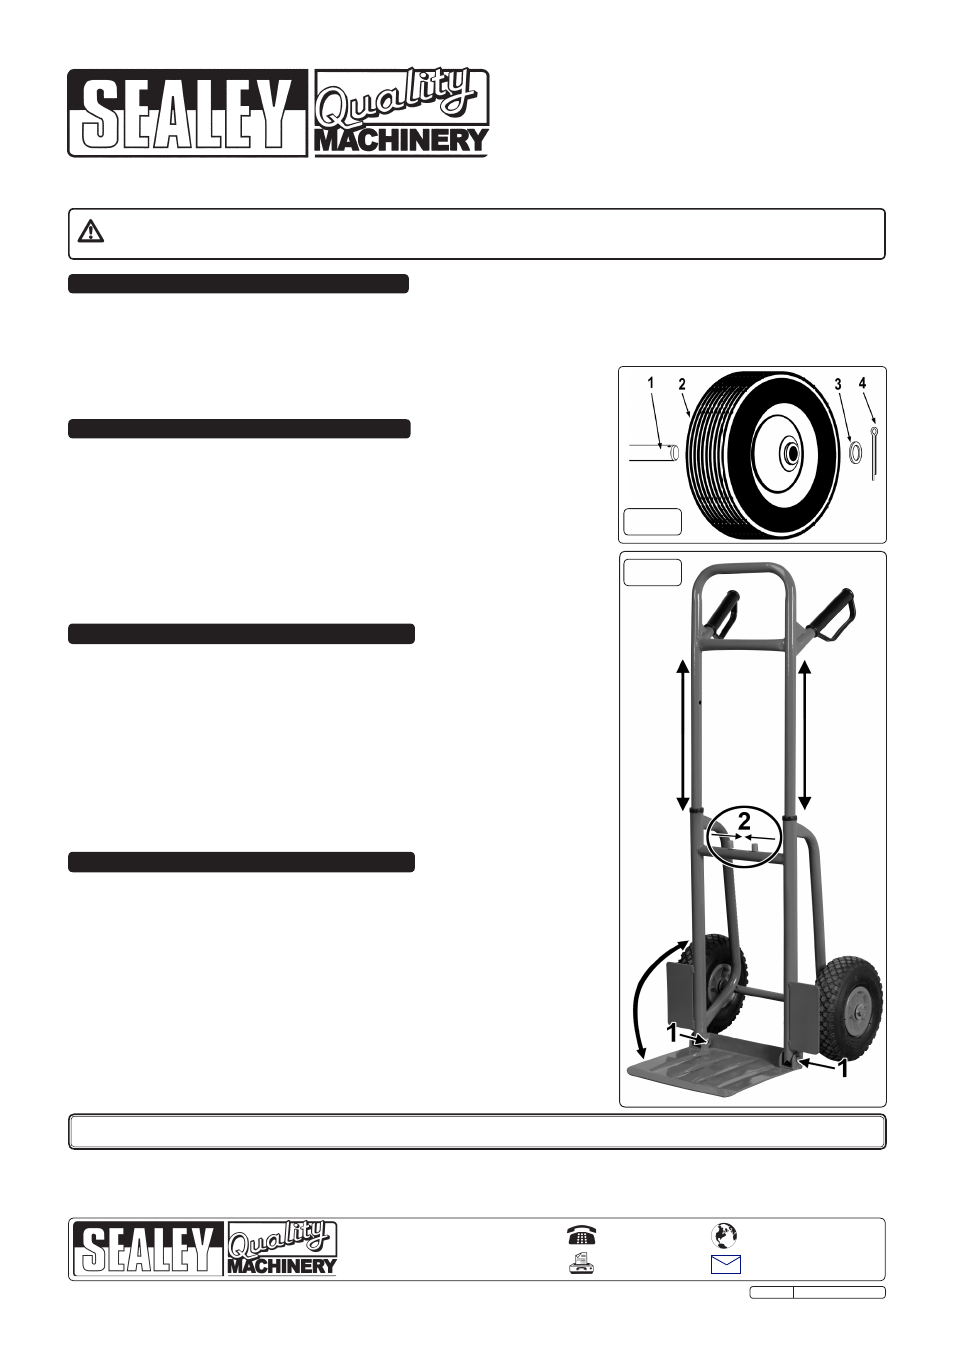
Ensure each axle is clean from dust and dirt to allow free movement of the wheel.
3.1.2 Slide the wheel (Fig.1.2) onto the axle (Fig.1.1), followed by the washer
(Fig.1.3) and complete by pushing the split pin (Fig.1.4) through the hole in the end of
the axle and bending over to retain.
3.1.3 Repeat for the other side.
3.2
Toe Plate
3.2.1 If the toe plate is not already attached, do so using the bolts, washers and nuts
supplied.
3.2.2 Attach at the bottom of the truck as in Fig.2.1
1. SAFETY INSTRUCTIONS
2. SPECIFICATION
Always load evenly with the centre of gravity of the load as near the centre and rear of the plate as possible.
Obtain additional support for large or wide loads to prevent tipping.
DO NOT overload the truck - see Specification.
DO NOT leave unattended, especially when loaded, unless the wheels are chocked or the truck is otherwise secured.
DO NOT use truck on uneven ground and do not run over curbs or steps - use a ramp.
DO NOT allow others to ride on the truck.
DO NOT use the truck if any part is damaged, paying particular attention to the wheels.
4. USE
Model No. . . . . . . . . . . . . . . . . . . . . . . . . . . . CST801
Max. Load . . . . . . . . . . . . . . . . . . . . . . . . . . . . .200kg
Wheel Diameter . . . . . . . . . . . . . . . . . . . . . . . .250mm
Wheel Thickness . . . . . . . . . . . . . . . . . . . . . . . .90mm
Height / Extended . . . . . . . . . . . . . . . . 810 / 1140mm
Overall Width . . . . . . . . . . . . . . . . . . . . . . . . . .480mm
Platform Depth . . . . . . . . . . . . . . . . . . . . . . . .290mm
InSTRucTIOnS FOR:
SACK TRUCK
MODEL no:
CST801
Thank you for purchasing a Sealey product. Manufactured to a high standard this product will, if used according to these instructions
and properly maintained, give you years of trouble free performance.
IMPORTANT: PLEASE READ THESE INSTRUCTIONS CAREFULLY. NOTE THE SAFE OPERATIONAL REQUIREMENTS, WARNINGS & CAUTIONS.
USE THE PRODUCT CORRECTLY AND WITH CARE FOR THE PURPOSE FOR WHICH IT IS INTENDED. FAILURE TO DO SO MAY CAUSE
DAMAGE AND/OR PERSONAL INJURY AND WILL INVALIDATE THE WARRANTY. PLEASE KEEP INSTRUCTIONS SAFE FOR FUTURE USE.
Extra strong tubular steel framework with heavy-duty pneumatic tyres allow transport of load over
rough terrain. Features foldaway toe plate and height adjustable handles. Fitted with composite
grip handles for added comfort and stability.
Parts support is available for this product. To obtain a parts listing and/or diagram, please log on to www.sealey.co.uk, email
[email protected] or phone 01284 757500.
3. ASSEMBLY
NOTE: It is our policy to continually improve products and as such we reserve the right to alter data, specifications and component parts without prior notice.
IMPORTANT: no liability is accepted for incorrect use of this product.
WARRANTY: Guarantee is 12 months from purchase date, proof of which will be required for any claim.
INFORMATION: For a copy of our latest catalogue and promotions call us on 01284 757525 and leave your full name and address, including postcode.
01284 757500
01284 703534
Sole UK Distributor, Sealey Group,
Kempson Way, Suffolk Business Park
,
Bury St. Edmunds, Suffolk,
IP32 7AR
www.sealey.co.uk
Web
Original Language Version
cST801 Issue: 1 - 16/03/11
Fig.2
Fig.1
4.1
check and inflate the tyres. Do not inflate above 30psi.
4.2
Fold down the toe plate ready to accept a load. (See fig.2)
4.3
The handle can be extended by compressing the tabs on the central bar (fig.2.2) and
pulling up on the handle. Pull upwards until a 'click' is heard.
IMPORTANT! DO NOT overload the sack truck. DO NOT try to carry loads that make
the truck unstable.
4.4
Slowly lean the sack truck backwards to take the weight of the load.
4.5
Proceed at a safe speed especially at corners where there could be a danger of the
load shifting.
4.6
Extra care should be taken on inclined surfaces.
4.7
Where there is a curb or step, a ramp should be used.
4.8
After use fold up the toe plate and retract the handles (Fig.2.2) store in a safe dry place.
4.9
Periodically check all fittings are tight and the wheel split pins are secure.