Sealey SEGS5 User Manual
Electronic gun cabinets, Segs5, segs8, Fig.1
Thank you for purchasing a Sealey Product. Manufactured to a high standard this product will, if used according to these instructions and properly
maintained, give you years of trouble free performance.
IMPORTANT: PLEASE READ THESE INSTRUCTIONS CAREFULLY. NOTE THE SAFE OPERATIONAL REQUIREMENTS, WARNINGS AND
CAUTIONS. USE THIS PRODUCT CORRECTLY AND WITH CARE FOR THE PURPOSE FOR WHICH IT IS INTENDED. FAILURE TO DO SO MAY
CAUSE DAMAGE AND/OR PERSONAL INJURY, AND WILL INVALIDATE THE WARRANTY. PLEASE KEEP INSTRUCTIONS SAFE FOR FUTURE
REFERENCE.
InstructIon manual for:
ELECTRONIC GUN CAbINETS
model no:
SEGS5, SEGS8
2. INTRODUCTION
3. INSTALLATION
1. SAFETY
Heavy-duty gun cabinets with powder coated paint finish to prevent corrosion. each cabinet door is evenly locked by five 25mm locking bolts, one
top, one bottom and three along the side. each cabinet includes a set of securing bolts with rear and bottom holes for fixing to the wall and floor.
the gun cabinets feature electronic keypad lock or can be opened manually with the override keys provided and two small keys for locking the
internal ammo safe. each gun cabinet is manufactured in accordance with Bs7558:1992.
•
CAUTION: If you, or an intruder, uses an incorrect combination, the gun cabinet will not open and a yellow light will illuminate. entering
an incorrect PIn 3 times will freeze the system for 20 seconds and a continual ‘beep’ will sound.
If the wrong combination is used 3 times again the system will freeze for 5 minutes and the audible ‘beep’ will alarm.
•
Keep the gun cabinet key and any record of the combination separate from the gun cabinet and unidentified.
3.1 consideration should be given to the placing of the gun cabinet to ensure that it is placed in a discreet location and will not be easily found
by intruders.
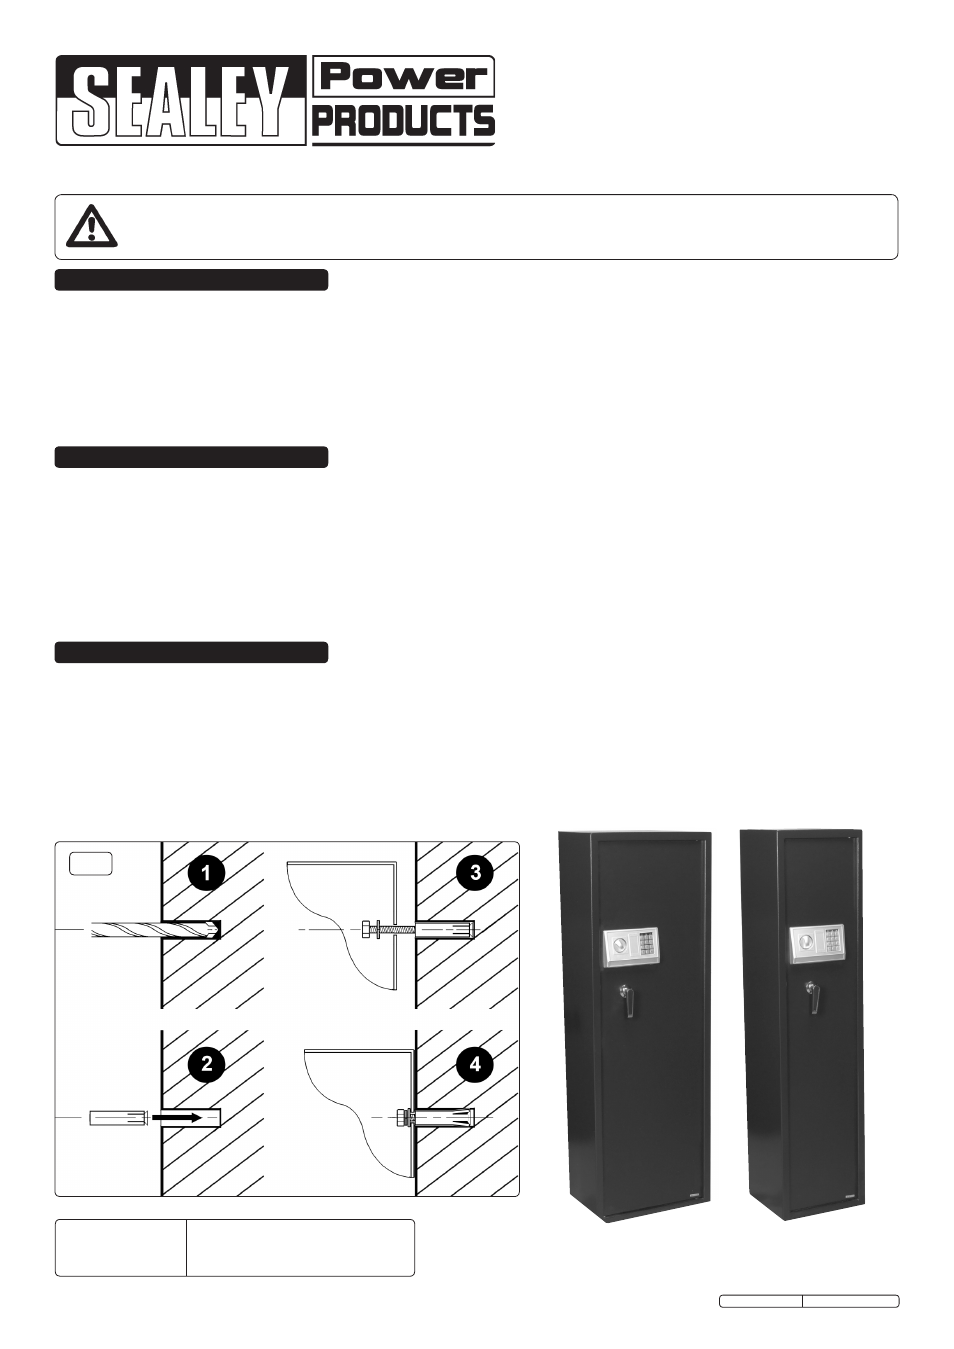
3.2 each gun cabinet is supplied with
a set
of anchor bolts suitable for fixing to brick and concrete.
3.3 fixing to hollow partition walls is not recommended. If fixed to wood it must be to a solid wooden structure.
3.4 open the door of the gun cabinet (see 4.1 for opening instructions) and with the help of a second person, position it where required and
mark the mounting positions through the pre-drilled holes in the back or base of the gun cabinet.
3.5 drill 12mm holes to a depth of 67mm (fig.1.1) and insert the anchor
sleeve and
nut
with bolt and washer removed (fig.1.2).
3.6 Position the gun cabinet over the anchor holes. Place a washer over the anchor bolt and insert into sleeve through the gun cabinet, screw
into nut and tighten to secure. (fig.1.3).
WARNING! these gun cabinets are heavy and care should be exercised in transit and handling to ensure that no one is injured.
WARNING! the gun cabinets are a 2 person job for transit and installation.
for maximum security, these gun cabinets must be securely fixed to a wall or floor.
ensure that if secured to the wall, the cabinets is on a firm level surface.
DO NOT install in areas where damp and condensation are present.
WARNING! the warnings, cautions and instructions referred to in this instruction manual cannot cover all possible conditions and situations
that may occur. It must be understood that common sense and caution are factors which cannot be built into this product, but must be applied
by the operator.
fig.1
Original Language Version
seGs5, seGs8 Issue: 1 - 26/10/11
serial number