Sealey CX105 User Manual
2 and 3 level heavy-duty trolleys, Fig.b fig.a fig.c fig.d fig.e fig.f fig.g, Instructions for
INSTRUCTIONS FOR:
2 AND 3 LEVEL HEAVY-DUTY TROLLEYS
MODEL No's
:
CX105.V2 & CX108.V2
Thank you for purchasing a Sealey product. Manufactured to a high standard this product will, if used according to these instructions and properly
maintained, give you years of trouble free performance.
IMPORTANT: PLEASE READ THESE INSTRUCTIONS CAREFULLY. NOTE THE SAFE OPERATIONAL REQUIREMENTS, WARNINGS & CAUTIONS.
USE THE PRODUCT CORRECTLY AND WITH CARE FOR THE PURPOSE FOR WHICH IT IS INTENDED. FAILURE TO DO SO MAY CAUSE DAMAGE
AND/OR PERSONAL INJURY, AND WILL INVALIDATE THE WARRANTY. PLEASE KEEP INSTRUCTIONS SAFE FOR FUTURE USE.
1. SAFETY INSTRUCTIONS
3. CONTENTS
4. ASSEMBLY
2. DESCRIPTION
1.1. GENERAL SAFETY
WARNING! Ensure Health & Safety, local authority, and general
workshop practice regulations are adhered to when using this trolley.
Always load evenly with the centre of gravity of the load as near the
centre of the trolley as possible.
DO NOT overload the trolley - each shelf has a capacity of 50kg.
Use the trolley in a suitable work area.
Keep the work area clean, uncluttered and ensure there is adequate
lighting.
Keep the trolley clean and tidy in accordance with good workshop
practice.
DO NOT use the trolley
for any purpose other than that for which it
is designed.
DO NOT stand on the trolley, use it as a ladder or allow others to ride
on it.
DO NOT leave unattended, especially when loaded, unless the
wheels are chocked or the trolley otherwise secured.
DO NOT use trolley on uneven ground and do not run over curbs or
steps - use a ramp.
DO NOT use trolley if any part is significantly damaged, paying
particular attention to the wheels.
Keep children and unauthorised persons away from the work area.
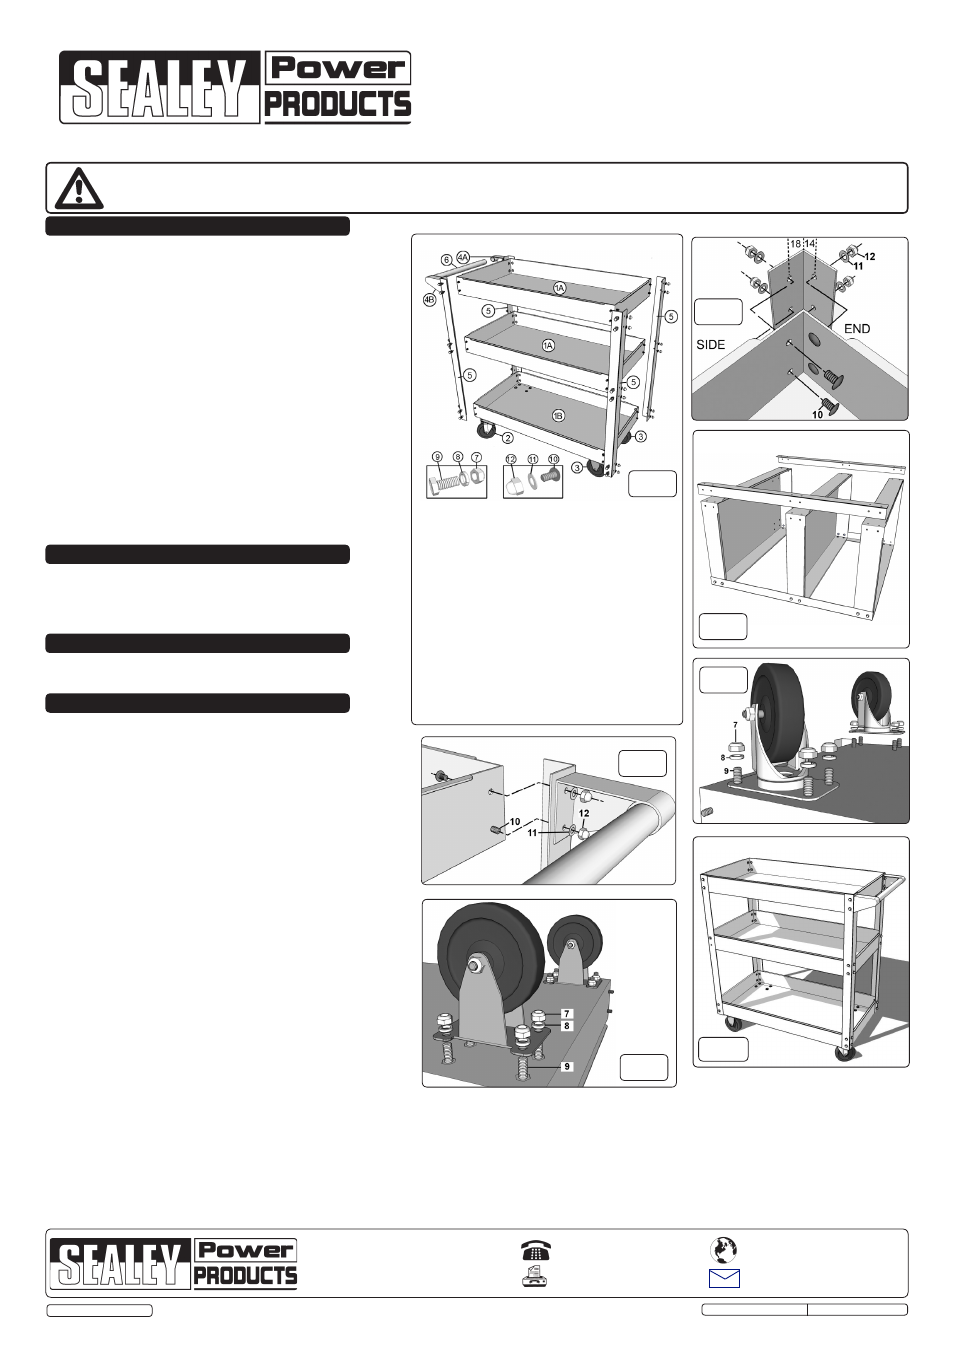
Carefully unpack the product and check the contents, fig.A. Should any
items be missing or damaged contact your Sealey dealer.
Garage or workshop trolley with each shelf having a capacity of
50kg.
Deep-walled shelves, each of which may be installed base down or
base up to give either tool and component security or unobstructed
access. Fitted with four large wheels, two fixed and two swivel.
4.1. Where each upright makes contact with the trays, it is fixed in
place with four M6 bolts passed through the holes in the tray
from the inside as shown in
fig.B. Each bolt is then fixed with a
washer and a dome nut on the outside surfaces of the uprights.
4.2. On each upright, one face is slightly narrower than the other and
has the holes 4mm closer to the corner than the longer face.
The narrower face should be positioned onto the ends of the
trays -
See fig.B. Double check that the bolt holes in the
uprights and trays are aligned on each corner during assembly.
4.3. Assemble the trolley as if it were on its side - See fig.C. Identify
the base tray which has holes in its bottom surface for mounting
the wheels and castors. Attach two uprights to the longer side of
the tray leaving the dome nuts finger tight. Attach the top tray to
the other ends of the uprights. If you have a 3 shelf trolley, now
attach the centre shelf.
4.4. Turn the assembly over so that the uprights are on the ground
and the trays are protruding upwards. Attach the other two
uprights leaving the dome nuts finger tight -
See fig.C.
4.5. Stand the assembly on the base tray. Slide the tubular handle
into each handle support and fix the handle assembly to one end
of the top tray using the general assembly bolts as shown in
fig.D.
4.6. Tighten all fixings. Hold each bolt stationary with a slotted
screwdriver and tighten each dome nut with a 10mm spanner.
4.7. Turn the trolley upside down and bolt the two castors to the base
tray at the same end of the trolley as the handle. Pass the 8mm
mounting bolts through the tray from the inside surface and
through the mounting plate as shown in
fig.E. Drop a split washer
over each bolt and fix with an 8mm Nyloc nut. Mount the fixed
wheels at the other end of the tray in the same manner -
See
fig.F.
4.8. Turn the assembled trolley the right way up - See fig.G.
fig.B
fig.A
fig.C
fig.D
fig.E
fig.F
fig.G
NOTE: It is our policy to continually improve products and as such we reserve the right to alter data, specifications and component parts without prior notice.
IMPORTANT: No liability is accepted for incorrect use of this product.
WARRANTY: Guarantee is 12 months from purchase date, proof of which will be required for any claim.
INFORMATION: For a copy of our latest catalogue and promotions call us on 01284 757525 and leave your full name and address, including postcode.
Sole UK Distributor, Sealey Group,
Kempson Way, Suffolk Business Park
,
Bury St. Edmunds, Suffolk,
IP32 7AR
01284 757500
01284 703534
www.sealey.co.uk
Web
CX105.V2 & CX108.V2 Issue: 3 (I) - 08/10/13
Original Language Version
Contents
CX105 CX108
Part No. Description
No.
No.
1A
Upper Tray
1
2
1B
Base Tray
1
1
2
Castor Wheel
2
2
3
Fixed Wheel
2
2
4A
Handle Bracket
1
1
4B
Handle Bracket
1
1
5 Upright
4 4
6
Handle Tube
1
1
7
8mm Nyloc Nut
16
16
8
8mm Split Washer 16
16
9
8mm Bolt
16
16
10
6mm Bolt
32
48
11
6mm Washer
32
48
12
6mm Dome Nut
32
48
© Jack Sealey Limited