Fig.5 fig.6 fig.4 2, Fig.8 fig.7 – Sealey BS3 User Manual
Page 2
4.1
PREPARING THE CARRIER.
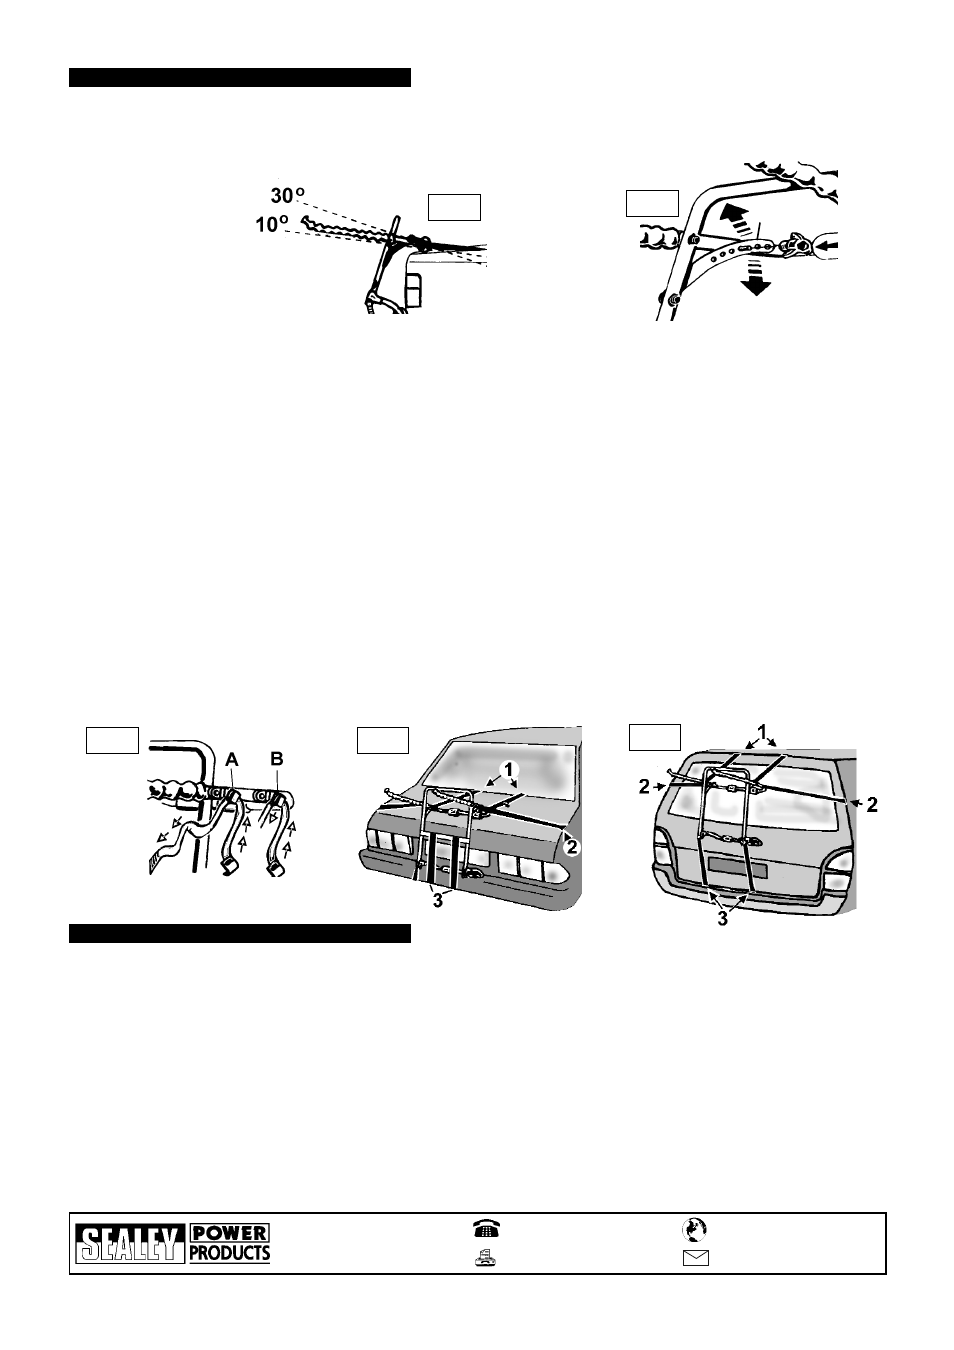
4.1.1 Position the carrier on the rear of your vehicle and adjust the carrier arms as shown in (fig.4 and fig.5).
4.1.2 The arms should be at an angle of between 10 and 30 degrees above the horizontal (fig.4).
4.1.3 To do this remove the hand nuts (fig.5 item 2) re-position the angle bracket and re-secure using the hand nuts.
5.1
When placing bicycles (max. of 3) onto the carrier support arms, place them in opposite directions. To avoid damage do not position
them directly next to the vehicle exhaust, especially the bicycle tyres.
Secure bicycles to the carrier with suitable ties or straps (not provided) DO NOT use string or elasticated straps. Ensure that the
bicycles do not come in contact with the vehicle bodywork.
5.2.
Ensure that the protection pads are in place and adjust if necessary to protect the bicycles rubbing against the cycle carrier.
5.3.
When you have secured the bicycles on the carrier, check and re-tighten all the straps and tie off the surplus lengths of strap for extra
security and to prevent the loose ends flapping.
r WARNING! Remember the driver of the vehicle is responsible for the security and safety of the load carried. Check the tension
of all straps and security of the bicycles frequently during your journey. If your lights or number plate are obscured, you must
fit an auxiliary number plate and/or lighting system. Contact your local Sealey dealer for details.
4. FIXING CARRIER TO VEHICLE
5. PLACING CYCLES ON CARRIER
fig.5
fig.6
fig.4
2
4.2
SALOON CARS
When securing carrier to the vehicle ensure that straps are not twisted. Each strap must be progressively tightened alternately and equally,
ensuring the carrier is centrally positioned. Attach straps in order: top, bottom, and then sides as follows:
4.2.1. To fix upper straps to vehicle, we recommend that you hook strap (fig 6 item B) onto the top edge of the boot lid, (fig.7 item 1) and equally
tighten the straps sufficiently to hold the carrier in place.
4.2.2. Use the angle brackets (see content item 5) to attach the lower straps to the lower edge of the boot lid, towing eye, or other adequate
securing point on the vehicle bodywork (refer to manufacturers hand book) (fig 7. item 3) and equally tighten the straps.
4.2.3. We recommend you hook straps (fig 6 item A) to a suitable position on the side of the boot lid (fig 7. item 2) and equally tighten the straps.
4.2.4. Adjust all straps to position carrier ensuring the protection pads (see content item 3) are firmly in contact with the vehicle bodywork.
4.2.5. Re-check all straps and fully tighten.
4.2.6. Place the bike protection pads (see content item 6) on the frame to protect bicycles and frame.
4.3.
HATCHBACKS & ESTATE CARS.
When securing carrier to the vehicle ensure that straps are not twisted. Each strap must be progressively tightened alternately and equally,
ensuring the carrier is centrally positioned. Attach straps in following order top, bottom, and then sides as follows:
4.3.1. To fix upper straps to vehicle, we recommend that you hook straps (fig 6 item A) onto the top edge of the tail gate or door, (fig.8 item 1),
and equally tighten the straps sufficiently to hold the carrier in place.
p
WARNING! For vehicles with a glass edge to the top of the tail gate or door, use the BS3/1 adaptor, available as an optional extra.
4.3.2 Tighten the straps sufficiently to hold the cycle carrier in place.
4.3.3. Use the angle brackets (see content item 5) to attached the lower straps to the lower edge of the tail gate, door, towing eye, or other
adequate securing point on the vehicle bodywork (refer to manufacturers hand book) (fig 8. item 3) and equally tighten the straps.
4.3.4. We recommend you hook straps (fig 6 item B) to a suitable position on the side of the boot lid (fig 8. item 2) and equally tighten the straps.
4.3.5. Adjust all straps to position carrier ensuring the protection pads (see content item 3) are firmly in contact with the vehicle bodywork.
4.3.6. Re-check all straps and fully tighten.
4.3.7. Place the bike protection pads (see content item 6) on the frame to protect bicycles and frame.
fig.8
fig.7
BS3.V2 - 2 - 101105
01284 757500
01284 703534
Sole UK Distributor
Sealey Group,
Bury St. Edmunds, Suffolk.
www.sealey.co.uk
Web
NOTE:
It is our policy to continually improve products and as such we reserve the right to alter data, specifications and component parts without prior notice.
IMPORTANT: No liability is accepted for incorrect use of this product.
WARRANTY: Guarantee is 12 months from purchase date, proof of which will be required for any claim.
INFORMATION: For a copy of our catalogue and latest promotions call us on 01284 757525 and leave your full name, address and postcode.