Fig.1, Fig.2, Operation – Sealey WPP1100 User Manual
Page 2: Maintenance
Environmental Protection
Recycle unwanted materials instead of disposing of them as waste. All tools, accessories and packaging should be sorted, taken to a
recycling centre and disposed of in a manner which is compatible with the environment.
When the product becomes completely unserviceable and requires disposal, drain off any fluids (if applicable)
into approved containers and dispose of the product and the fluids according to local regulations.
WEEE Regulations
Dispose of this product at the end of its working life in compliance with the EU Directive on
Waste Electrical and Electronic Equipment (WEEE). When the product is no longer required, it must be disposed
of in an environmentally protective way. Contact your local solid waste authority for recycling information.
3. OPERATION
WARNING! Ensure that you read, understand and apply the safety instructions in Section 1.
3.1.
Start-up.
3.1.1. Fit the four rubber feet to the base of the pump.
3.1.2. Place the pump on a flat level surface which is raised from the bottom of the pond. This will prevent the pump from clogging too quickly.
3.1.3. You may use the pump lying on its side. You should however, make sure that the motor axle is horizontal, otherwise the axle will be subject to increased wear.
3.2.
Cascade Fountain Mode.
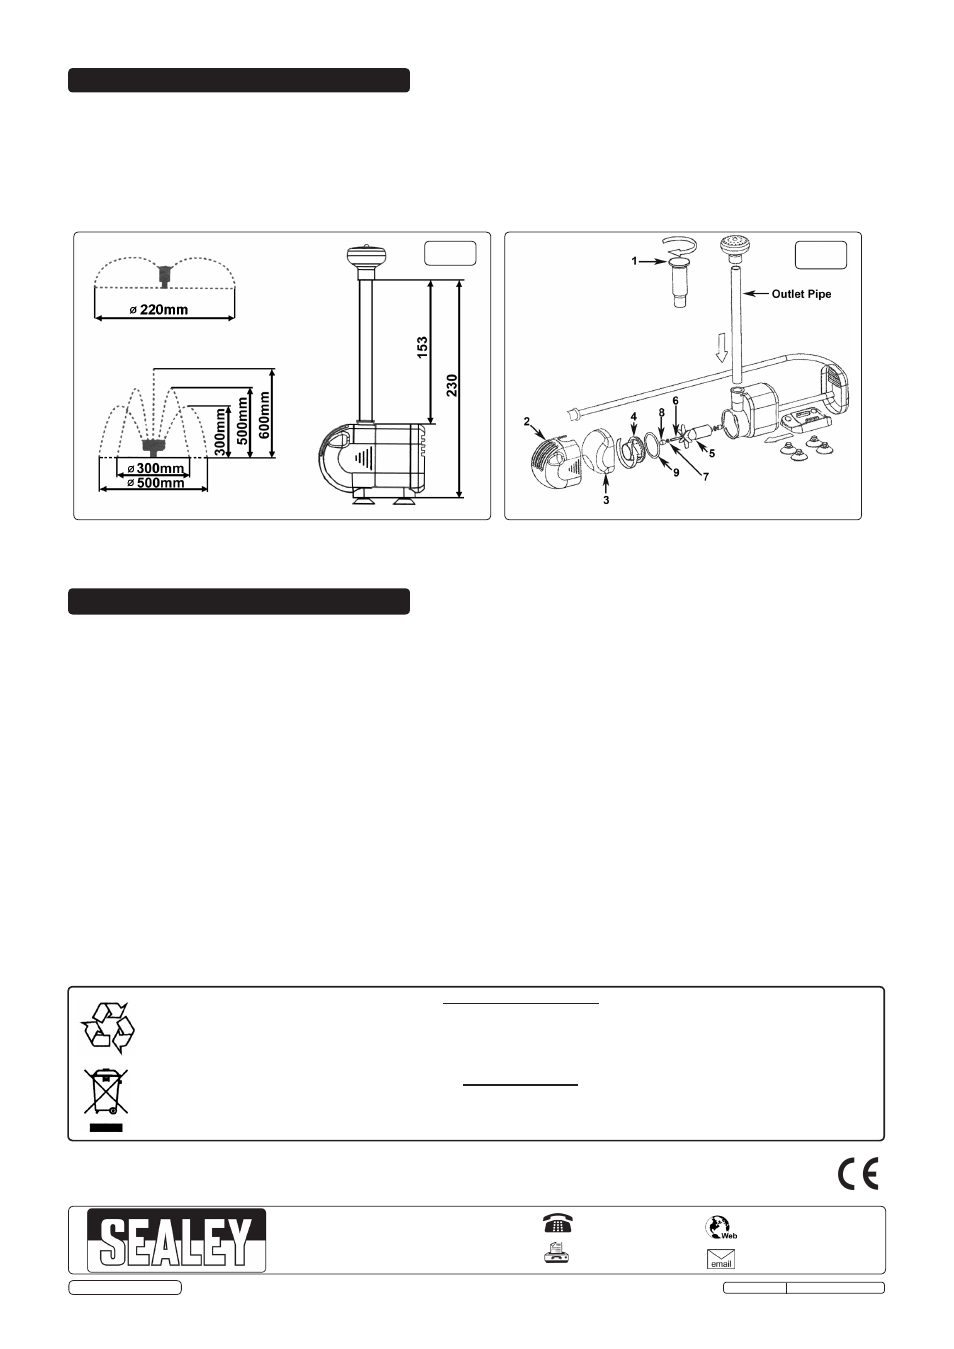
3.2.1. When installing the pump in the pond, make sure that the cascade fountain head projects above the water surface.
Refer to Fig 1 for the maximum delivery height and diameter.
fig.1
Water bell head
Cascade fountain head
3.3.
Water Bell Fountain Mode.
3.3.1. Install the water bell fountain head onto the outlet pipe.
3.3.2. The closer the head is to the water surface, the larger the diameter of the water bell that can be achieved.
3.3.3. You can adjust the volume of water and the size of the bell by screwing the top of the water bell head in or out. Fig 2.1.
4. MAINTENANCE
WARNING! With the exceptions listed below, all pump and electrical cable service maintenance and repair must be undertaken by an authorised
service agent only. Failure to observe this rule may be dangerous and will invalidate your warranty.
WARNING! Ensure that the pump is disconnected from the mains power supply before attempting any service or maintenance.
NOTE: The pump’s filter should only be cleaned out when necessary, as cleaning will simultaneously wash out the micro organisms which help to
keep the pond healthy. However, it should be cleaned whenever there is a noticeable deterioration in pump performance.
4.1.
Cleaning the filter sponge.
4.1.1. Press the filter housing together on both sides (fig 2.2) and pull off the cover.
4.1.2. Remove the sponge filter (fig 2.3) from the housing and clean with clean cold water.
CAUTION: Never use the pump without the filter in place as this could lead to damage to the pump.
4.2.
Cleaning the functioning parts.
4.2.1. Open the pump chamber lid (fig 2.4) by twisting it anti-clockwise a quarter turn and pulling it clear of the pump body.
4.2.2. Remove the magnetic impeller (fig 2.5) carefully from the shaft. As this is done the magnetic force of the impeller must be overcome.
4.2.3.
Do not use any implements to remove dirt from inside the pump, but simply wash it out with lukewarm water.
4.2.4. Use a soft sponge to remove any dirt deposits.
4.2.5. To reassemble the pump carefully slide the magnetic impeller onto the shaft. At a certain point, the impeller will be drawn into the housing by the magnetic
force.
4.2.6. Check that the ceramic washer (fig 2.7) and rubber bearing (fig 2.8) at both ends of the shaft are correctly mounted.
4.2.7. Before closing the pump chamber with the lid (fig 2.4) make sure that the o-ring (fig 2.9) is correctly seated.
4.2.8. Plug the supply cable into the mains supply briefly (no more than 3 seconds) to check that the impeller turns freely. A certain level of noise is inevitable
during this dry run. This is no cause for concern. When it is used in water, the pump should operate silently.
4.3.
Winter storage
4.3.1. Place the pump in water filled vessel in a frost-free room. Storage in water prevents deposits from accumulating on the pump. If the pump is stored dry,
these deposits can block the impeller. If you wish to store the pump dry, you must ensure that the functioning parts and filters have been thoroughly
cleaned and dried.
NOTE: It is our policy to continually improve products and as such we reserve the right to alter data, specifications and component parts without prior notice.
IMPORTANT: No liability is accepted for incorrect use of this product.
WARRANTY: Guarantee is 12 months from purchase date, proof of which will be required for any claim.
INFORMATION: For a copy of our latest catalogue and promotions call us on 01284 757525 and leave your full name and address, including postcode.
01284 757500
01284 703534
Sole UK Distributor, Sealey Group,
Kempson Way, Suffolk Business Park
,
Bury St. Edmunds, Suffolk,
IP32 7AR
www.sealey.co.uk
© Jack Sealey Limited
Original Language Version
WPP1100 Issue:5 (S) - 17/0914
fig.2