MINOURA CS-500 User Manual
Instructions manual
iH-520-STD / iH-520-OS
instructions manual
(ver.1.0 2015/4)
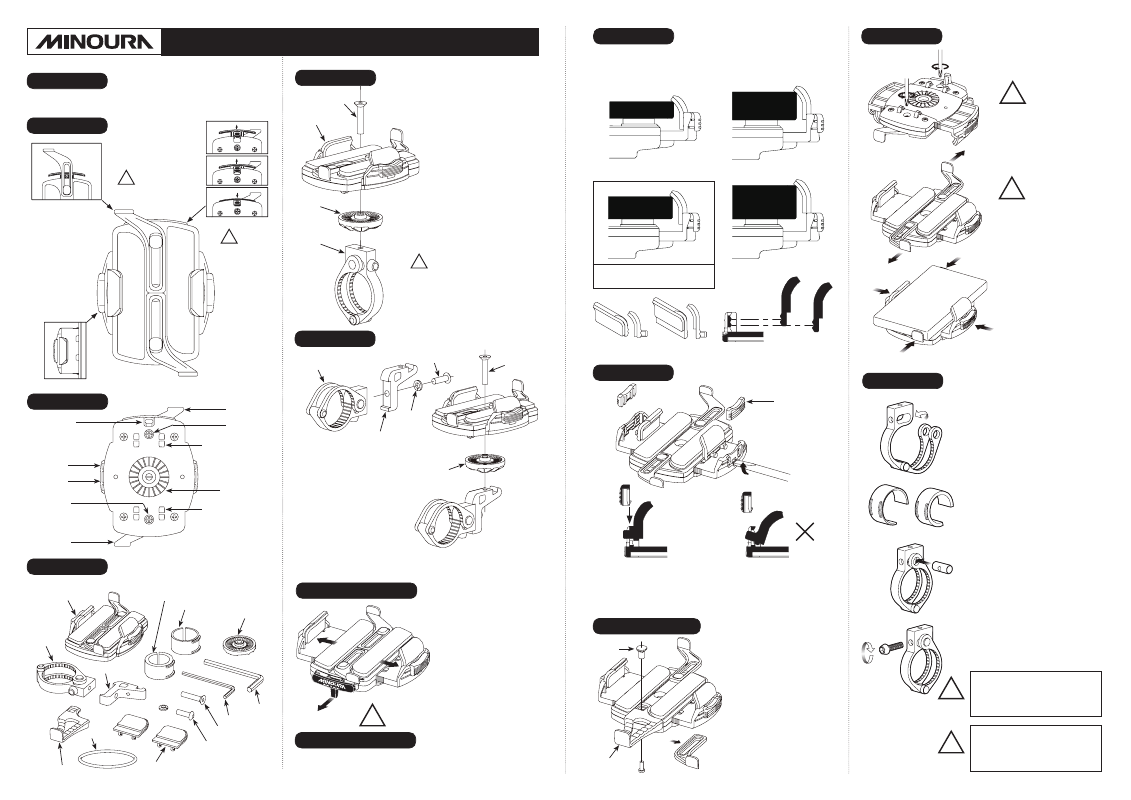
2 different clamp sizes are available.
● iH-520-STD : Fits 22 – 29mm diameter
● iH-520-OS : Fits 27 – 35mm diameter
iH-520 Body
+
Side Hook (Small)
Plastic Shim (thin)
Plastic Shim (thick)
LW type
Clamp
Side Hook (Large) x2
iH-520 comes with the lightweight type clamp
which requires a tool to tighten.
Disassemble the clamp, wrap the
handlebar and shut the arms.
Insert the appropriate plastic shim
between the clamp and the handlebar
depending on the target tube diameter.
See the chart below;
[STD]
[OS]
--------------------------------------------------
Thick Shim:
22mm / 27mm
Thin Shim:
25mm / 32mm
without Shim:
29mm / 35mm
Insert the roll nut in the all 3 holes.
Make sure the thread hole on the roller
nut can be seen through the hole beside
the clamp body.
Screw the bolt to the thread hole on the
roll nut.
Be sure you must screw the bolt with
your fingers for the first 3 – 4 revolutions,
then use the 5mm hex wrench to fix the
clamp securely.
Thin Shim
Thick Shim
!
Be sure the roll nut is made of
soft alloy material. Do not force
to tighten, otherwise the thread
hole will be broken.
!
You should not use the hex
wrench from the beginning.
If the bolt has been slanted,
it will destroy the roll nut.
Silicon Ring
Variations
Side wings can be
locked to prevent
unexpected opening
from shock or
vibrations during ride.
Release
Neutral
Lock
Holds the phone
securely from all
4 directions.
The arms are
fully adjustable.
The side wings
open wide to
accommodate
devices up to
75mm wide, with
or without a case.
The included
white silicon ring
is a safety device
for holding the
phone together
with the holder in
order to prevent
unexpected
dropping off
problem.
Lower Arm
Fixing Screw
Lower Arm
Wing Lock &
Release Lever
Upper Arm
Side Hook
Side Hook
Locking Shim
Angle Adjust
Base
Upper Arm
Fixing Screw
!
Make sure you
securely lock
the wing before
start riding.
Functions
!
Do not push
the wings again
after locking.
This action will
automatically
release the
lock.
Silicon Ring Hook
Silicon Ring Hook
Back Side
Check to make sure you have all the parts.
Contact place of purchase if you are missing
pieces.
Contents
Angle Adjust
Plate
3mm Hex Wrench
5mm Hex Wrench
M5x25 Flush Bolt
M5x16 Button Bolt
+
M5 Spring Waasher
Extended Lower Arm
Alloy Adapter
Install just above the clamp.
For mounting on the stem or for minimizing
the distance to you.
Install in front of the handlebar.
For locating the phone screen as far as
possible for easier view.
To open the wings, pull the red
wing release lever.
To clamp the phone, just push
the wings inward until they tightly
hold the phone.
After clamping, push down this
lever to lock the wings securely.
Do not push the wings
again after locking. This
will not tighten the wings
but will automatically
release the lock.
!
Installation – 1
Open / Close the Wings
1. Install the alloy adapter to the
clamp body first by M5x16
button bolt and spring washer.
2. Put the holder body and the
angle adjust plate on the alloy
adapter. Insert the M5x25 flush
bolt through them and screw
to the clamp.
Holder body is angle adjust-able
in every 9 degrees.
!
You should need OS-size clamp
for mounting on the stem due to
the applicable diameter.
Place the holder body and
the angle adjust plate on the
clamp.
Pierce the M5x25 flush bolt
through them and screw to the
clamp.
Holder body is angle adjust-
able in every 9 degrees.
To adjust the angle, loosen the
flush bolt, lift up and turn the
holder.
After adjusting, tighten the
flush bolt firmly.
Clamp
Angle
Adust Plate
M5x25 Flush Bolt
Holder Body
Angle Adjust
Plate
Clamp
M5x16 Button bolt
M5 Spring
Washer
Alloy Adapter
M5x25
Flush Bolt
Using Silicon Ring
Embed the silicon ring to the backside hooks, and hold both the
holder and the phone in order to avoid unexpected dropping problem.
Installation – 2
To adjust the angle, loosen the flush bolt, lift up and turn the holder.
After adjusting, tighten the flush bolt firmly.
Always push the lock lever as the final
step.
iH-520 comes with 2 sets of Side Hooks and
the smaller hooks are installed in standard.
Each hook can be set at 2 levels to fit various
thickness of the phone case.
Choose the best hook size and position to
your actual phone size.
6 – 9mm Thick
12 – 15mm Thick
9 – 12mm Thick
15 – 18mm Thick
Small Hook / Low
Large Hook / Low
Small Hook / High
Large Hook / High
[ Default Combination ]
Side Hook (Small)
Side Hook (Large)
2 height levels available
Side Hook Locking
Shim
Insert the tip of
flat screwdriver
and twist
While pushing the hook fully
toward the wing end, slide down
the shim to the pins to fix.
Make sure you fully push down
the shim.
If the hook is slanted, the shim
cannot be installed.
Adjust Hook
Replace Lower Arm
If you are using an iPhone 6plus or
similar, you need to replace the the
lower arm with the extended arm if
your phone is longer than 147mm
(max. 173mm).
The arm is not position adjustable.
1. Loosen the backside lower
arm fixing screw, and remove
the lower arm and the nut.
2. Replace the lower arm to the
extended one.
3. While sticking the extended
arm to the holder body, insert
the nut into the hole and
tighten the screw firmly.
Replace Hook
Extended
Lower Arm
Nut
Adjust the arm position to fit the actual
phone size.
The center chrome plated
screw holds the arm. Loosen it
to adjust the arm position.
Do not loosen any
other screws.
!
Slide both arms until they
touch the phone case.
Tighten the backside screws
to fix the position.
We recommend you set the
phone in the center of the
holder for the best fit.
Slide the arms to make wide
space.
Adjust Arms
Put the phone on the holder
and close the wings to hold the
phone.
If the phone power
switch has been on or off
unexpectedly because the
wing pushes the button
when holding, add a piece
of pad (supplied) on the
existing pad on the side
hook.
!
Clamp Mechanism