Most commonly used remote control buttons, Quick reference steps for the rugged vision dvr – Rugged Cams Rugged Vision DVR User Manual
Page 2
General Information to Guide you through the DVR
• Follow power up instructions to power unit. To shut the system down hit Live Menu, Shutdown, and input password
• Some menu functions require password input. When asked select user name, input password and press enter to
continue.
• If you make a mistake in any menu either press Live or Setup to exit out and start again.
Recording Methods
– Press Setup / Input Password / Go down to Recording and then over to your selected menu.
* Continuous Recording for all Cameras
• Under the Recording tab, go to schedule and make all selections C for continuous.
• Adjust Normal frame rate and resolution under the recording menu.
* Motion Based Recording for all Cameras
• Under the Recording tab, go to schedule and make all selections M for Motion.
• Adjust Event frame rate and resolution under the recording menu.
• Event resolution must be set higher than the normal settings.
• To adjust the sensitivity or alter Motion areas go to Setup / Event / Motion.
Viewing Screens
– change the monitor viewing screens using your arrow buttons.
• Up & Down to change the # of cams shown (1 cam, 4 cams, 8 cams, or 16 cams).
• RT & LT to change what cameras are shown (1-4 or 5-8 etc.).
• On any particular screen other than 16 cams, press the enter button to sequence the cameras.
- To change dwell time between screens go to Setup / System / OSD.
• PIP (Picture in Picture) – shows one full screen image and one smaller.
- Use the Up and Down arrow keys to change the position of the inset.
- Use the RT and LT arrow keys to change the camera # in the inset.
• Zoom – You can zoom in on a full screen live camera image by pressing Zoom +.
- Use the arrow keys to change to a different portion of the screen.
Search
– Press Search to select the type of archive you want (zoom + increases playback speed, zoom – decreases it).
* Event – allows you to search by date, time and camera channel for a log list of events.
• Select the year / month / day / hour / event type (motion, continuous, etc.) / camera.
• Ten logs at a time will show, select the one you want to see and press enter to watch the footage.
* Smart – allows you to select a particular camera or set of 4 cameras to search by date and time.
• Select the cameras, or set of 4 cameras and then month / day / hour / minute and press enter to watch footage.
Back Up
– to make a back up copy of video onto a USB 2.0 memory stick.
• Must format the USB 2.0 stick in the DVR prior to the first back up being made.
• To format the stick, insert the USB into the system, Go to Setup / System / Tools / Format USB Hard Disk / then press enter
on Yes to confirm.
• Press Back up / Video Back Up / Change data to correct times and dates from and to, select all cameras or one camera.
• Once the selections are made the available size and required size will be displayed. Press enter to start back up, and
then select yes to confirm.
• You will be taken back to the live screen where the back up will run in the background, indicated by an icon in the top
right corner. Do not remove the USB stick until the icon.
disappears. Back up is complete and you can remove the stick.
• To view the back up you must use the DVR backup viewer that came on the disk with your DVR.
Network Connection
– you must install the remote client software onto each PC you want to access the DVR from, or you
can access it through Internet Explorer.
• Connect the DVR into your router with a standard Ethernet cable (cannot use cross over).
• How to Find Correct Network Information to put in the DVR from your router (the info in the DVR is from the test Network
at Rugged CCTV).
- On a regular PC connected into the same router as the DVR go to Start / Run / type in cmd and press Enter /
type in ipconfig and press Enter / then write down the IP, Subnet Mask and Gateway from your computer (you
will enter the exact Subnet Mask and Gateway into the DVR, the IP will be different).
- Example of info from your PC
• IP – 192.168.001.100, Subnet Mask – 255.255.255.000, Gateway – 192.168.001.001
- Example of info you would input into the DVR
• IP – 192.168.001.200, Subnet Mask – 255.255.255.000, Gateway – 192.168.001.001
• DVR Network setup – Setup / System / Network / Statically Set IP Address and change information.
• Ports to open to the IP address in the DVR
- 3490, 3492, 9201-9205 and 80 if you want to be able to view the DVR through IE.
- All in the TCP direction.
- For help with Port forwarding go to:
http://www.portforward.com/English/routers/port_forwarding/routerindex.htm
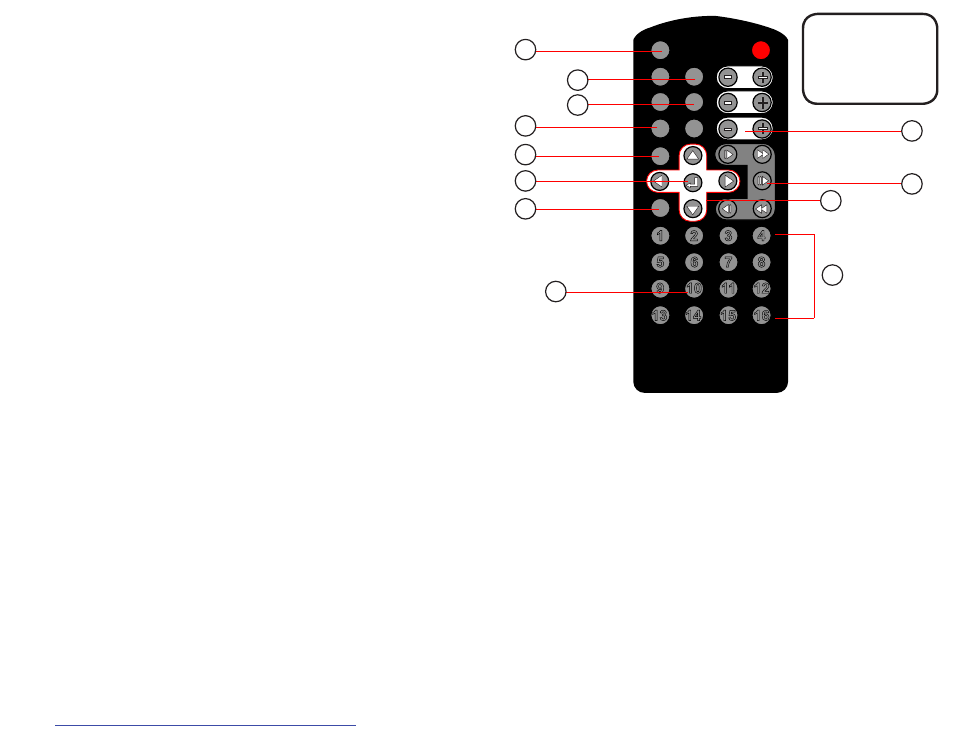
Quick Reference Steps for the Rugged Vision DVR
REC
SEARCH
RELAY
AUDIO
BACKUP
LIVE
SETUP
IRIS
FOCUS
ZOOM
PTZ
PIP
DISP
1
2
3
4
5
6
7
8
9
10 11 12
13
16
15
14
1
2
3
8
5
6
7
4
9
10
11
12
1. Live Menu or Go back to Live Mode
2. Main Setup (password protected)
3. Enter/Select and Camera Sequencing
4. Up/Down/Left/Right arrows and Camera Displays (1,4,9 & 16)
5. Search Through Archives –
Pick Date/Time/Event Type and Camera Channel
6. Backup a video or an image – 1 camera or all (password protected)
7. Zoom in & out or FF and RW in playback
8. Playback Controls
9. PIP – Picture In Picture - Up and Down Arrows to change location of inset
and Right and Left to change cam # input (must turn off PIP to enter any
other function)
10. PTZ Mode (requires PTZ cameras)
11. #s to Enter Password and to Call Up a Specific Camera
12. #10 button functions as 0 button
full description on pg. 14 of the manual
Most
Commonly
Used Remote
Control Buttons