Pedestal mount (through body), Pedestal mount (side bracket) – Whelen Pioneer Pole Pedestal Mount User Manual
Page 2
Page 2
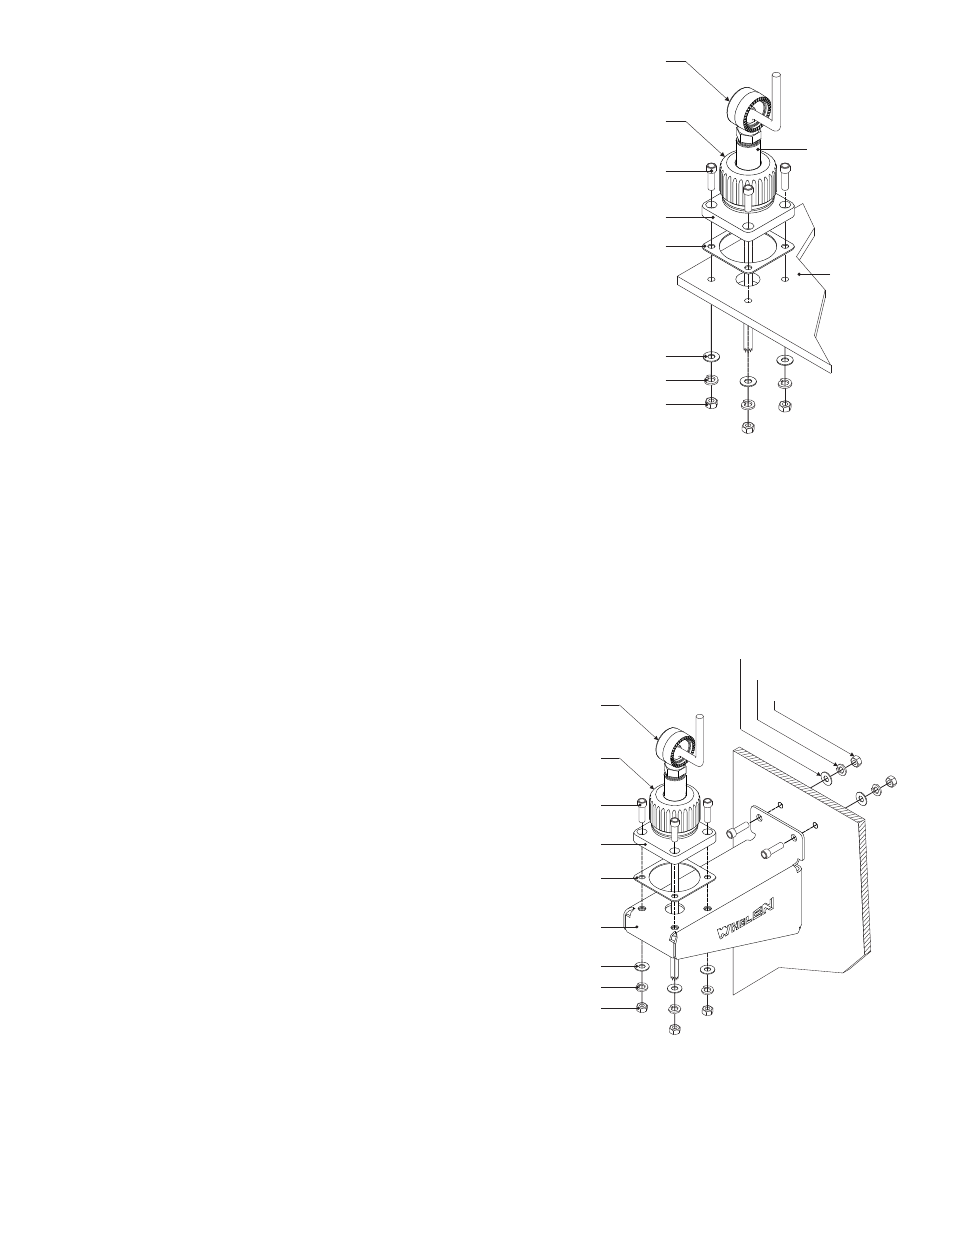
Pedestal Mount
(Through Body)
Adjustment
Knuckle
5/16 Washer, Flat
5/16 Washer, Split-Lock
5/16-18 Hex Nut
Adjustment
Collar
Mounting Pad
Mounting
Surface
Pedestal
Pole
Pedestal Base
Socket Head Cap Screw
5/16 x 1"
Pedestal Mount
(Side Bracket)
Adjustment
Knuckle
5/16 Washer (Flat)
5/16 Washer (Split-Lock)
5/16-18 Hex Nut
Adjustment
Collar
Mounting Pad
Mounting
Surface
Pedestal Base
Socket Head Cap Screw
5/16 x 1"
5/16 Washer (Flat)
5/16 Washer (Split)
5/16-18 Hex Nut
Side Bracket
Pedestal Mount (through body).....
1.
Position the pedestal assembly against the proposed mounting
surface and trace the outline of the pedestal onto the mounting
surface.
2.
Locate the center of this outline and drill a 1” dia. hole into the
mounting surface. Be sure to de-burr this hole before continuing.
3.
Feed the wires coming out of the bottom of the pedestal assembly
through the hole drilled in step 2.
4.
With the pedestal centered on the hole drilled in step 2, and using
the pedestal base as a template, mark the locations of the 4
mounting holes to be drilled.
5.
Using a drill bit sized for 5/16” mounting hardware (included), drill
and de-burr the four mounting holes marked in the previous step.
6.
If the Pioneer is already mounted onto the adjustment knuckle,
proceed to step 11.
7.
Following the instructions included with your Pioneer, connect the
electrical cable included with your mounting kit to your Pioneer
lighthead.
8.
As shown, route this cable from the lighthead, down through the
Adjustment Knuckle, Adjustment Collar, Pedestal Pole and
Pedestal Base.
9.
Install the Adjustment Knuckle onto the Pedestal Pole. Using
wrenches, tighten this union firmly. It may be necessary to unscrew
the Adjustment Collar to hold the machined flat section of the
Pedestal Pole with a wrench.
10.
Position the Pedestal Pole into the Pedestal base and secure by
tightening the Adjustment Collar. Tighten the strain relief to lock the
cable in place.
11.
Using the illustration shown as a guide, secure the pedestal
assembly to the mounting surface using the hardware provided. Be
sure the mounting pad is positioned between the mounting surface
and the pedestal assembly.
12.
Using the wiring information provided with your Pioneer lighthead
as a guide connect the Pioneer assembly to power.
13.
Test the lighthead for proper operation before returning the vehicle
to active duty.
Pedestal Mount (Side Bracket).....
1.
Position the Side Bracket against the proposed mounting surface
as shown and mark the locations of the two mounting holes for the
side bracket.
2.
Using a drill bit sized for 5/16” mounting hardware (included), drill
and de-burr the mounting holes marked in the previous step.
3.
Using the hardware provided, secure the side bracket to the
mounting surface as shown.Following the instructions included with
your Pioneer, connect the electrical cable included with your
mounting kit to your Pioneer lighthead.
4.
If the Pioneer is already mounted onto the adjustment knuckle,
proceed to step 8.
5.
As shown, route this cable from the lighthead, down through the
Adjustment Knuckle, Adjustment Collar, Pedestal Pole and
Pedestal Base.
6.
Install the Adjustment Knuckle onto the Pedestal Pole. Using
wrenches, tighten this union firmly. It may be necessary to unscrew
the Adjustment Collar to hold the machined flat section of the
Pedestal Pole with a wrench.
7.
Position the Pedestal Pole into the Pedestal base and secure by
tightening the Adjustment Collar. Tighten the strain relief to lock the
cable in place.
8.
Using the illustration shown as a guide, secure the pedestal
assembly to the side bracket using the hardware provided. Be sure
the mounting pad is positioned between the mounting surface and
the pedestal assembly.
9.
Feed the Pioneer wires from the bottom of the pedestal assembly
through the side bracket as shown and secure the pedestal
assembly to the bracket using the hardware provided.
10.
Using the illustration shown as a guide, secure the pedestal
assembly to the mounting surface using the hardware provided. Be
sure the mounting pad is positioned between the mounting surface
and the pedestal assembly.
11.
Install the adjustment knuckle and mounting collar onto your
Pioneer light assembly. Route the lighthead-end of the power cable
through the mounting collar and adjustment knuckle as shown.