DE DIETRICH DHG1166X User Manual
Page 52
52
4. Prepare the wall unit where the hood will be installed.
5. Fix the exhaust pipe to the flange and then insert the
hood into the wall unit so that pipe and electric cable
come out of the wall unit ceiling.
Fix the hood to the bottom of the wall unit with 8 screws.
Ducting version only: the exhaust pipe must be run to
the outside.
Filter version only: cut the pipe to measure so that the
air is exhausted on the wall unit ceiling.
6. Ducting version only: remove the charcoal filters.
7. Reinstall the frame making sure it is hooked to the hood.
8. Reinstall the grease filter.
Connect to the electrical system and check the proper
functioning of the hood.
Operation
Use the high suction speed in cases of concentrated kitchen
vapours. It is recommended that the cooker hood suction is
switched on for 5 minutes prior to cooking and to leave in
operation during cooking and for another 15 minutes
approximately after terminating cooking.
DHG1136X - DHG1137X Models
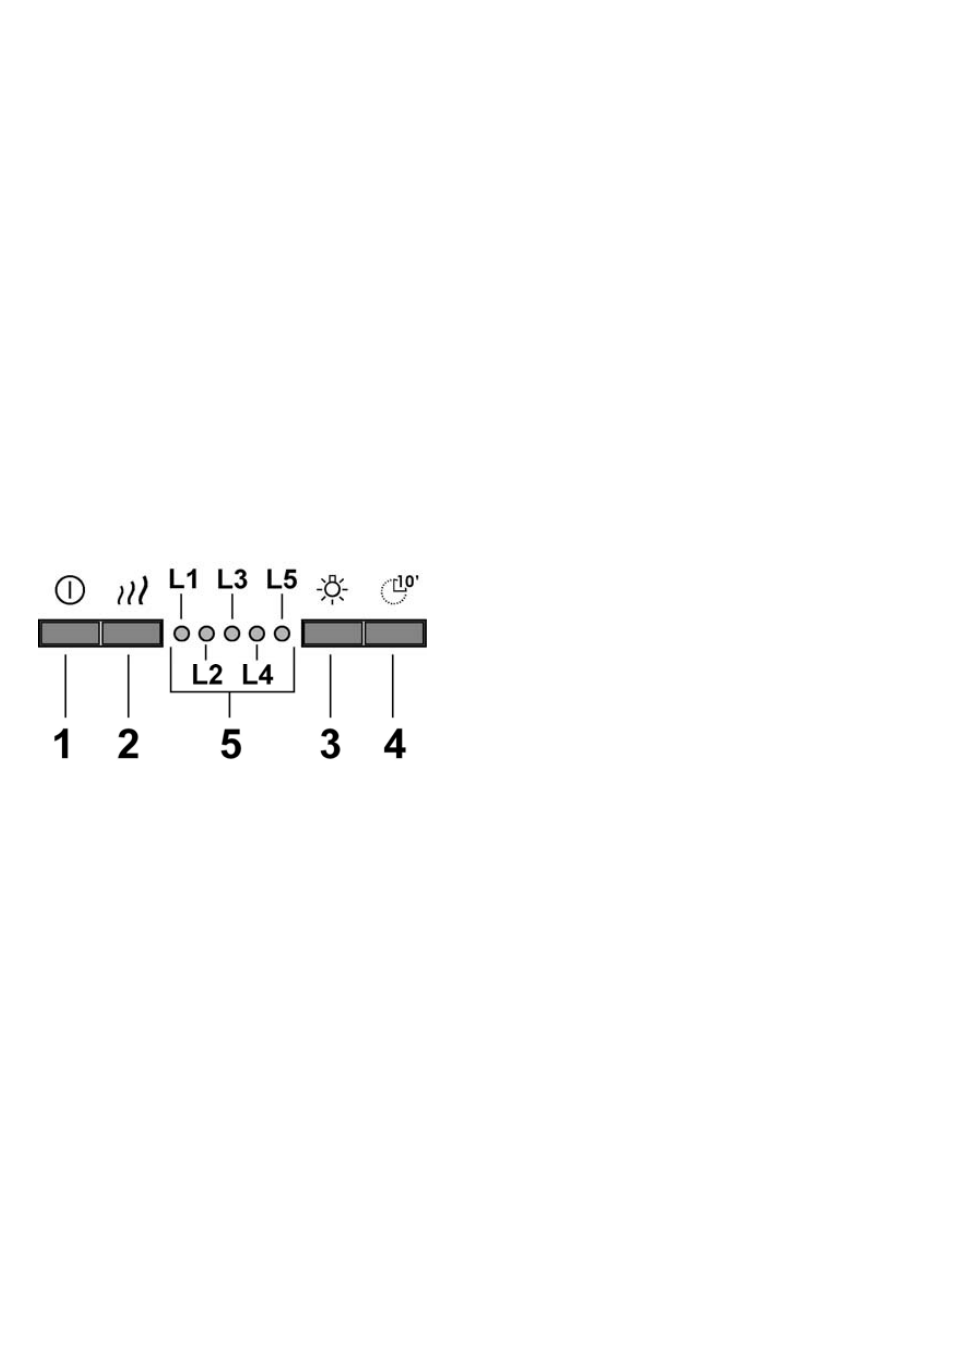
1 ON/OFF
motor
Pressing the button, the hood turns on at speed 1.
Pressing the button during functioning, the hood turns
OFF.
2 Speed
Increase
Pressing the button the hood passes from the OFF state
to speed 1.
Pressing the button (hood in ON state) the motor speed
is increased from speed 1 to intensive.
To each speed corresponds the ignition of the respective
led.
Speed 1 led L1
Speed 2 led L2
Speed 3 led L3
Intensive Speed led L4 (flashing)
The intensive speed is timed. The standard timing is 5’,
at the end of which the hood positions itself to speed 2.
To deactivate the function before the time expires press
key 2, the hood positions itself to speed 1, pressing key 1
the hood will turn off.
3 ON/OFF
lights
4 Speed
timing
5 Function state indicator
Speed Timing
The timing of the speed is enabled by pressing key 4, once
the timing expires the hood turns off.
The timing is subdivided as follows:
Speed 1 - 20 minutes (led L1 flashing)
Speed 2 - 15 minutes (led L2 flashing)
Speed 3 - 10 minutes (led L3 flashing)
Intensive Speed - 5 minutes (led L4 flashing)
During the timed functioning pressing key 1 the hood turns off,
if you press key 2 or key 4 the hood returns to the set speed.
Grease trap Signal
After 40 hours of operation the led L5 turns on.
When such signal appears the installed grease trap needs to
be washed.
To reset the signal hold down key 1 for 3”.
Carbon filter Signal
After 160 hours of operation the led L5 flashes.
When such signal appears the installed carbon filter must be
substituted.
To reset the signal hold down key 1 for 3”.
In the case of both filters signalling at the same time, the led
L5 will indicate the alarms alternately remaining on for 3" and
subsequently flashing 3 times.
The reset takes place by carrying out the procedure described
above 2 times.
The first time resets the grease trap signal, the second resets
the carbon filter signal.
In the standard mode the carbon filter signal is not active.
In case one uses the hood in filter version is it necessary to
enable the carbon filter signal.
Carbon filter signal activation:
Position the hood in OFF and simultaneously hold down keys
1 and 4 for 3”.
The led L1 and L2 will flash for 5”.
Carbon filter signal deactivation:
Position the hood in OFF and simultaneously hold down keys
1 and 4 for 3”.
The led L1 will flash for 2”.
Temperature Alarm
The hood is equipped with a temperature sensor that activates
the motor to speed 3 in the case that the temperature in the
control zone becomes too elevated.
The alarm condition is indicated with the sequential flash of
the leds L1, L2, L3.
This condition remains until the temperature falls below the
alarm threshold.
You can get out of this mode by pressing key 1 or 2.
Every 30” the sensor checks the environmental temperature of
the display zone.