MAAX CALLA User Manual
Page 4
4
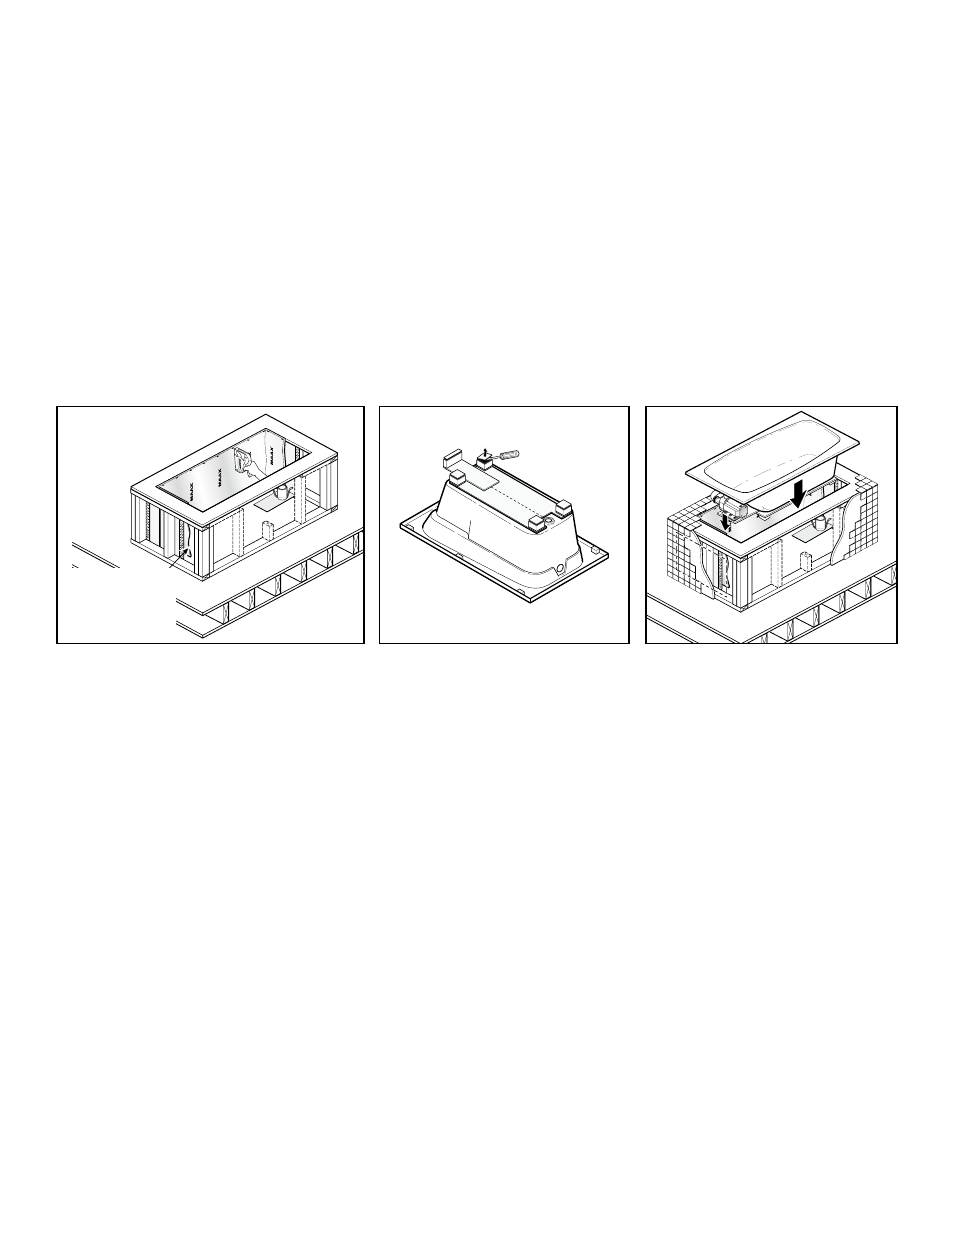
Install the membrane (using a T-50 stapler
or other) in the form of curtain along the
height and width of the casing (podium).
Fig. 5.
Note: the thermal coating (silver side)
must face the unit shell.
Note: make sure the seal for the
membrane coincides with the location
of the pump and/or blower to facilitate
future access. Fig. 5.
Finish the podium in accordance with the
instructions included in the unit installation
guide.
Remove the wood-fibre leg protectors in
order to lay the unit on the neutra-
Phone
®
insulating cushions. Fig. 6.
Install the unit in the podium. Fig. 7.
Seal the unit and podium with a silicone
caulking, as described in the unit
installation guide.
Installer la membrane (à l’aide d’une
brocheuse « T-50 « ou autre) en forme de
rideau à la pleine hauteur et longueur du
caisson (podium). Fig. 5.
Note : la pellicule thermique (côté argenté)
doit faire face à la coquille de l’unité.
Note : prendre soin de bien faire
coïncider le joint de la membrane avec
l’emplacement de la pompe et/ou du
souffleur pour tout accès ultérieur. Fig. 5.
Finir le podium selon les instructions du
guide d’installation de l’unité.
Enlever les protecteurs de pattes en fibres
de bois, afin que l’unité repose ensuite sur
les coussins isolants neutra-Phone
MD
.
fig. 6.
Installer l’unité dans le podium. Fig. 7.
Effectuer le scellement de l’unité et du
podium avec un calfeutrant à la silicone,
tel que décrit dans le guide d’installation
de l’unité.
Instalar la membrana (con una grapadora
‘’T-50’’ u otra) como una cortina cubriendo
enteramente lo alto y largo del cajón
(plataforma). Fig. 5.
Nota: la membrana (lado plateado) debe
quedar cara al caparazón de la unidad.
Nota: atender a que la junta de la
membrana coincida con la ubicación de la
bomba o con el soplador para posibilitar
cualquier acceso ulterior. Fig. 5.
Rematar el podio o plataforma con arreglo
a las instrucciones de la guía de instalación.
Retirar los protectores de fibra de madera
de las patas, con objeto de que la unidad
se apoye sobre los cojines aislantes
neutra-Phone
Mr
. Fig. 6.
Instalar la unidad en la cavidad del podio. Fig. 7.
Sellar la unidad y el podio con silicona,
tal y como se describe en la guía de
instalación de la unidad.
Seal of thermo acoustic
membrane
Joint de la membrane
thermo acoustique
Junta de membrana
termo acústico
Fig. 5
Fig. 6
Fig. 7