PLANET IGT-902 User Manual
Package content, Requirements, Wiring the power inputs
- 1 -
- 2 -
- 3 -
- 4 -
- 5 -
- 6 -
- 7 -
- 8 -
1. Package Content
Thanks you for purchasing PLANET 10/100/1000Base-T to
1000Base-SX / LX Industrial Managed Media Converter, IGT-
90x. Terms of “Industrial Managed Media Converter” in
following section of this Quick Installation Guide means the
IGT-90x.
The PLANET Industrial Managed Media Converter comes
with one of the following models.
● IGT-902: 10/100/1000Base-T to 1000Base-SX Industrial
Managed Media Converter (SC, MM)
● IGT-902T: 10/100/1000Base-T to 1000Base-SX Indus-
trial Managed Media Converter (SC, MM) (-30 to 75
Degree C)
● IGT-902S: 10/100/1000Base-T to 1000Base-LX Indus-
trial Managed Media Converter (SC, SM)
● IGT-902TS: 10/100/1000Base-T to 1000Base-LX Indus-
trial Managed Media Converter (SC, SM) (-30 to 75
Degree C)
● IGT-905A: 10/100/1000Base-T to mini-GBIC Indus-
trial Managed Media Converter (LC, MM/SM) (-30 to 75
Degree C)
2. Requirements
The Industrial Managed Media Converter provide remote
Web interface for manage; the following equipments are
necessary for further management.
Network cables: Use standard network (UTP) cables with
RJ45 connectors
Subscriber PC installed with Ethernet NIC (Network Card)
The operate system of subscriber PC that running Windows
98/ME, NT4.0, 2000/XP, MAC OS9 or later, Linux, UNIX or
other platform compatible with TCP/IP protocols.
IP address of the Industrial Managed Media Converter is
192.168.0.100 (the factory-default IP address), then the
manager PC should be set at 192.168.0.x (where x is a
number between 1 and 254, except 100), and the default
subnet mask is 255.255.255.0.
Use Internet Explorer 7.0 or above Web browser, enter
default IP address http://192.168.0.100
To access the Web interface then the Web login screen
appears in Figure 3.
Figure 3. Web Login Screen of IGT-90x
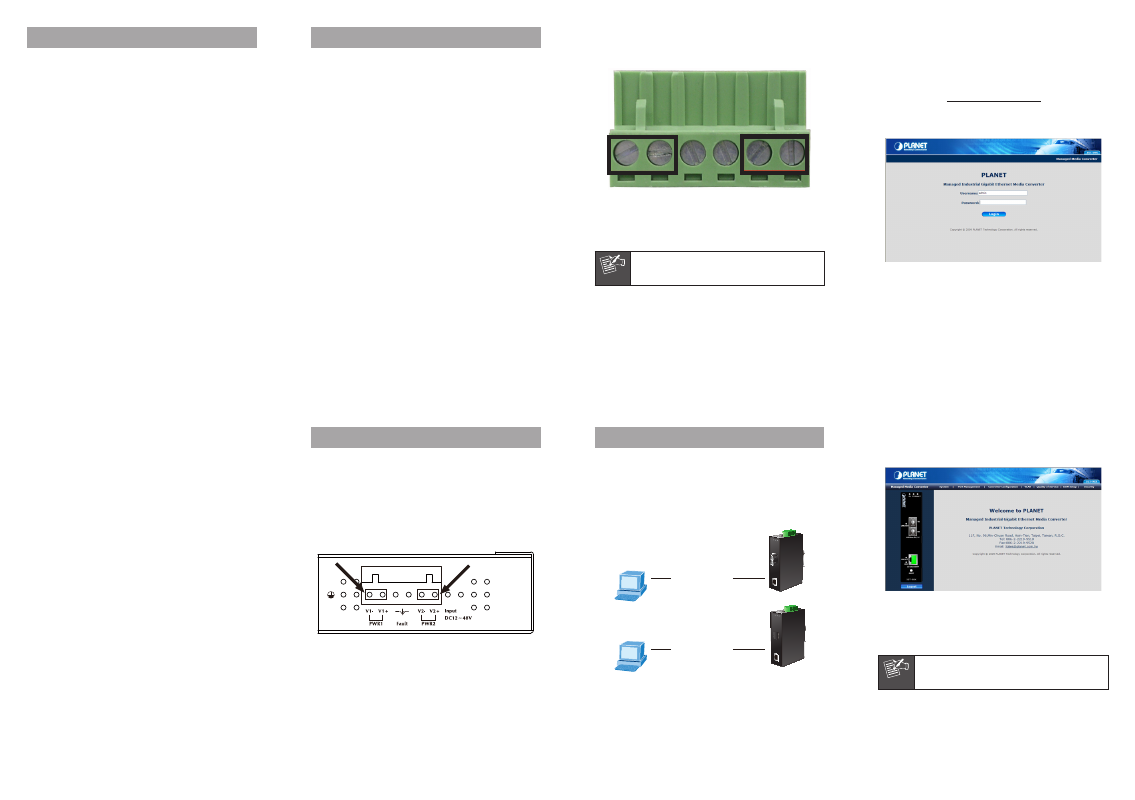
2. Tighten the wire-clamp screws for preventing the wires
from loosing. Figure 2 shows PWR1 and PWR2 pin of the
terminal block.
1
2
3
4
5
6
Power 1
Fault
Power 2
–
+
–
+
Figure 2 PWR1 & PWR2 pin of terminal block.
Note
The wire gauge for the terminal block should be
in the range between 12 ~ 24 AWG.
Upon open the box of the Industrial Managed Media
Converter and carefully unpack it. The box should contain
the following items:
u The Industrial Managed Media Converter x 1
u This Quick Installation Guide x 1
u User’s Manual CD x 1
u Wall Mount Kit x 1
u DIN Rail Kit x 1
If any item is found missing or damaged, please contact
your local reseller for replacement.
3. Wiring the Power Inputs
The 6-contact terminal block connector on the top panel
of Industrial Managed Media Converter is used for two DC
redundant powers input. Please follow the steps below to
insert the power wire.
1. Insert positive / negative DC power wires into the
contacts 1 and 2 for POWER 1, or 5 and 6 for POWER
2. Figure 1 shows PWR1 and PWR2 of the Industrial
Managed Media Converter.
V1- V1+
V2- V2+
Figure 1 PWR1 & PWR2 of Industrial Managed Media Converter.
4. Start Web Management
The PLANET Industrial Managed Media Converter provides
a built-in browser interface. You can manage the Industrial
Managed Media Converter remotely by having a remote
host with Web browser, such as Microsoft Internet Explorer,
Netscape Navigator or Mozilla Firefox.
PC / Workstation
with
IE or Netscape
Browser
IGT-902 / IGT-902S
IGT-905A
RJ-45 UTP Cable
RJ-45 UTP Cable
The following shows how to startup the Web Management
of the Industrial Managed Media Converter, please note the
Industrial Managed Media Converter is configured through
an Ethernet connection, make sure the manager PC must be
set on the same IP subnet address, for example, the default
After entering the password (default user name and
password is “admin”) in login screen (Figure 1 appears).
The Web main screen appears as Figure 4.
Figure 4. Web Main Screen of IGT-90x
Now, you can use the Web management interface
to continue the Industrial Managed Media Converter
management, please refer to the user manual for more.
Note
For security reason, please change and
memorize the new password after this first
setup.