PLANET IHD-200PR User Manual
Ihd-200 poe series, English italian german portuguese
IHD-200 PoE Series
Quick Guide
PLANET Technology Corporation
Tel: 886-2-2219-9518
Fax: 886-2-2219-9528
Email: [email protected]
www.planet.com.tw
11F., No.96, Minquan Rd., Xindian Dist., New Taipei City 231, Taiwan (R.O.C.)
PLANET reserves the right to change specifications without prior notice. All brand names and trademarks are property of
their respective owners. Copyright © 2013 PLANET Technology Corp. All rights reserved.
2341-K20080-000
Quick Installation Guide (English / Italian / German / Portuguese)
Further Configuration
For detail configuration, please check user’s manual on the bundled CD.
If you have any other questions, please contact the dealer where you purchased this product or you can contact PLANET directly at the following email address: [email protected]
VERIFY THE CONTENTS INSIDE PACKAGE BOX
The package should contain the items plus IHD-200PT/IHD-200PR. If any item is missing or damaged, please contact the seller immediately.
● Quick Installation Guide
● CD-ROM
● RJ-45 Cable
● Vesa Mounting Bracket
● Screws
● Foot Pad
● Plastic Screw Driver
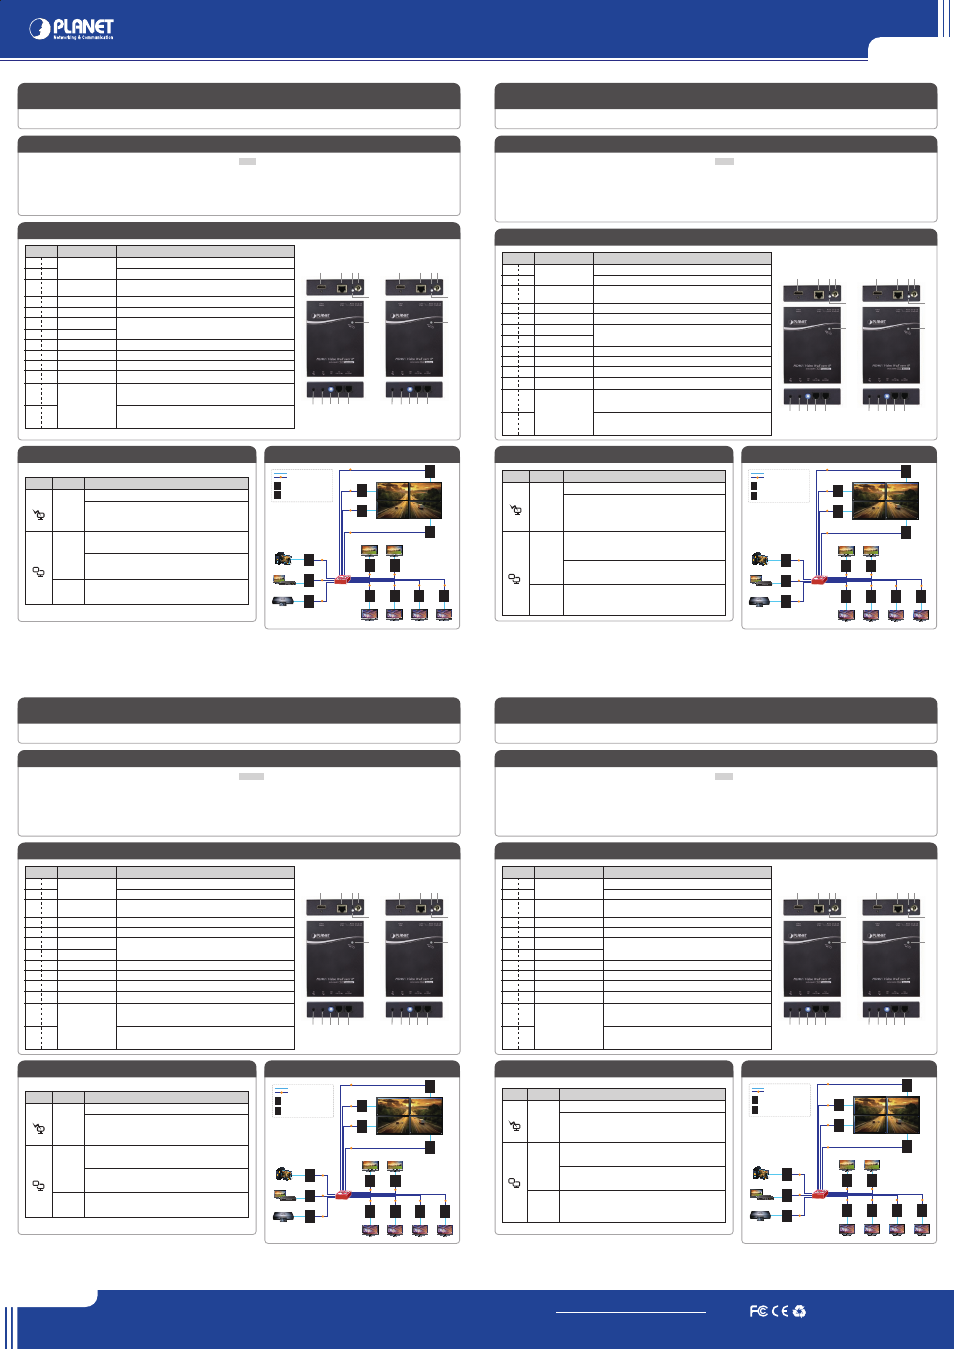
INSTALLATION
PRODUCT OUTLOOK & FUNCTION
Function
Connect to the HDMI source
Connect to the HDMI monitor
Connect to an LAN Switch (IGMP supported Gigabit Ethernet Switch
recommended)
System reset
DC power input
Refer to Push Button Control section
Channel ID Select
System control (reserved)
Data communication (reserved)
Flashing: Connected to Ethernet network
Blue: Link OK
Green: Video Unlink
Flash Blue + Green: Linking and searching video source
Blue: Link OK
Red: Video Unlink
Flash Blue + Red: Linking and searching video source
1. Connect the video source to the Transmitter / Sender (IHD-200PT) Unit.
2. Connect the monitor to the Receiver (IHD-200PR) Unit.
3. Use CAT5/5e cables (EIA / TIA 568B industry standard compliant) for connection
between Transmitter / Receiver and the PoE Switch.
4. Set an identical ID number on Rotary DIP Switch for all Units of the same group.
✳
Please refer the CD (User’s Manual) for more about the device setting.
PUSH BUTTON CONTROL
CONNECTION PATTERN
English
Italian
German
Portuguese
Unit
IHD-200PT
&
IHD-200PR
IHD-200PT
&
IHD-200PR
IHD-200PR
Description
Video Connector
RJ-45 Jack
Reset Button
Power Supply
B2 Push Button
B1 Push Button
Rotary DIP Switch
Control Port
AUX/EXT Port
Network Status LED
Link / Power LED
Note:
● It is suggested using the proper PoE Switch to ensure optimal transmission quality.
● If users encounter no screen display in computer connection:
1. Make sure the device cables are correctly and firmly attached.
2. Set your display device’s (TV, monitor, etc.) input source as HDMI.
3. Check the PC BIOS configuration about the video output setting.
4. Connect your computer to the HDMI Display DIRECTLY to check if the video signal gets
through.
Function
■ Press once – Link / Unlink video
■ Factory Default Setting with steps below: Power off the unit →
Press and hold the button → Power on the unit → Release the
button after 17 sec. (the Power / Link LED flashes green/red &
blue) → Re-power the unit
■ Press for 1 sec. - Select Graphic Mode or Video Mode (also
deploy to all the IHD-200PT and IHD-200PR of the same
channel) (Default: Graphic Mode)
■ Press for 3 sec. – Enter Anti-Dither Adjustment Mode: Level 1 /
Level 2 / Off (also deploy to all the IHD-200PT and IHD-200PR of
the same channel) (Default: Off)
■ EDID Copy with steps below: Power off the unit → Press and
hold the button → Power on the unit → Release the button after
12 sec. (the Network Status LED flashes yellow)
V
G
Button
B1
B2
T1
T10
T11
T5 T6 T7 T8 T9
T2
T3
T4
Transmitter
(IHD-200PT)
R1
R2
R3
R4
R10
R11
R5 R6 R7 R8 R9
Receiver
(IHD-200PR)
Position
T1
R1
T2
R2
T3
R3
T4
R4
T5
R5
T6
R6
T7
R7
T8
R8
T9
R9
T10
R10
T11
R11
Weitere Konfiguration
Detaillierte Hinweise zur Konfiguration entnehmen Sie bitte der Bedienungsanleitung auf der mitgelieferten CD.
Falls Sie weitere Fragen haben, wenden Sie sich bitte an den Händler, bei dem Sie dieses Produkt erworben haben, oder unter folgender eMail-Adresse direkt an PLANET:
[email protected]
Inhalte des Lieferkartons prüfen
Der Karton sollte die folgenden Artikel enthalten plus IHD-200PT/IHD-200PR. Falls etwas fehlen oder beschädigt sein sollte, wenden Sie sich bitte umgehend an Ihren Händler.
● Schnellinstallationsanleitung
● CD-ROM
● RJ-45 Kabel
● Vesa-befestigungswinkel
● Schrauben
● Fusspolster
● Plastik-Schraubenzieher
INSTALLATION
PRODUKT OUTLOOK UND FUNKTION
Funktion
An die HDMI-Quelle anschließen
An den HDMI-Monitor anschließen
An einen LAN-Switch (IGMP-unterstützter Gigabit Ethernet-Switch
empfohlen) anschließen
System zurückstellen
DC-Spannungsversorgung
Siehe Abschnitt Drucktastenbetätigung
Kanalnummer auswählen
Systemsteuerung (reserviert)
Datenkommunikation (reserviert)
FBlinken: Ans Ethernet-Netzwerk angeschlossen
Blau: Verbindung OK
Grün: Video getrennt
Blinken blau + grün: Verbindungsaufbau und Suche nach Videoquelle
Blau: Verbindung OK
Rot: Video getrennt
Blinken blau + rot: Verbindungsaufbau und Suche nach Videoquelle
1. Schließen Sie die Videoquelle an das Übertragungs- /Sendegerät (IHD-200PT) an.
2. Schließen Sie den Monitor an den Receiver (IHD-200PR) an.
3. Verbinden Sie Übertragungsgerät / Receiver und den Ethernet-Switch mit den CAT5/5e-
Kabeln (EIA / TIA 568B industrienormkonform).
4. Legen Sie für alle Geräte derselben Gruppe dieselbe ID-Nummer am DIP-Drehschalter fest.
✳
Weitere Informationen zur Geräteeinstellung entnehmen Sie bitte der CD
(Benutzerhandbuch).
DRUCKTASTENBETÄTIGUNG
CONNECTION PATTERN
Gerät
IHD-200PT
&
IHD-200PR
IHD-200PT
&
IHD-200PR
IHD-200PR
Beschreibung
Videoanschluss
RJ-45 Buchse
Reset-Taste
Stromversorgung
B2-Drucktaste
B1-Drucktaste
DIP-Drehschalter
Steuerungsanschluss
AUX/EXT-Anschluss
Netzwerkstatus-LED
Link- / Power-LED
Hinweis:
● Es wird angeregt, einen geeigneten Ethernet-Switch zu nutzen, um eine optimale
Übertragungsqualität sicherzustellen.
● Wenn die Benutzer keine Bildschirmanzeige bei der Computerverbindung haben:
1. Stellen Sie sicher, dass die Gerätekabel richtig und fest befestigt sind.
2. Stellen Sie die Eingangsquelle Ihres Anzeigegeräts (Fernseher, Monitor usw.) auf HDMI ein.
3. Überprüfen Sie die BIOS-Konfiguration des PCs bezüglich der Einstellung Videoausgang.
4. Schließen Sie Ihren Computer DIREKT an das HDMI-Display an um zu sehen, ob das Signal
durchkommt.
Funktion
■ Einmal drücken – Video verbinden / trennen
■ Werkseinstellung mit Schritten unten: Gerät ausschalten →
Taste drücken und halten → Gerät einschalten → Taste nach 17
Sek. loslassen (die Power- / Link-LED blinkt grün/Rot und blau)
→ Gerät erneut einschalten
■ 1 Sek. lang drücken - Grafikmodus oder Videomodus auswählen
(auch auf alle IHD-200PT und IHD-200PR desselben Kanals
anwenden) (Standard: Grafikmodus)
■ 3 Sek. lang drücken – In den Anti-Dither-Anpassungsmodus
gehen: Level 1 / Level 2 / Aus (auch auf alle IHD-200PT und
IHD-200PR desselben Kanals anwenden) (Standard: Aus)
■ EDID Copy mit Schritten unten: Gerät ausschalten → Taste
drücken und halten → Gerät einschalten → Taste nach 12 Sek.
loslassen (die Netzwerkstatus-LED blinkt gelb)
V
G
Taste
B1
B2
T1
T10
T11
T5 T6 T7 T8 T9
T2
T3
T4
Übertragungsgerät
(IHD-200PT)
R1
R2
R3
R4
R10
R11
R5 R6 R7 R8 R9
Receiver
(IHD-200PR)
Position
T1
R1
T2
R2
T3
R3
T4
R4
T5
R5
T6
R6
T7
R7
T8
R8
T9
R9
T10
R10
T11
R11
Mais Configurações
Para detalhes de configuração, veja o manual do usuário no CD integrado.
Caso você tenha outras dpuvidas, por favor, entre em contato com o revendedor onde você adquiriu este produto ou entre em contato diretamente com a PLANET no seguinte endereço de
email: [email protected]
VERIFIQUE O CONTEÚDO DENTRO DA CAIXA DA EMBALAGEM
A embalagem deve conter os itens mais IHD-200PT/IHD-200PR. Se qualquer item estiver faltando ou danificado, entre em contato com o vendedor imediatamente.
● Guia de Instalação Rápida
● CD-ROM
● RJ-45 Cable
● Estrutura De Montagem Vesa
● Parafusos
● Tabuleiro De Comida
● Chave de Fenda de Plástic
NSTALAÇÃO
DESCRIÇÃO DO PRODUTO & FUNÇÃO
Função
Ligue à fonte HDMI
Ligue ao monitor HDMI
Ligue a um Interruptor LAN (recomendamos um Interruptor Gigabit
Ethernet que suporte IGMP)
Reinício do sistema
Entrada de energia DC
Veja a Secção do Botão de Controlo
Seleccione a ID do Canal
Controlo de sistema (reservado)
Comunicação de dados (reservado)
A piscar: Ligado à rede Ethernet
Azul: Ligação OK
Verde: Vídeo Desligado
Azul + Verde a piscar: A ligar e à procura da fonte de vídeo
Azul: Ligação OK
Vermelho: Vídeo Desligado
Azul + Vermelho a piscar: A ligar e à procura da fonte de vide
1. Ligue a fonte de vídeo à unidade Transmissora / Emissora (IHD-200PT).
2. Ligue o monitor à unidade Receptora (IHD-200PR).
3. Utilize cabos CAT5/5e (EIA / TIA 568B de acordo com os padrões da indústria) para
ligação entre o Transmissor / Receptor e o Interruptor Ethernet.
4. Defina um número de ID idêntico no Interruptor Alternativo para todas as Unidades do
mesmo grupo.
✳
Veja por favor o CD (Manual de Utilização) para saber mais sobre a definição do
dispositivo.
BOTÃO DE CONTROLO
PADRÃO DE LIGAÇÃO
Unidade
IHD-200PT
&
IHD-200PR
IHD-200PT
&
IHD-200PR
IHD-200PR
Descrição
Ligação de Vídeo
Tomada RJ-45
Botão de Reinício
Fornecimento de Energia
Botão B2
Botão B1
Interruptor Alternativo
Porto de controlo
Porto AUX/EXT
Estado de Rede LED
Link- / Power-LED
Nota:
● Sugerimos que utilize um Interruptor Ethernet adequado para assegurar óptima qualidade
de transmissão.
● Se os utilizadores não encontrarem ecrã de apresentação no computador de ligação:
1. Certifique que os cabos de ligação estão correctamente e firmemente ligados.
2. Defina a apresentação do seu dispositivo (TV, monitor, etc.) na entrada como o HDMI.
3. Verifique a configuração PC BIOS acerca da definição do vídeo de saída.
4. Ligue o seu computador à Apresentação HDMI DIRECTAMENTE para verificar se o sinal de
vídeo é transmitido.
Função
■ Pressione uma vez – Ligar / Desligar vídeo
■ Definições Padrão de Fabrico com os seguintes passos:
Desligue a unidade → Pressione e mantenha o botão → Ligue a
unidade → Liberte o botão ao fim de 17 seg. (a Energia / O LED
de ligação pisca verde/
Vermelho & azul) → Volte a ligar a unidade
■ Pressione durante 1 seg. – Seleccione o Modo Gráfico ou Modo
de Vídeo (ligue também a todos os IHD-200PT e IHD-200PR do
mesmo canal) (Padrão: Modo Gráfico)
■ Pressione durante 3 seg. – Entre no Modo de Ajustamento Anti
Falha: Nível 1 / Nível 2 / Desligado (ligue também a todos os
IHD-200PT e IHD-200PR do mesmo canal) (Padrão: Desligado)
■ Cópia EDID com os seguintes passos: Desligue a unidade →
Pressione e mantenha o botão → Ligue a unidade → Liberte o
botão ao fim de 12 seg. (O LED de Estado da Rede pisca
amarelo)
V
G
Botão
B1
B2
T1
T10
T11
T5 T6 T7 T8 T9
T2
T3
T4
Transmissor
(IHD-200PT)
R1
R2
R3
R4
R10
R11
R5 R6 R7 R8 R9
Receptor
(IHD-200PR)
Posição
T1
R1
T2
R2
T3
R3
T4
R4
T5
R5
T6
R6
T7
R7
T8
R8
T9
R9
T10
R10
T11
R11
Ulteriori configurazioni
Per maggiori dettagli sulla configurazione, fare riferimento al manuale fornito sul CD presente nella confezione.
Se dopo aver visionato il manuale i dubbi persistono contattare il distributore, il rivenditore locale dove è stato acquistato il prodotto oppure inviare una email al seguente indirizzo:
[email protected]
VERIFICARE IL CONTENUTO DELLA CONFEZIONE
La confezione dovrebbe contenere il prodotto della IHD-200PT/IHD-200PR. Se uno dei seguenti accessori è mancante o danneggiato contattare il rivenditore.
● Guida Rapida
● CD-ROM
● Cavo RJ-45
● Supporto A Parete Vesa
● Viti
● Piedini
● Driver-vite di plastica
INSTALLAZIONE
PANORAMICA DEL PRODOTTO & FUNZIONI
Funzione
Collegare alla sorgente HDMI
Collegare al monitor HDMI
Collegare ad uno Switch di rete LAN (raccomandato uno Switch
Ethernet con supporto IGMP e Gigabit)
Riporta il dispositivo ai valori di fabbrica
Collegamento all’alimentatore
Riferirsi alla sezione tasti di controllo
Selezione del canale video
System control (riservato)
Data communication (riservato)
Lampeggiante: connesso alle rete LAN
Blu: Link OK
Verde: senza collegamento Video
Lampeggiante Blu + Verde: in collegamento e ricerca la sorgente video
Blue: Link OK
Rosso: senza collegamento Video
Lampeggiante Blu + Rosso: in collegamento e ricerca la sorgente video
1. Collegare il video al Transmitter / Sender dell’unità (IHD-200PT).
2. Collegare il monitor al Receiver dell’unità (IHD-200PR).
3. Usare cavi di CAT5/5e (compatibili allo standard EIA / TIA 568B) per effettuare la
connessione tra il Transmitter / Receiver e lo Switch Ethernet.
4. Configurare lo stesso numero di ID sia sul DIP Switch a rotellina che per tutte le unità
dello stesso gruppo.
✳ per ulteriori informazioni sulla configurazione dell’unità fare riferimento al manuale
utente presente sul CD fornito nella confezione.
TASTI DI CONTROLLO
SCHEMA DI COLLEGAMENTO
Dispositivo
IHD-200PT
&
IHD-200PR
IHD-200PT
&
IHD-200PR
IHD-200PR
Descrizione
Connettore Video
RJ-45 Jack
Tasto Reset
Alimentazione
Tasto B2
Tasto B1
Switch a rotellina
Porta di Controllo
Porta AUX/EXT
LED stato Rete
Link / LED Power
Nota:
● Utilizzare uno Switch Ethernet appropriato per assicurare una qualità di trasmissione
ottimale.
● Se dopo la connessione non appare nessuna schermata:
1. Assicurarsi che I cavi siano collegati correttamente ed i connettori bloccati.
2. Configurare l’unità sorgente in modalità HDMI (TV, monitor, etc.).
3. Controllare la configurazione BIOS del PC per quanto riguarda i parametri uscita video.
4. Collegare il computer al alla porta HDMI del Display DIRETTAMENTE per controllare se il
segnale video è presente.
Funzione
■ Premuto Una Volta – Link / Unlink video
■ Riporta ai valori di fabbrica effettuare le seguenti operazioni:
spegnere il dispositivo → tenere premuto il tasto → accendere il
dispositivo → Rilasciare il tasto dopo 17 sec. (il LED Power /
Link lampeggerà verde/Rosso
& blu) → alimentare il dispositivo
nuovamente
■ Premere per 1 sec. – Selezionare la modalità Grafica o la
modalità Video (impostare tutti i dispositivi IHD-200PT e
IHD-200PR sullo stesso canale) (impostazione iniziale: Graphic
Mode)
■ Premere per 3 sec. – inserire Anti-Dither Adjustment Mode:
Livello 1 / Livello 2 / Off (impostare tutti i dispositivi IHD-200PT e
IHD-200PR sullo stesso canale) (impostazione iniziale: Off)
■ EDID Copy. Effettuare le seguenti operazioni: spegnere il
dispositivo → tenere premuto il tasto → accendere il dispositivo
→ rilasciare il tasto dopo 12 sec. (il LED di stato rete
lampeggerà giallo)
V
G
Tasto
B1
B2
T1
T10
T11
T5 T6 T7 T8 T9
T2
T3
T4
Transmettitore
(IHD-200PT)
R1
R2
R3
R4
R10
R11
R5 R6 R7 R8 R9
Ricevitore
(IHD-200PR)
Riferimento
T1
R1
T2
R2
T3
R3
T4
R4
T5
R5
T6
R6
T7
R7
T8
R8
T9
R9
T10
R10
T11
R11
Video Source
Video Wall
PC
DVD Player
Video Extender
Video Extender
Rx
Rx
Rx
Rx
Rx
Rx
Rx
Rx
Rx
Rx
Tx
Tx
Tx
Blu-ray Player
PoE
PoE
PoE
PoE
PoE
PoE
PoE
PoE
PoE
PoE
PoE
PoE
PoE
HDMI
1000Base-T UTP with PoE
Rx
IHD-200PR Receiver
Tx
IHD-200PT Transmitter
PoE
PoE Switch
Video Source
Video Wall
PC
DVD Player
Video Extender
Video Extender
Rx
Rx
Rx
Rx
Rx
Rx
Rx
Rx
Rx
Rx
Tx
Tx
Tx
Blu-ray Player
PoE
PoE
PoE
PoE
PoE
PoE
PoE
PoE
PoE
PoE
PoE
PoE
PoE
HDMI
1000Base-T UTP with PoE
Rx
IHD-200PR Receiver
Tx
IHD-200PT Transmitter
PoE
PoE Switch
Video Source
Video Wall
PC
DVD Player
Video Extender
Video Extender
Rx
Rx
Rx
Rx
Rx
Rx
Rx
Rx
Rx
Rx
Tx
Tx
Tx
Blu-ray Player
PoE
PoE
PoE
PoE
PoE
PoE
PoE
PoE
PoE
PoE
PoE
PoE
PoE
HDMI
1000Base-T UTP with PoE
Rx
IHD-200PR Receiver
Tx
IHD-200PT Transmitter
PoE
PoE Switch
Video Source
Video Wall
PC
DVD Player
Video Extender
Video Extender
Rx
Rx
Rx
Rx
Rx
Rx
Rx
Rx
Rx
Rx
Tx
Tx
Tx
Blu-ray Player
PoE
PoE
PoE
PoE
PoE
PoE
PoE
PoE
PoE
PoE
PoE
PoE
PoE
HDMI
1000Base-T UTP with PoE
Rx
IHD-200PR Receiver
Tx
IHD-200PT Transmitter
PoE
PoE Switch