Sony SEL24240 24-240mm f/3.5-6.3 FE User Manual
Interchangeable lens objectif interchangeable, E-mount
–1
(1)
(2)
–2
24
240
240
24
FE
3.5
3.5
FE
6.3
100
70
50
35
150
150
2
1
3 4 5
6
7
24
35
50
70
100
150
240
24
FE 3.5 6.3
24
35
50
70
100
150
240
24
FE 3.5 6.3
E
A
35mm
35mm
APS-C
http://www.sony.co.jp/DSLR/support/
ˎ
ˎ
ˎ
ˎ
ˎ
ˎ
ˎ
ˎ
1
ˎ
ˎ
2
1
2
3
4
5
6
*
7
*
–
1
•
1
2
2
2
2
•
•
–
ˎ
ˎ
ˎ
ˎ
3
DMF
FE 24-240mm F3.5-6.3 OSS
(SEL24240)
mm
24-240
*
1
mm
36-360
12-17
1*
2
84°-10°
2*
2
61°-6°50’
*
3
m
0.5-0.8
0.27
F22-F40
mm
72
mm
80.5 × 118.5
g
780
*
1
APS-C
35mm
*
2
1 35mm
2 APS-C
*
3
ˎ
ˎ
1
1
1
1
This instruction manual explains how to use
lenses. Notes on use are found in the separate
“Precautions before using”. Be sure to read both
documents before using your lens.
This lens is designed for Sony α camera system
E-mount cameras. You cannot use it on A-mount
cameras.
This lens is compatible with the range of a 35mm
format image sensor.
A camera equipped with a 35mm format image
sensor can be set to shoot at APS-C size.
For details on how to set your camera, refer to its
instruction manual.
For further information on compatibility, visit the web
site of Sony in your area, or consult your dealer of
Sony or local authorized service facility of Sony.
Notes on Use
ˎ
When carrying a camera with the lens attached, always
firmly hold both the camera and the lens.
ˎ
Do not hold by the part of the lens that protrudes when
zooming.
ˎ
This lens is not water-proof, although designed with
dust-proofness and splash-proofness in mind. If using
in the rain etc., keep water drops away from the lens.
Precautions on using a flash
ˎ
When using a flash, always remove the lens hood and
shoot at least 1 m (3.3 feet) away from your subject.
With certain combinations of lens and flash, the lens
may partially block the light of the flash, resulting in a
shadow at the bottom of the picture.
Vignetting
ˎ
When using the lens, the corners of the screen become
darker than the center. To reduce this phenomena
(called vignetting), close the aperture by 1 to 2 stops.
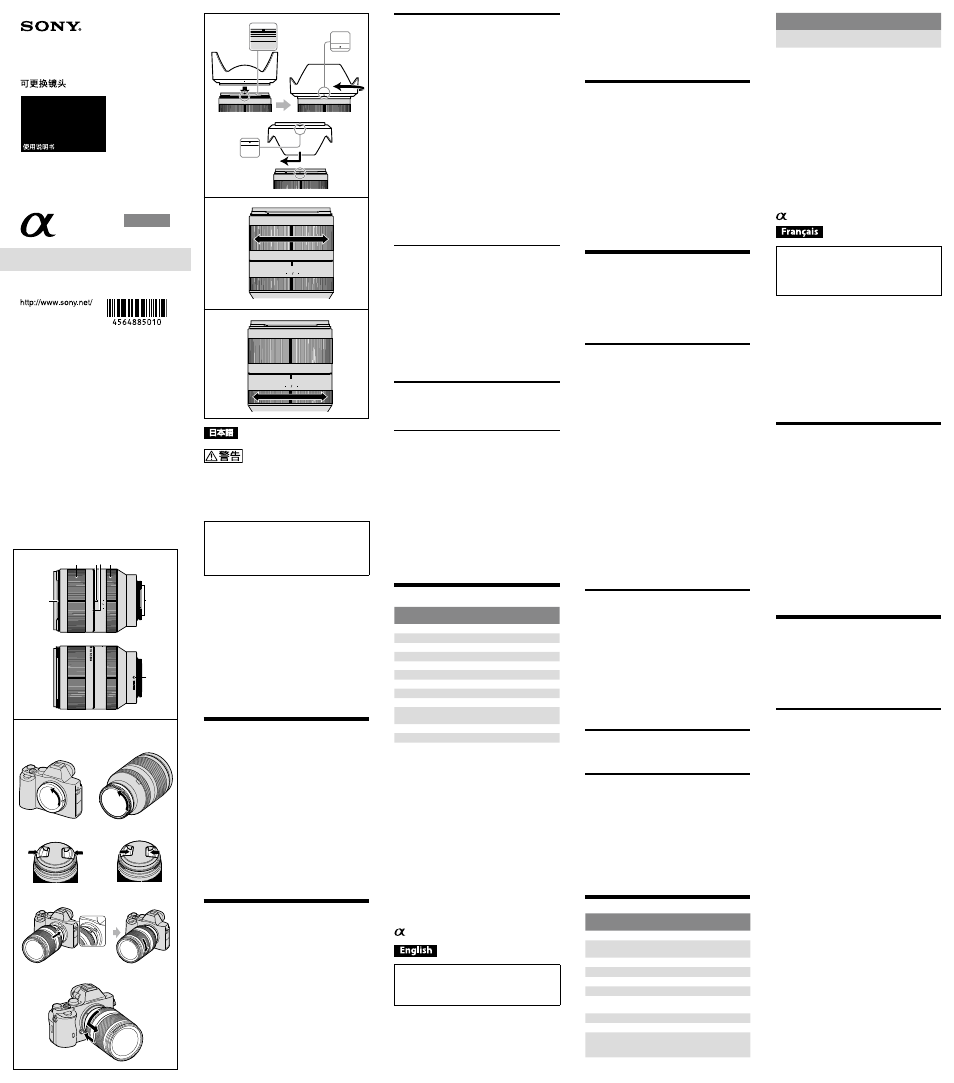
Identifying the Parts
1 Lens hood index
2 Zooming ring
3 Focal-length index
4 Focal-length scale
5 Focusing ring
6 Lens contacts*
7 Mounting index
* Do not touch the lens contacts.
Attaching and Detaching the
Lens
To attach the lens
(See illustration –.)
1
Remove the rear and front lens caps and
the camera body cap.
ˎ
ˎ You can attach/detach the front lens cap in two
ways, (1) and (2). When you attach/detach the lens
cap with the lens hood attached, use method (2).
2
Align the white index on the lens barrel
with the white index on the camera
(mounting index), then insert the lens
into the camera mount and rotate it
clockwise until it locks.
ˎ
ˎ Do not press the lens release button on the
camera when mounting the lens.
ˎ
ˎ Do not mount the lens at an angle.
To remove the lens
(See illustration –.)
While holding down the lens release
button on the camera, rotate the lens
counterclockwise until it stops, then detach
the lens.
Attaching the Lens Hood
It is recommended that you use a lens hood to
reduce flare and ensure maximum image quality.
Align the red line on the lens hood with the
red line on the lens (lens hood index), then
insert the lens hood into the lens mount and
rotate it clockwise until it clicks into place
and the red dot on the lens hood is aligned
with the red line on the lens.
ˎ
When using a built-in camera flash or a flash supplied
with the camera, remove the lens hood to avoid
blocking the flash light.
ˎ
When storing, fit the lens hood onto the lens
backwards.
Zooming
Rotate the zooming ring to the desired focal
length.
Focusing
There are three ways to focus.
ˎ
ˎ
Auto focus
The camera focuses automatically.
ˎ
ˎ
DMF (Direct manual focus)
After the camera focuses in auto focus, you can make
a fine adjustment manually.
ˎ
ˎ
Manual focus
You focus manually.
For details on mode settings, refer to the instruction
manual supplied with the camera.
Specifications
Product name
(Model name)
FE 24-240mm F3.5-6.3 OSS
(SEL24240)
Focal length (mm)
24-240
35mm equivalent focal
length*
1
(mm)
36-360
Lens groups-elements
12-17
Angle of view 1*
2
84°-10°
Angle of view 2*
2
61°-6°50’
Minimum focus*
3
(m (feet)) 0.5-0.8 (1.64-2.63)
Maximum magnification
(X)
0.27
Minimum aperture
f/22-f/40
Filter diameter (mm)
72
Dimensions (maximum
diameter × height)
(approx., mm (in.))
80.5 Ч 118.5
(3 1/4 Ч 4 3/4)
Mass (approx., g (oz))
780 (27.6)
4-564-885-
01(1)
©2015 Sony Corporation
SEL24240
Interchangeable Lens
Objectif interchangeable
Operating Instructions
Mode d’emploi
Manual de
instrucciones
FE 24-240mm F3.5-6.3 OSS
E-mount
Printed in China
Product name
(Model name)
FE 24-240mm F3.5-6.3 OSS
(SEL24240)
Shake compensation
function
Yes
*
1
This is the equivalent focal length in 35mm format
when mounted on an Interchangeable Lens Digital
Camera equipped with an APS-C sized image sensor.
*
2
Angle of view 1 is the value for 35mm cameras, and
angle of view 2 is the value for Interchangeable Lens
Digital Cameras equipped with an APS-C sized image
sensor.
*
3
Minimum focus is the distance from the image sensor
to the subject.
ˎ
Depending on the lens mechanism, the focal length
may change with any change in shooting distance. The
focal lengths given above assume the lens is focused
at infinity.
Included items
Lens (1), Front lens cap (1), Rear lens cap (1),
Lens hood (1), Set of printed documentation
Design and specifications are subject to change
without notice.
is a trademark of Sony Corporation.
Cette notice explique comment se servir des
objectifs. Les remarques sur l’emploi se trouvent
dans les « Précautions avant toute utilisation »
séparées. Veuillez lire les deux documents avant
d’utiliser votre objectif.
Votre objectif est conçu pour les appareils photo à
monture E de type Sony α. Il ne peut pas être utilisé
pour les appareils photo à monture A.
Cet objectif est compatible avec la plage des
capteurs d’image de format 35 mm.
Un appareil photo équipé d’un capteur d’image de
format 35 mm peut être réglé pour la prise de vue en
APS-C.
Pour les détails sur la manière de régler l’appareil
photo, reportez-vous à son mode d’emploi.
Pour plus d’informations sur la compatibilité, consultez
le site de Sony de votre pays, ou adressez-vous à un
revendeur Sony ou à un service après-vente agréé Sony.
Remarques sur l’emploi
ˎ
Lorsque vous portez un appareil photo avec l’objectif
dessus, tenez toujours fermement l’appareil photo et
l’objectif.
ˎ
Ne tenez pas l’appareil photo par la partie de l’objectif
qui ressort lors d’un zoom.
ˎ
Cet objectif n’est pas étanche à l’eau bien qu’il soit
conçu pour résister à la poussière et aux éclaboussures.
Si vous l’utilisez sous la pluie, etc. veillez à ce que de
l’eau ne tombe pas dessus.
Précautions concernant l’emploi d’un flash
ˎ
Lorsque vous utilisez un flash, retirez toujours le
parasoleil et prenez vos photos à au moins 1 m
(3,3 pieds) du sujet. Associé à certains types de flash,
l’objectif peut bloquer partiellement la lumière du flash
et produire un ombre au bas de l’image.
Vignetage
ˎ
Lorsque l’objectif est utilisé, les coins de l’écran
deviennent plus sombres que le centre. Pour réduire ce
phénomène (appelé vignetage), fermez l’ouverture de
1 ou 2 crans.
Identification des éléments
1 Repère de parasoleil
2 Bague de zoom
3 Repère de focale
4 Échelle de focale
5 Bague de mise au point
6 Contacts d’objectif *
7 Repère de montage
* Ne touchez pas les contacts d’objectif.
Pose et dépose de l’objectif
Pour poser l’objectif
(Voir l’illustration
–.)
1
Déposez les capuchons d’objectif avant
et arrière et le capuchon de l’appareil
photo.
ˎ
ˎ Vous pouvez poser et déposer les capuchons
d’objectif avant de deux façons, (1) et (2). Si vous
posez/déposez le capuchon d’objectif avec le
parasoleil, utilisez la méthode (2).
2
Alignez le repère blanc du barillet
d’objectif sur le repère blanc de l’appareil
photo (repère de montage), puis posez
l’objectif sur la monture de l’appareil
photo et tournez-le dans le sens horaire
de sorte qu’il s’encliquette.
ˎ
ˎ N’appuyez pas sur le bouton de libération de
l’objectif sur l’appareil photo lorsque vous posez
l’objectif.
ˎ
ˎ Ne posez pas l’objectif de biais.
Pour déposer l’objectif
(Voir l’illustration
–.)
Tout en appuyant sur le bouton de libération
de l’objectif sur l’appareil photo, tournez
l’objectif dans le sens antihoraire jusqu’à
l’arrêt, puis déposez l’objectif.
(Suite à la page arrière)