Panel descriptions, Front panel, Turning the power on/off – Roland JC-40 Jazz Chorus 40W 2x10 Guitar Amplifier User Manual
Page 4
4
Panel Descriptions
Front Panel
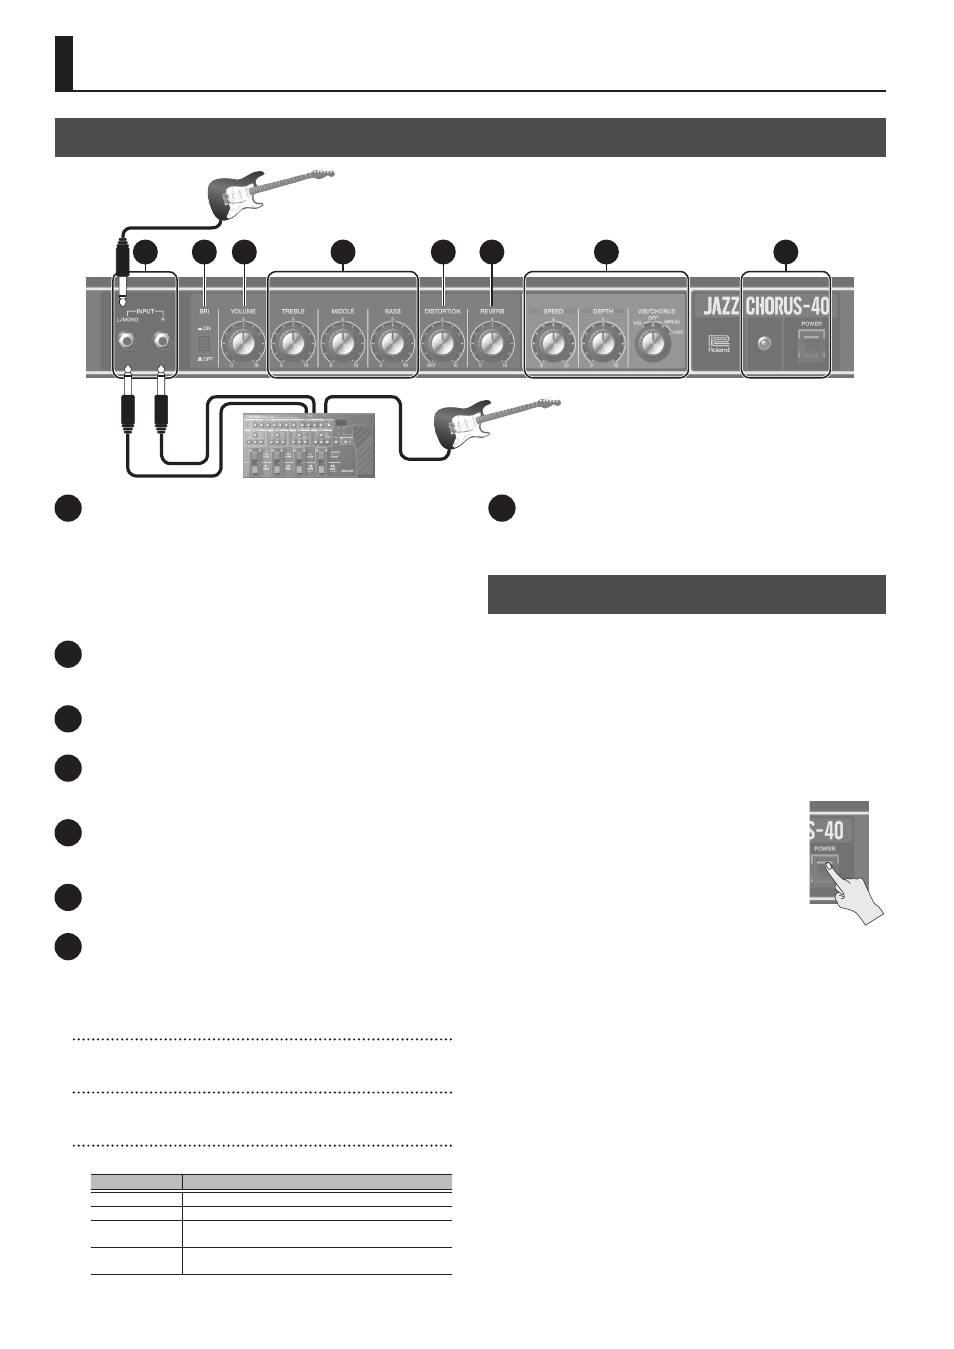
1
INPUT jacks
Connect your electric guitar or effect unit here. If you’re connecting
a guitar directly, or a monaural effect unit, connect it to the L/
MONO jack. If you connect a stereo-output effect unit to these
jacks, you’ll obtain a stereo effect with the left and right speakers of
the JC-40.
* If you connect your guitar to the R jack, the sound is heard only
from the right speaker.
2
[BRI] (Bright) switch
Brightens the mid- and high-frequency range, making the sound
more crisp.
3
[VOLUME] knob
Adjusts the overall volume.
4
[TREBLE] / [MIDDLE] / [BASS] knobs
Adjust the volume of the high-, mid-, and low-frequency ranges
respectively.
5
[DISTORTION] knob
Adjusts the amount of distortion. If this is set to “OFF,” distortion is
not applied.
6
[REVERB] knob
Adjusts the reverb depth.
7
VIB/CHORUS
The JC-40 features dimensional space chorus and vibrato effects.
* The [SPEED] knob and [DEPTH] knob have no effect when the
[VIB/CHORUS] switch it set to “FIXED.”
[SPEED] knob
Adjusts the modulation speed of chorus and vibrato.
[DEPTH] knob
Adjusts the modulation depth of chorus and vibrato.
[VIB/CHORUS] switch
Switches between chorus and vibrato.
Value
Explanation
VIB (vibrato)
Turns vibrato on.
OFF
Turns vibrato/chorus off.
MANUAL (chorus)
Turns chorus on. Use the [SPEED] knob and [DEPTH]
knob to adjust the speed and depth of the modulation.
FIXED (chorus)
Turns chorus on. The [SPEED] knob and [DEPTH] knob
have no effect; their settings are fixed.
8
[POWER] switch
Turns the power of the JC-40 on/off. When the power is on, the
indicator is lit.
Turning the Power On/Off
Once everything is properly connected, be sure to follow the
procedure below to turn on their power. If you turn on equipment
in the wrong order, you risk causing malfunction or equipment
failure.
1.
Make sure that the JC-40’s [VOLUME] knob and the
volume of the devices connected to the JC-40 are set to 0.
* Before connecting your instrument to the JC-40’s INPUT jacks,
set the [VOLUME] knob to the minimum setting (far left).
2.
Turn on the JC-40.
* Before turning the unit on/off, always be sure to
turn the volume down. Even with the volume
turned down, you might hear some sound when
switching the unit on/off. However, this is normal
and does not indicate a malfunction.
* This unit is equipped with a protection circuit.
A brief interval (a few seconds) after turning the
unit on is required before it will operate normally.
3.
Turn on the power of the connected devices.
4.
Adjust the volume levels for the devices.
Before switching off the power, lower the volume on each of the
devices in your system and then TURN OFF the devices in the
reverse order to which they were switched on.
* If you need to turn off the power completely, first turn off the
unit, then unplug the power cord from the power outlet. Refer
to “To completely turn off power to the unit, pull out the plug
1
2
3
5
6
8
7
L
R
4