Sony BRAVIA XR A90K 48" HDR 4K UHD OLED TV User Manual
Preparations, Shooting, Viewing
DSC-RX0M2
4-748-163-11(1)
Z:\CX64010(WJ)\JPGB\Compose\4748163111\4748163111DSCRX0M2UC2\01GB.indd
DTP data saved: 2018/12/14 15:17
PDF file created: 2018/12/14 15:18
Digital Still Camera
Startup Guide
4-748-163-
11
(1)
Preparations
Checking the supplied items
The number in parentheses indicates the number of pieces.
• Camera (1)
• Power cord (mains lead) (1) (supplied
in some countries/regions)
• Rechargeable battery pack NP-BJ1 (1)
• Micro USB cable (1)
• AC Adaptor (1)
The type of the AC Adaptor may differ
depending on the country/region.
• Wrist strap (1)
• Memory card protector (1)
• Startup Guide (this manual) (1)
• Reference Guide (1)
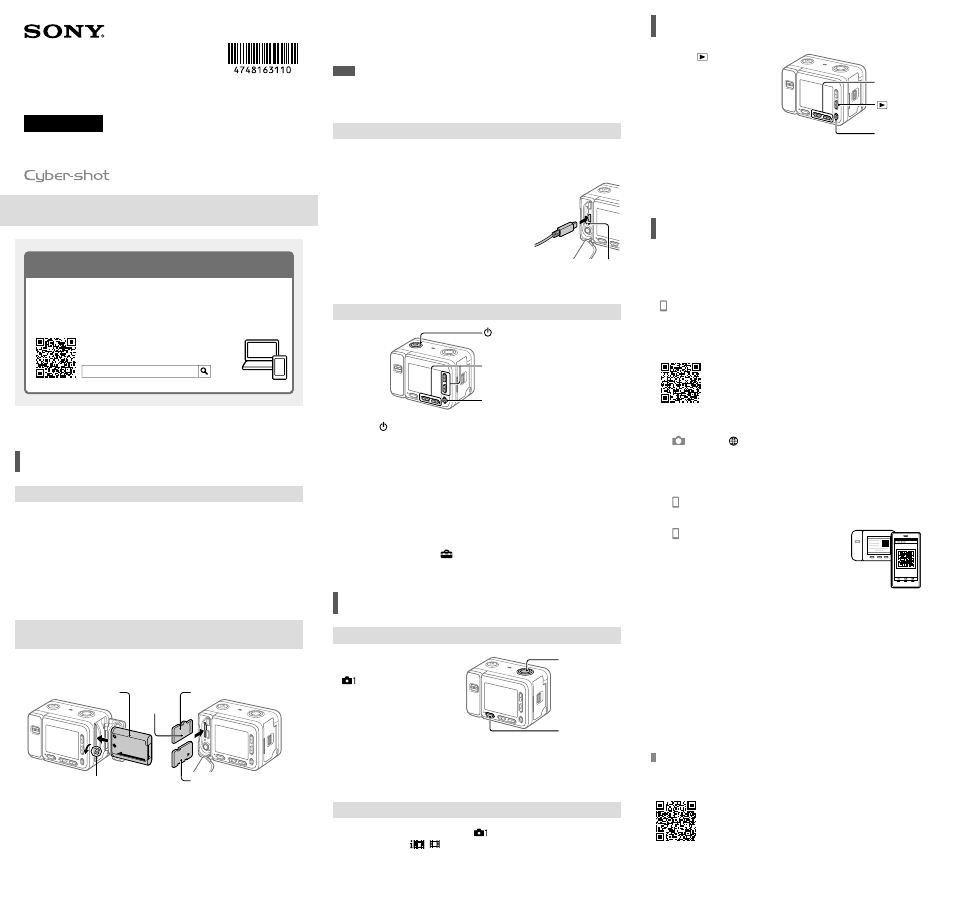
Inserting the battery pack (supplied)/memory card
(sold separately) into the camera
Open the battery cover and memory card/connector cover, and insert the battery
pack and a memory card into the camera. Then, make sure that the yellow mark
under the slide lock is hidden and the cover is tightly closed.
microSD memory card
Memory Stick Micro media
Battery pack
Battery lock lever
Terminal side
Battery pack
Make sure that the battery pack is facing in the correct direction, and insert it while
pressing the battery lock lever.
Memory card
microSD memory card/microSDHC memory card/microSDXC memory card: Insert
the card straight, as illustrated in the figure (
).
Memory Stick Micro: Insert the card as illustrated in the figure (
).
This camera is compatible with microSD memory cards or Memory Stick Micro
media. For details on the compatible memory cards, refer to the “Help Guide.”
When you use a memory card with this camera for the first time, format the card
using the camera in order to stabilize the performance of the memory card.
Note
• Formatting erases all data, including protected images and registered settings
(M1 to M4). Once erased, this data cannot be restored. Save valuable data to a
computer, etc. before formatting.
Charging the battery pack
1
Turn the power off.
If the camera is turned on, the battery pack will not be charged.
2
Connect the camera with the battery pack
inserted to the AC Adaptor (supplied) using
the micro USB cable (supplied), and connect
the AC Adaptor to the wall outlet (wall
socket).
The charge lamp will light up when charging
starts. When the charge lamp turns off, charging
is completed.
Charge lamp
Setting the language and the clock
(On/Standby) button
Confirm :
(Enter) button
Select items : Up button/down button/
left button/right button
1
Press the (On/Standby) button to turn on the camera.
2
Select the desired language and then press the
(Enter) button.
3
Make sure that [Enter] is selected on the screen and then press the
(Enter) button.
4
Select the desired geographic location and then press the
(Enter)
button.
5
Set [Daylight Savings], [Date/Time], and [Date Format], and then select
[Enter] and press the
(Enter) button.
If you want to reconfigure the date/time or the area setting at a later point, press
the MENU button and select
(Setup)
[Date/Time Setup] or [Area Setting].
Shooting
Shooting still images
1
Press the MENU
button and select
(Camera Settings1)
[Shoot Mode]
[Intelligent Auto].
SHUTTER/MOVIE
button
MENU button
2
Press the SHUTTER/MOVIE button halfway down to focus.
3
Press the SHUTTER/MOVIE button all the way down.
Shooting movies
1
Press the MENU button and select
(Camera Settings1)
[Shoot Mode]
(
Intelligent Auto).
2
Press the SHUTTER/MOVIE button to start recording.
3
Press the SHUTTER/MOVIE button again to stop recording.
©2019 Sony Corporation Printed in China
About the manual for this camera
This guide describes the necessary preparations to start using the
product, basic operations, etc. For details, refer to the “Help Guide”
(web manual).
http://rd1.sony.net/help/dsc/1910/h_zz/
“Help Guide” (Web manual)
DSC-RX0M2 Help Guide
DSC-RX0M2
Viewing
1
Press the (Playback)
button to switch to the
playback mode.
Left button/right
button
(Playback)
button
(Enter) button
2
Select an image with the left/right button.
To start playing back a movie, press the
(Enter) button.
Transferring images to a
smartphone
You can transfer images to a smartphone by connecting the camera and a
smartphone via Wi-Fi.
1
: Install Imaging Edge Mobile on your smartphone.
To connect the camera and your smartphone, Imaging Edge Mobile is required.
Install Imaging Edge Mobile to your smartphone in advance.
If Imaging Edge Mobile is already installed on your smartphone, be sure to
update it to the latest version.
https://www.sony.net/iem/
2
Connect the camera and your smartphone using the QR Code.
: MENU
(Network)
[Send to Smartphone Func.]
[Send to Smartphone]
[Select on This Device]
images to
transfer.
If you want to select images on the smartphone, select
[Select on Smartphone].
: Launch Imaging Edge Mobile on your smartphone, and select
[Scan QR Code of the Camera].
: Scan the QR Code displayed on the
camera using your smartphone.
3
The images will be transferred.
If you are using Android, you can transfer images after the first time simply by
launching Imaging Edge Mobile with Step 2-
above.
If image transfer does not start, select the camera to connect on the screen of your
smartphone.
For details on how to connect to a smartphone, refer to the following support sites:
https://www.sony.net/dics/iem01/
• For details on other connection methods or how to use the smartphone as a
remote commander to operate the camera, refer to the “Help Guide.”
• The Wi-Fi functions introduced in this manual are not guaranteed to operate on
all smartphones or tablets.
• The Wi-Fi functions of this camera are not available when connected to a public
wireless LAN.
Editing movies on a smartphone
You can edit recorded movies by installing the Movie Edit add-on to your
smartphone.
For details on installation and use, refer to the following URL:
https://www.sony.net/mead/