Kodak PIXPRO AZ405 Digital Camera (Black) User Manual
Kodak, Pixpro az405, Digital camera
The detailed Camera User Manual is available online at the website below:
Le Manuel d'utilisation de l'Appareil Photo est disponible dans le site internet
suivant:
El manual de usuario de la cámara se encuentra disponible en el siguiente sitio
web:
O Manual do usuário da Câmera é disponíveis no site Web abaixo:
Das Benutzerhandbuch der Kamera ist auf der folgenden Website verfügbar:
Руководство пользователя камеры размещены на веб-сайте:
A kamera Felhasználói kézikönyv az alábbi webhelyen található:
Il manuale dell'utente della fotocamera è disponibili al sito web riportato sotto:
інструкції до камери користувача доступний на веб-сайті нижче:
https://us.kodakpixpro.com/
az405/user-manual/
Americas
https://kodakpixpro.com/Europe/
support/multi-lang-downloads.php
Europe
2
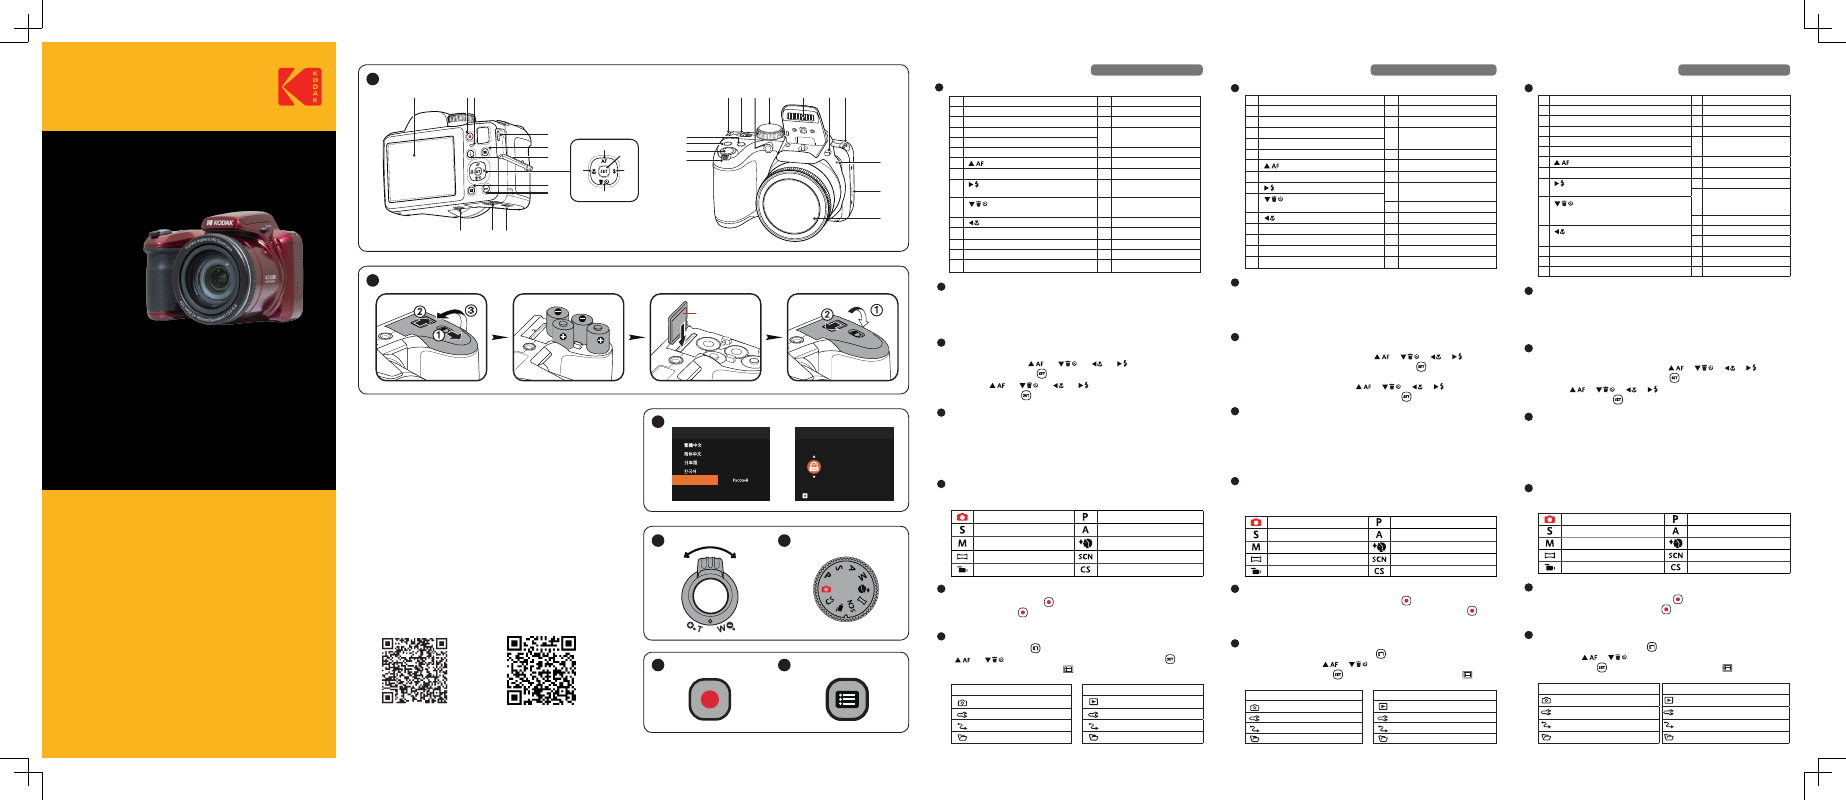
Installing AA Batteries and Memory Card
1. Open the Battery Cover Door as shown in step
①
,
②
and
③
.
2. Insert the AA Batteries into the battery compartment.
3. Insert the Memory Card into the memory slot.
4. Close the Battery Cover Door as shown in step
①
and
②
.
1. Push the Power Switch to turn the camera on and the language menu
will appear. Use the [
] / [
] / [
] / [
] buttons to select a
language and press the
button to confirm the language.
2. Use the [
] / [
] / [
] / [
] buttons again to set the date and
time and press the
button to confirm.
3
Setting the Language/Date/Time
5
Using the Mode Dial
This camera provides a convenient Mode Dial that allows you to manually switch
among different camera settings with ease. Available modes are listed below:
Auto Mode
Program AE
Shutter Priority
Aperture Priority
Manual Mode
Face Beautifier
Panorama Mode
Scene Mode
Movie Mode
Custom Settings
6
Using the Fast Video Recording Button
In Shooting Mode, press the
button to begin recording a video. After
recording, press the
button again to stop recording. The camera will store
the video and return to the shooting screen.
7
Using the Menu Button
In each mode, press the
button to access the "Easy Menu". Press the
[
] / [
] buttons to move among options, then press the
button
to make a selection. Choosing the
within this list will provide access to
the "Full Menu":
Shooting Mode
Playback Mode
Shoot Settings
Playback Settings
General Settings
General Settings
Connection Settings
Connection Settings
File Settings
File Settings
1
22 23
21
20
19
18
28
17
21
1
2 3
24
25
26
27
4
5
6
12
13
15 14
16
29
7
8
9
11
10
Quick Start Guide
Guide de démarrage rapide
Guía de inicio rápido
Guia de Inicialização rápida
Schnellstartanleitung
Краткое руководство
Üzembe helyezési útmutató
Guida avvio veloce
Коротка інструкція
The Kodak trademark, logo and trade dress are used under license from Eastman
Kodak
Company.
La marque de commerce Kodak, logo et son apparence sont utilisées sous
licence Eastman Kodak Company.
La marca, el logotipo y la imagen comercial Kodak son usadas bajo licencia de
Compañía Eastman Kodak.
A marca, logotipo e a imagem comercial Kodak são usadas sob licença da
Eastman Kodak Company.
Die Kodak, das Logo und die Kodak-Markenausstattung werden unter Lizenz von
Eastman Kodak Company genutzt.
Товарный знак Kodak, логотип и товарная упаковка используются по
лицензии компании Eastman Kodak Company.
A Kodak márkajelzés, embléma és kereskedelmi jelzés használata a Eastman
Kodak Company. engedélyével történik.
Il marchio Kodak, logo ed il trade dress Kodak sono usati sotto licenza di Eastman
Kodak Company.
Торгова марка Kodak, логотип та фірмовий стиль використовуються за
ліцензією Eastman Kodak Company.
© 2022 JK Imaging Ltd. All Rights Reserved.
JK Imaging Ltd., 17239 So. Main Street, Gardena, CA 90248 USA
kodakpixpro.com
1. Hold the camera securely.
2. Use the Zoom Lever to select Tele or Wide positions to zoom in or out on
your subject.
3. Press the Shutter Button half way down to focus on the subject. When the
focus frame turns green, press the Shutter Button completely down to take
your photo.
4
Taking a Picture
Quick Start Guide
Printed in Myanmar (Burma)
U.DIS.0072.0622.en.01
CR493080299-0
3
1
2
2
Class 10 or higher
for better
1
2
Español
English
Français
Português
Italiano
Deutsch
Svenska
Language
Date & Time
07
01
00 00
Back
H - M
2022
3
6
7
4
5
Battery Usage Precautions
• Please use brand name batteries (such as Energizer® or Duracell®) for optimal
performance. Do not mix new and old batteries or use different brands of
batteries. When replacing batteries, please replace all 4 batteries at the same
time.
• The performance and life expectancy of alkaline batteries will vary depending
on the brand.
• Do not mix alkaline, standard (carbon-zinc), or rechargeable (ni-cad, ni-mh,
etc.) batteries.
2
Insérer la batterie et la carte mémoire
1. Ouvrez le couvercle de la batterie.
2. Insérez la batterie dans le compartiment de la batterie.
3. Insérez la carte mémoire dans l’emplacement.
4. Refermez le couvercle de la batterie.
4
Prendre une photo
1. Maintenez fermement l'appareil photo.
2. Utiliser le levier de zooming pour sélectionner les positions tele ou Large
pour zoomer en avant ou en arrière sur votre sujet.
3. Appuyez sur le bouton déclencheur à moitié pour faire la mise au point
sur l’objet. Quand la case de mise au point devient verte, appuyez
complètement sur le bouton déclencheur pour prendre la photo.
5
Utiliser le mode molette
L'appareil photo de offre le mode molette très pratique qui vous permet de
passer d'un mode à l'autre aisément. Tous les modes disponibles sont listés
comme suit:
Mode auto
Programme AE
Priorité à la vitesse
Priorité à l'ouverture
Mode manuel
Embellisseur de visage
Mode panorama
Mode scène
Mode film
Réglages personnalisés
3
Régler la langue et la date, l’heure
1. Appuyez sur curseur d'alimentation pour allumer l’ appareil photo. Le menu
langue apparaît, utiliser les boutons [
]/[
]/[
]/[
] pour
sélectionner la langue, puis appuyer sur le bouton
pour confirmer votre
choix.
2. Utiliser à nouveau les boutons [
]/[
]/[
]/[
] pour régler la
date et l'heure, appuyer ensuite sur le bouton
pour confirmer.
6
Utilisation des bouton d'enregistrement vidéo rapide
En mode de prise de vue, appuyer sur le bouton
pour commencer à
enregistrer une vidéo. Après l'enregistrement, appuyer sur le bouton
pour
arrêter l'enregistrement. L'appareil photo va stocker la vidéo et retourner à
l’écran de prise de vue.
7
Utilisation des bouton menu
En chaque mode, appuyer sur le bouton
pour accéder au "Menu Facile".
Appuyer sur le bouton [
]/[
] pour déplacer parmis les options,
puis appuyer sur le bouton
pour faire une décision. Choisissant
dans
cette liste va fournir l'accès au "Menu Complet":
Prise de Vue Mode
Mode de Lecture
Réglages de prise de photos
Réglages de lecture
Réglages générale
Réglages générale
Réglages de connexion
Réglages de connexion
Réglages de fichiers
Réglages de fichiers
1. Presione el interruptor de encendido para encender la cámara, aparecerá
el menú de idioma. Utilice las teclas [
]/[
]/[
]/[
] para
seleccionar un idioma, pulse el botón
para confirmarlo.
2. Pulse [
]/[
]/[
]/[
] de nuevo para configurar la fecha y la
hora, pulse el botón
para confirmar.
3
Configuración idioma/fecha/hora
4
Como Tomar una fotografía
1. Sostenga la cámara con firmeza.
2. Utilice el control del zoom para seleccionar las posiciones Tele o Wide,
para acercar o alejar el objeto.
3. Presione el botón disparador a medio camino para focalizar el tema.
Cuando la caja de focalización se torna verde, presione el botón disparador
completamente hacia abajo para tomar la fotografía.
5
Utilizando la dial de modo
La cámara ofrece un dial de modo conveniente que le permite cambiar entre
distintos modos con facilidad. Todos los modos disponibles son los siguientes:
Modo automático
Programa AE
Prioridad de obturador
Prioridad de Abertura
Modo manual
Embellecedor facial
Modo panorámico
Modo de escena
Modo de vídeo
Configuración Personalizada
2
Inserte la batería y la tarjeta de memoria
1. Abra la tapa de batería.
2. Inserte la batería en el compartimiento de la batería.
3. Inserte la tarjeta de memoria en la ranura.
4. Cierre la tapa de la batería.
6
Utilización del botón de grabación rápida de vídeo
En el modo de disparo, presione el botón
para empezar a grabar un vídeo.
Después de grabar, presione el botón
de nuevo para dejar de grabar. La
cámara guardará el vídeo y regresará a la pantalla de disparo.
7
Utilización del botón de menú
En cada modo, presione el botón
para acceder al "Menú fácil". Presione
los botones [
]/[
] para desplazarse entre las opciones, luego
presione el botón
para hacer una selección. Al elegir
dentro de esta
lista le permitirá un acceso al "Menú completo":
Modo de Disparo
Modo de Reproducción
Configuraciones de disparo
Configuraciones de reproducción
Configuraciones generales
Configuraciones generales
Configuraciones de la conexión
Configuraciones de la conexión
Configuraciones de archivo
Configuraciones de archivo
Guía de inicio rápido
Guide de démarrage rapide
DIGITAL CAMERA
KODAK
PIXPRO AZ405
1
Camera Views
1 LCD
16 Tripod Socket
2 Fast Video Recording Button
17 Zoom Lever
3 Indicator Lamp
18 Shutter Button
4 Micro USB Port
19 Exposure Compensation
Button
5 Menu Button
6 “I” Button
20 Continuous Shot Button
7 [
] AF Button /Arrow Button (Up)
21 Strap Eyelet
8 SET Button
22 Power Switch
9 [
] Flash Button /
Arrow Button (Right)
23 AF Assist Beam /
Self-Timer Lamp
10 [
] Delete Button / Self-Timer
Button / Arrow Button (Down)
24 Mode Dial
11 [
] Macro Button /Arrow Button (Left) 25 Flash Lamp
12 Playback Button
26 Flash Button
13 Display Button
27 Microphone
14 Battery Cover Buckle
28 Speaker
15 Battery Door Cover
29 Lens
1
Vues de l’appareil photo
1 LCD
16 Embase filetée de trépied
2 Bouton d'enregistrement vidéo rapide 17 Molette du zoom
3 Voyant
18 Déclencheur
4 Port Micro USB
19 Bouton de correction
d’exposition
5 Bouton Menu
6 Bouton I
20 Bouton de capture en rafale
7 [
] Bouton AF/Bouton Haut
21 OEillet de courroie
8 Bouton SET
22 Curseur d'alimentation
9 [
] Bouton Flash/Bouton Droite
23 Voyant Rayon aide AF/
Voyant du retardateur
10 [
] Bouton Supprimer/
Bouton Retardateur/Bouton Bas
24 Molette de mode
11 [
] Bouton Macro/Bouton Gauche 25 Flash
12 Bouton Lecture
26 Bouton Flash
13 Bouton Disp (Affich)
27 Micro
14 Languette du couvercle de la batterie 28 Haut-parleur
15 Couvercle de la batterie
29 Objectif
1
Vistas de la cámara
1 LCD
15 Tapa de la batería
2 Botón de grabación rápida de vídeo
16 Rosca de trípode
3 Indicador de luz
17 Barra de zoom
4 Puerto Micro USB
18 Botón del obturador
5 Botón de menú
19 Botón de compensación
de exposición
6 Botón I
7 [
] Botón de AE/Botón de flecha (ariba) 20 Botón de captura continua
8 Botón SET
21 Ojal para correa
9 [
] Botón de flash/
Botón de flecha (derecha)
22 Interruptor de encendido
23
Indicador de Haz Asist.
EA/Luz del disparador
automático
10
[
] Botón Eliminar/
Botón de temporizador automático/
Botón de flecha (abajo)
24 Dial de Modo
11 [
] Botón de macro/
Botón de flecha (izquierda)
25 Lámpara de flash
26 Botón del flash
12 Botón de reproducción
27 Micrófono
13 Botón de disparo
28 Altavoz
14 Hebilla de la tapa de la batería
29 Objetivo