Sony BDV-L600 User Manual
Bdv-l600
4-279-077-11(1)
BDV-L600
©2011 Sony Corporation Printed in Malaysia
1
4
3
5
Speaker Installation Guide / Guide d’installation des enceintes /
Guía de instalación de los altavoces / Montageanleitung für Lautsprecher /
Installatiegids voor de luidspreker / Guida all’installazione dei diffusori /
Podręcznik instalacji głośników / 扬声器安装指南
(1)
6
7
8
9
64 mm
(2
33
/
64
in / 2
33
/
64
po /
2
33
/
64
pulg)
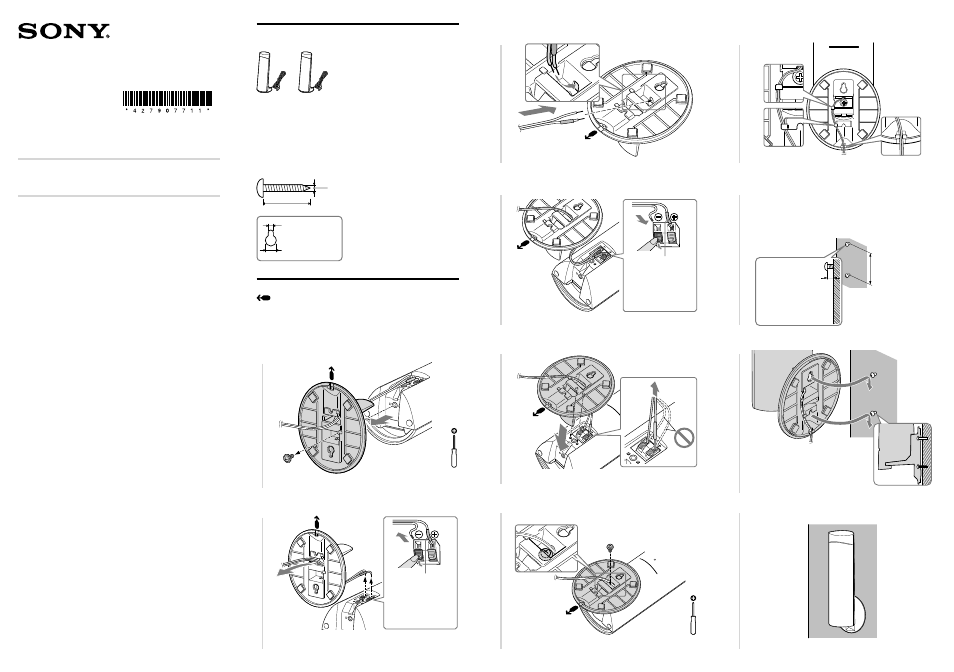
Read this guide to install the speakers on a wall. / Lisez ce guide si
vous accrochez les enceintes au mur. / Lea esta guía para instalar los
altavoces en una pared. / Lesen Sie diese Anleitung, wenn Sie die
Lautsprecher an der Wand montieren wollen.
Spread a cloth on the floor to avoid damaging the floor when you
assemble the speakers.
Contact a screw shop or installer regarding the wall material or
screws to be used.
Use screws that are suitable for the wall material and strength. As
a plaster board wall is especially fragile, attach the screws securely
to a beam and fasten them to the wall. Install the speakers on a
vertical and flat wall where reinforcement is applied.
Sony is not responsible for accidents or damage caused by
improper installation, insufficient wall strength or improper screw
installation, natural calamity, etc.
Recouvrez le sol d’un linge pour éviter de l’endommager lors de
l’assemblage des enceintes.
Adressez-vous à un quincaillier ou à un installateur pour
connaître le matériau du mur ou les vis à utiliser.
Utilisez des vis adaptées au matériau et à la résistance du mur.
Comme les plaques de plâtre sont particulièrement fragiles, fixez
fermement les vis à une poutre et fixez-les au mur. Installez les
enceintes sur une paroi verticale et plane à un endroit où se
trouve un renforcement.
Sony ne peut être tenu responsable de tout accident ou dégât
entraîné par une installation incorrecte, une résistance
insuffisante du mur, une mauvaise fixation des vis, une
catastrophe naturelle, etc.
Coloque una tela en el suelo para evitar dañarlo al instalar los
altavoces.
Consulte con una tienda especializada en tornillos o con un
instalador acerca del material de pared o de los tornillos que se
deben utilizar.
Utilice tornillos adecuados para el material y la resistencia de la
pared. Dado que una pared de yeso es especialmente frágil,
acople los tornillos firmemente a una viga y fíjelos en la pared.
Instale los altavoces en una pared vertical y lisa que esté reforzada.
Sony no se responsabiliza de ningún accidente o daño causado por
una instalación inadecuada, una pared de poca resistencia, una
instalación incorrecta de los tornillos, una catástrofe natural, etc.
Breiten Sie ein Tuch auf dem Boden aus, damit dieser beim
Zusammenbauen der Lautsprecher nicht beschädigt wird.
Wenden Sie sich bei Fragen bezüglich des Wandmaterials oder
geeigneter Schrauben an einen Fachmann.
Verwenden Sie Schrauben, die für das Material der Wand und die
Wandstärke geeignet sind. Wände aus Gipskarton sind nicht sehr
stabil. Drehen Sie die Schrauben zur Befestigung in einen
Holzträger. Montieren Sie die Lautsprecher an einer senkrechten
und ebenen Wand, die ausreichend verstärkt ist.
Sony haftet nicht für Unfälle oder Schäden, die durch
unsachgemäße Montage, unzureichende Wandstärke, schlechte
Schraubenverankerung, Naturkatastrophen usw. entstehen.
Necessary Items / Eléments requis /
Elementos necesarios / Erforderliche Teile
Front speakers / Enceintes avant /
Altavoces frontales / Vordere Lautsprecher
Prepare four screws (not supplied) that are suitable for the holes on
the back of each speaker.
Préparez quatre vis (non fournies) adaptées aux orifices situés au
dos de chaque enceinte.
Prepare cuatro tornillos (no suministrados) adecuados para los
orificios de la parte posterior de los altavoces.
Beschaffen Sie vier Schrauben (nicht mitgeliefert), die sich für die
Bohrungen an der Rückseite der einzelnen Lautsprecher eignen.
5 mm (
7
/
32
in /
7
/
32
po /
7
/
32
pulg)
10 mm (
13
/
32
in /
13
/
32
po /
13
/
32
pulg)
Hole on the back of the speaker /
Orifice situé au dos de l’enceinte /
Orificio de la parte posterior del
altavoz / Bohrung an der Rückseite
des Lautsprechers
30 mm (1
3
/
16
in / 1
3
/
16
po / 1
3
/
16
pulg)
4 mm (
3
/
16
in /
3
/
16
po /
3
/
16
pulg)
Fasten the screws (not supplied) to the wall. / Fixez les vis
(non fournies) au mur. / Fije los tornillos (no suministrados)
a la pared. / Drehen Sie die Schrauben (nicht mitgeliefert)
in die Wand.
Installation / Installation / Instalación / Montage
: Use this mark to identify the orientation of the stand. /
Utilisez ce repère pour déterminer l’orientation de l’enceinte. /
Utilice esta marca para identificar la orientación del soporte. /
Anhand dieser Markierung erkennen Sie die Ausrichtung des
Ständers.
Colored tube
Tube coloré
Tubo de color
Farbige
Kabelschlaufe
2
Colored tube
Tube coloré
Tubo de color
Farbige
Kabelschlaufe
6 mm to 8 mm (
15
/
64
in to
5
/
16
in) / 6 mm à
8 mm (
15
/
64
po. à
5
/
16
po.) / de 6 mm a
8 mm (de
15
/
64
pulg a
5
/
16
pulg) / 6 mm bis
8 mm