Awabase sa, Self-adhering sbs modifi ed base sheet, General application instructions – TAMKO AWABASE SA User Manual
Page 2
AWABASE SA
Self-Adhering SBS Modifi ed Base Sheet
GENERAL APPLICATION INSTRUCTIONS
(CONTINUED)
©
2012 TAMKO Building Products, Inc. TAMKO
®
is a registered trademark of TAMKO Building Products, Inc.
tamko.com
Corporate
220 West 4th Street, Joplin, Missouri 64801
800-641-4691
Central District
220 West 4th Street, Joplin, Missouri 64801
800-641-4691
Northeast District
4500 Tamko Drive, Frederick, Maryland 21701
800-368-2055
Southeast District
2300 35th Street, Tuscaloosa, Alabama 35401
800-228-2656
Southwest District
7910 South Central Expressway, Dallas, Texas 75216
800-443-1834
Western District
5300 East 43rd Avenue, Denver, Colorado 80216
800-530-8868
Information included in this product data sheet was current at time of printing. To obtain a copy of the most current version of this product data sheet, visit
us online at tamko.com or call us at 800-641-4691.
This product is covered by a 5-year limited material warranty. For information regarding or a copy of TAMKO's limited warranty, contact your local
TAMKO representative, visit us online at tamko.com, or call us at 800-641-4691.
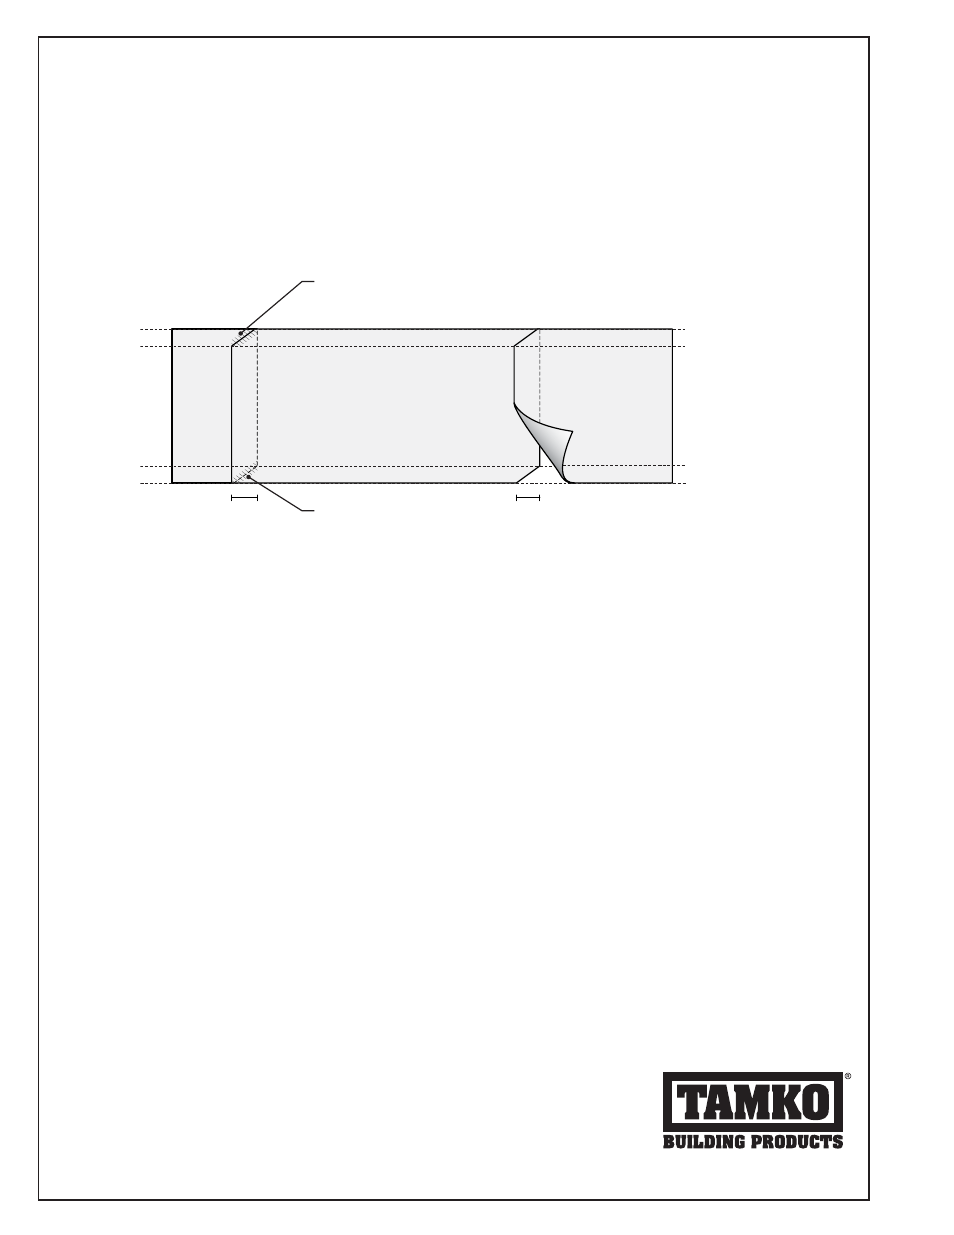
At all endlaps of AWABASE SA, cut and remove the lower corner of the underlying sheet and the upper corner of the
overlapping sheet to provide a tapered transition at the T-joints. Cut on a diagonal angle 5-1/2 in. long from the end of the roll to
the outside edge. The width of the cut should be 4 in. - the same width as the side lap. (See illustration below).
6” END LAP
5 - 1/2”
4” SIDE LAP
4” SIDE LAP
APPLY A BEAD OF TAM-PRO Q-15 ELASTOMERIC FLASHING CEMENT
AT THE EDGE OF EACH CUT AREA OF THE OVERLAPPING SHEET AS
T-JOINTS ARE FORMED BY SUCCEEDING COURSES.
APPLY TAMKO TAM-PRO Q-15
ELASTOMERIC FLASHING CEMENT
TO THE EDGE OF THE END LAP
CUT AREA OF THE UNDERLAYING SHEET TO AVOID A CAPILLARY.
Apply a 1/8 in. thick layer of TAM-PRO Q-15 Elastomeric Flashing Cement in the end lap cut area of the underlying sheet.
Remove the release fi lm and press the top sheet into the mastic. Apply a bead of TAM-PRO Q-15 Elastomeric Flashing Cement at
each cut area of the overlapping sheet as T-joints are formed by succeeding courses.
An alternative installation method involves unrolling the entire roll and aligning it. Apply the down slope half of the sheet fi rst
by removing the split release fi lm from the entire length of the roll on the down slope side and pressing the base sheet into
place. Then remove the release fi lm from the up slope half of the roll and press it into place. Roll the entire sheet with a roller of
adequate size and weight to ensure solid contact with the insulation or base sheet. End laps should be completed in the manner
described above.
Once the AWABASE SA membrane has had a chance to bond, check all laps and joints for full adhesion. If the membrane can be
lifted at any area it is not properly adhered. A seam probing tool can be used to check for small voids at the laps. If necessary,
use a hand-held hot air welding tool and seam roller to heat the lap and press into place to ensure proper adherence at the lap.