Nexen LSCC-44 923555 User Manual
Page 2
FORM NO. L-20119-C-1212
2
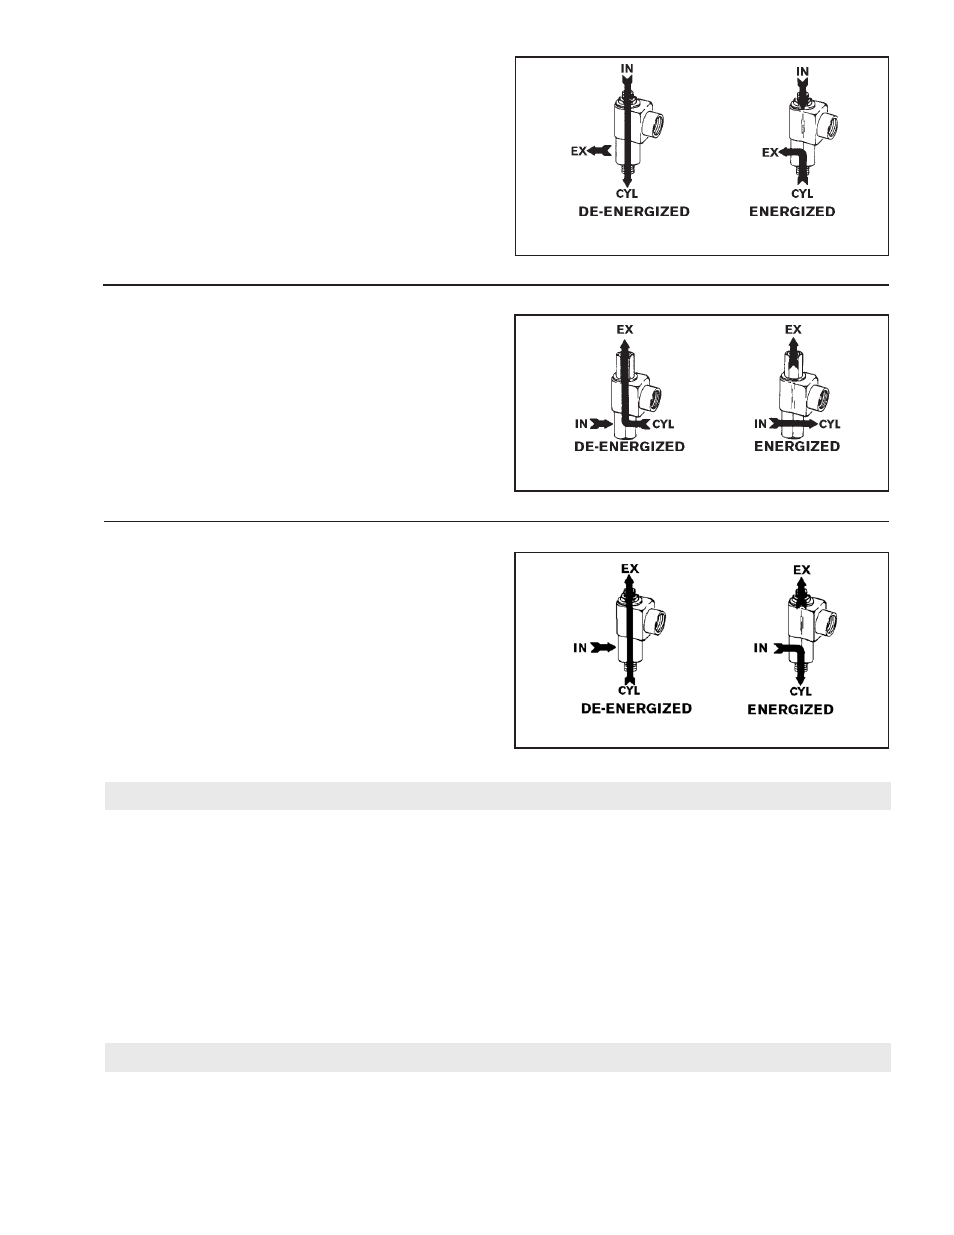
FIGURE 3
Air Inlet Mount (Refer to Figure 3.)
1. Connect inlet air pressure line to inlet port (marked
“IN”) on top of valve.
2. Install the 1/8 or 1/4 NPT male bottom outlet port in
clutch or brake air inlet.
NOTE: When solenoid is de-energized, air flows from
the inlet port directly to clutch or brake. When solenoid
is energized, air is free to flow from clutch or brake to
exhaust.
MAINTENANCE
Inline Mount (Refer to Figure 4.)
1. Connect inlet air pressure to inlet port (marked “IN”)
on top of valve.
2. Route air line from outlet port (marked “CYL”) to
clutch or brake.
NORMALLY CLOSED 3-WAY VALVE
Air Inlet Mount (Refer to Figure 5.)
1. Connect inlet air pressure line to inlet port (marked
“IN”) on top of valve.
2. Install the 1/8 or 1/4 NPT male bottom outlet port in
clutch or brake air inlet.
NOTE: When solenoid is energized, air flows from the
inlet port directly to clutch or brake. When solenoid is
de-energized, air is free to flow from clutch or brake to
exhaust.
All pneumatically activated valves require clean pressure
regulated air with the correct amount of lubrication for
long trouble-free service. Refer to Nexen’s Pneumatic
Clutch/Brake Catalog (ACP 7/86) for information on filters,
regulators, and lubricators.
If a valve malfunctions, check the following:
A. Excessive air pressure - pressures greater than psi
rating on valve’s legend plate will cause valve to leak.
B. Dirt in valve - check filters.
C. Improper voltage - voltage specifications are
stamped on valve’s legend plate.
D. Faulty or burned-out coil.
FIGURE 4
FIGURE 5
PARTS REPLACEMENT
There are no replacement parts in Nexen 3-Way Pilot Valves. When ordering replacement 3-Way Pilot Valves, please give
voltage of solenoid and product number of valve.
Purchase replacement 3-Way Pilot Valves through your local Nexen Distributor.
- 3-Way Valve 949006 3-Way Valve 948801 3-Way Valve 949001 3-Way Valve 948802 3-Way Valve 949002 3-Way Valve 948803 3-Way Valve 949003 3-Way Valve 948804 3-Way Valve 949004 3-Way Valve 948805 3-Way Valve 949005 3-Way Valve 948808 3-Way Valve 948807 3-Way Valve 948810 3-Way Valve 948806 3-Way Valve 948809