Features – Alto Professional ZMX862 User Manual
Page 3
3
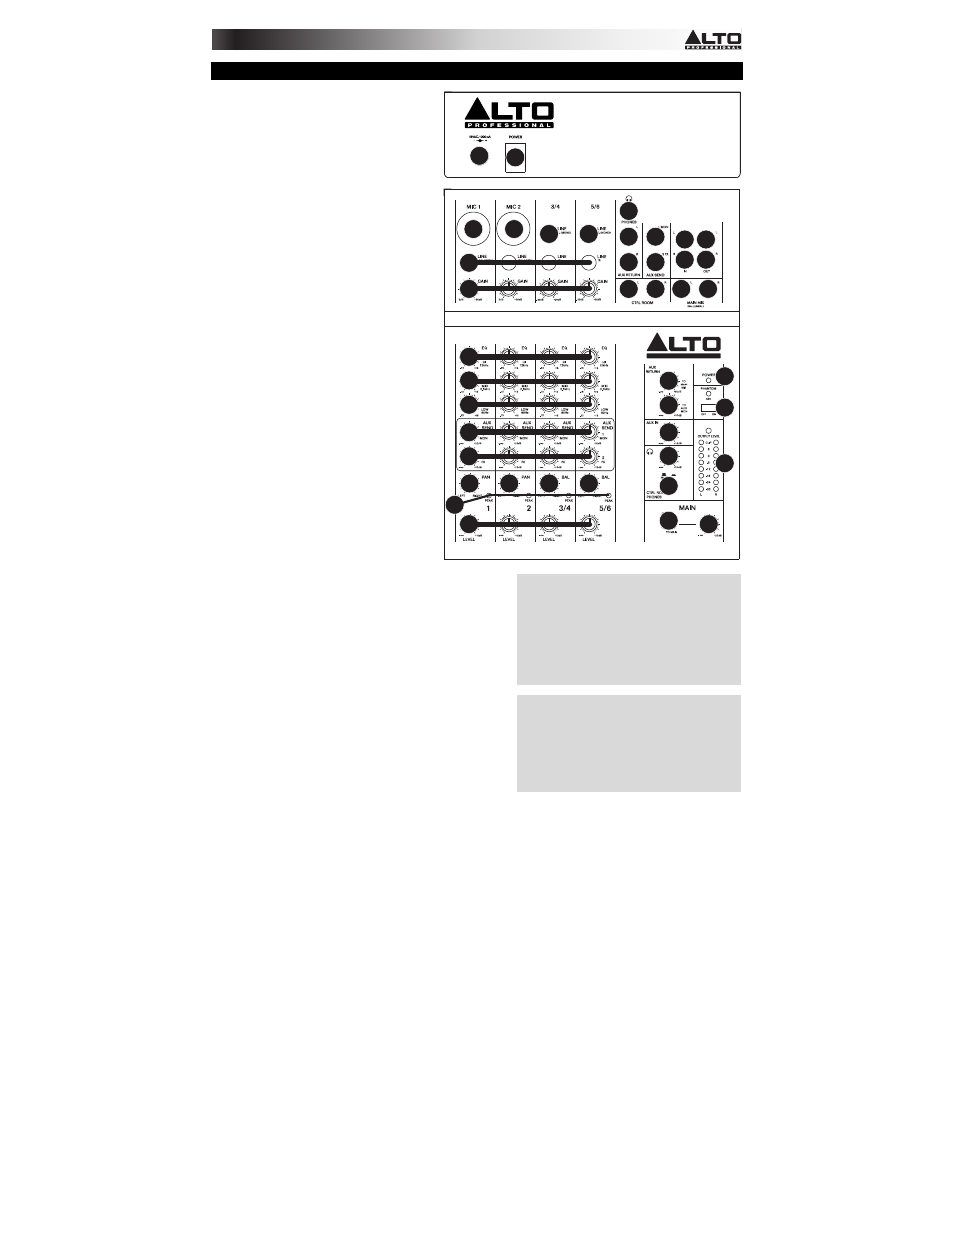
FEATURES
1.
POWER IN – Use the included power
adapter to connect the mixer to a
power outlet. While the power is
switched off, plug the power supply
into the mixer first, then plug the power
supply into a power outlet.
2.
POWER SWITCH – Turns the mixer
on and off. Turn on the mixer after all
input devices have been connected
and before you turn on amplifiers.
Turn off amplifiers before you turn off
the mixer.
3.
MIC INPUT – Connect a microphone
to these inputs with an XLR cable.
4.
LINE INPUT * – Connect line-level
devices to these inputs with 1/4"
cables.
5.
GAIN – Adjusts the channel audio
level (pre-fader and pre-EQ gain).
Adjust this so that the PEAK LED just
barely lights up during the loudest
parts of the song.
6.
HI EQ (TREBLE) – Adjusts the high
(treble) frequencies of the channel.
7.
MID EQ – Adjusts the mid-range
frequencies of the channel.
8.
LO EQ (BASS) – Adjusts the low
(bass) frequencies of the channel.
9.
AUX SEND 1 MON – Adjusts the
channel audio (pre-EQ) level that is
sent to the AUX SEND output labeled
"1 MON." You can use this to create a
custom monitor mix for yourself or
your musicians.
10.
AUX SEND 2 FX – Adjusts the
channel audio (post-EQ) level that is sent to the
mixer's internal effects processor. Turn this up for the
channels that you want internal effects applied to.
You can use this to apply external effects to individual
channels.
11.
CHANNEL PAN – Adjusts the (mono) channel's
position in the stereo field.
12.
BALANCE (CH 3/4 & 5/6) – Adjusts the balance
between Channels 3 and 4 and Channels 5 and 6.
13.
PEAK LED – The LED will flash if the signal is
clipping. If this happens, decrease the setting of the
GAIN knob or CHANNEL VOLUME knob.
14.
CHANNEL VOLUME – Adjusts the audio level on the
channel.
15.
AUX RETURN INPUTS ** – You can connect the
outputs of an external device to these inputs with 1/4"
mono cables. This is usually used for outboard
effects devices but can also be used like an extra input channel for synthesizers, drum machines, etc.
If your source is mono, plug it into the left jack and it will be heard on both the left and right sides.
16.
AUX SEND OUTPUTS ** – You can use a 1/4" TRS cable to connect the AUX 1 MON output to the
input of an external amplifier or active monitor to create a custom monitor mix for onstage musicians.
You can adjust this level with the AUX RETURN LEVEL knob labeled "TO AUX 1 MON." To use an
external effects rack unit, compressor, etc. with the mixer, you can use a Y-cable to connect the AUX 2
FX output to the input of your external device, then connect the outputs of the device to the AUX
RETURN INPUTS of the mixer.
* When using LINE INPUTS 3/4, 5/6 and the
AUX RETURNS:
• If only the left channel is used, the signal
will be heard in both left and right
channels and the balance will not be
adjustable.
• If only the right channel is used, the signal
will be heard in the right channel only.
** To use an external effects rack unit,
compressor, etc., use a Y-cable (1/4" stereo
to two 1/4" mono) to connect the AUX SEND
"2 FX" output to the left and right inputs your
external device. Connect the outputs of your
external device to the left and right AUX
RETURN INPUTS.
2 TK
2 TK
2 TK
1
2
3
4
5
6
7
8
9
22
23
24
25
26
27
28
29
30
31
10
11
13
14
11
12
12
4
4
15
21
15
16
16
19 19 20 20
17
17
18
18
3