Warranty information, Appendix: navigation, user options & programming, Rt-24 menu options – Legrand RT-24 User Manual
Page 2: Set time and date, Location, Preferences, Schedule, Setting the time, Setting the date, Setting the dst (daylight savings time)
www.passandseymour.com
Call 800.223.4185 for Technical Support
WARRANTy INfORMATION
Pass & Seymour/Legrand warranties its products to be free of defects in
materials and workmanship for a period of five (5) years. There are no obligations
or liabilities on the part of Pass & Seymour/Legrand for consequential damages
arising out of, or in connection with, the use or performance of this product or
other indirect damages with respect to loss of property, revenue or profit, or cost
of removal, installation or reinstallation.
P.O. Box 4822, Syracuse, NY 13221-4822
Technical Support: 800.223.4185 • www.passandseymour.com
340897 12252
Please
Recycle
www.passandseymour.com
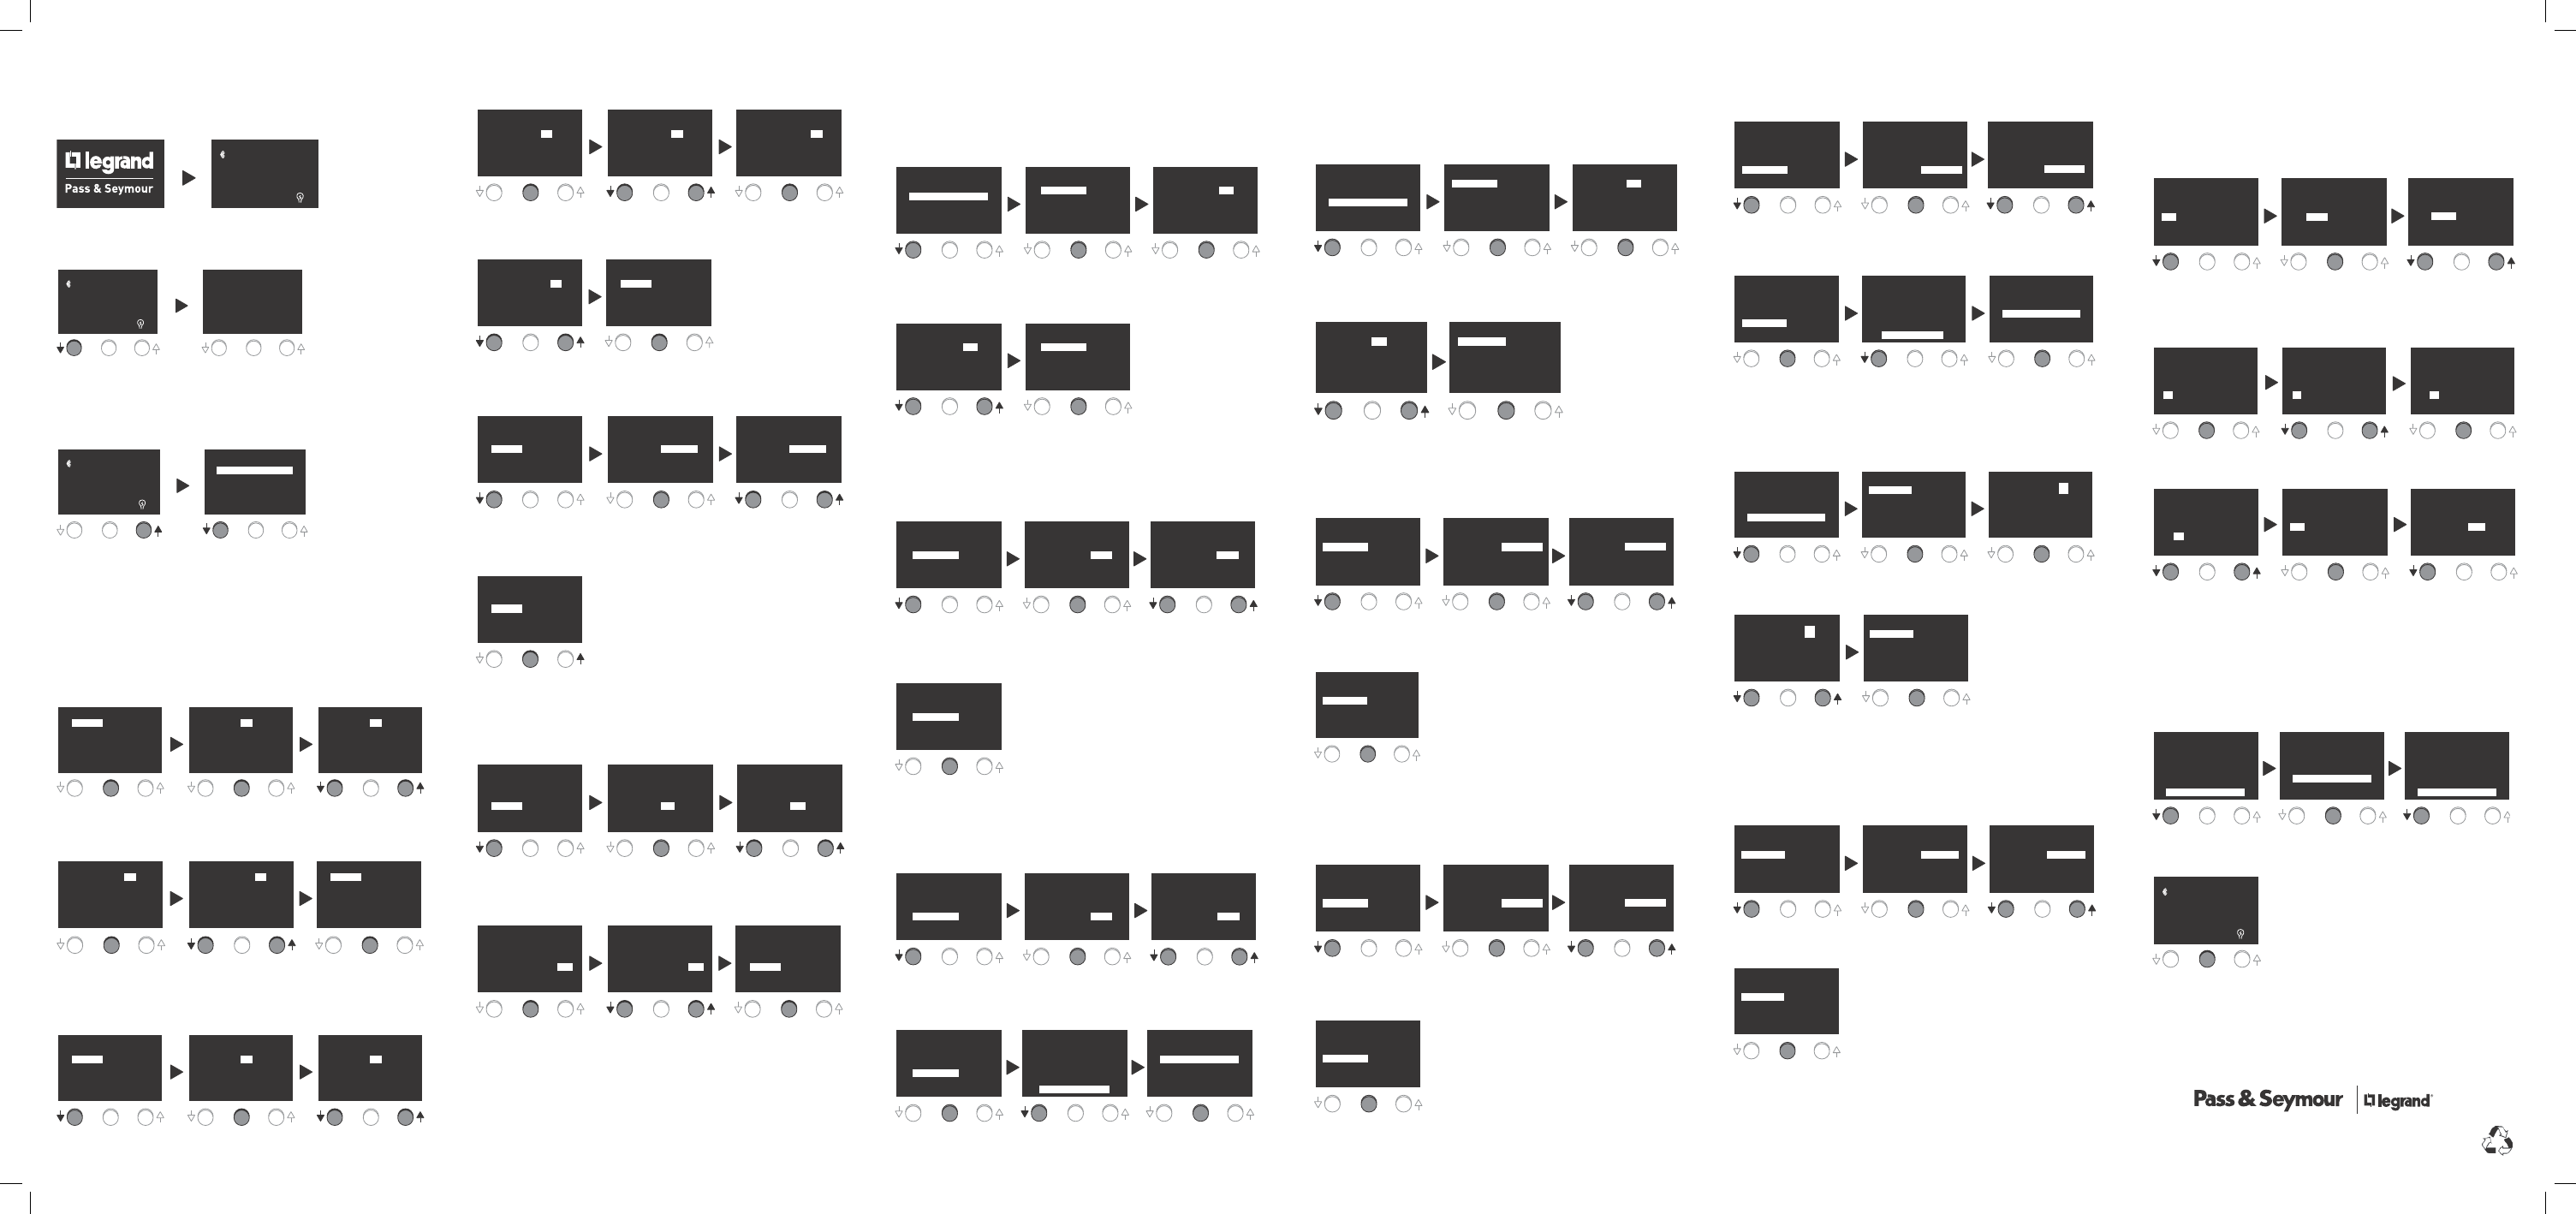
APPENDIx: NAVIGATION, USER OPTIONS & PROGRAMMING
When first powered up,
the Pass & Seymour
logo appears.
Standard display, aka:
MAIN PAGE when the
RT-24 is powered and
running:
DST
PM
Tue 03/31/2009
12:04
PROG
Press and hold the ↓ button
to see sunset, sunrise,
software version and date:
DST
PM
Tue 03/31/2009
12:04
PROG
RISE TIME:
SET TIME:
VER: 2.0
Jan 19 2009
06:40
19:34
RT-24 MENU OPTIONS
From the MAIN PAGE, press
and release the ↑ button to
enter SETUP menu.
Press the ↓ button to
move to desired SETUP
function.
DST
PM
Tue 03/31/2009
12:04
PROG
SETUP
SET TIME AND DATE
LOCATION
PREFERENCES
SCHEDULING
MAIN PAGE
General Notes: Once in SETUP menu, the ↓ button moves to the previous menu
or decreases the value, the ↑ button moves to next menu or increases the value.
The CENTER button confirms the selected variable.
SET TIME AND DATE
Setting the TIME
Press the CENTER
button to highlight
TIME.
Press the CENTER
button to highlight the
hour.
Press the ↓ or the ↑
button to decrease or
increase the hour.
SET TIME AND DATE
PREVIOUS MENU
TIME:
DATE:
DST:
START:
END:
01:00 am
03/30/09
ENABLED
1st Sun Mar
1st Sun Nov
SET TIME AND DATE
PREVIOUS MENU
TIME:
DATE:
DST:
START:
END:
01
: 00 am
03/30/09
ENABLED
1st Sun Mar
1st Sun Nov
SET TIME AND DATE
PREVIOUS MENU
TIME:
DATE:
DST:
START:
END:
05
: 00 am
03/30/09
ENABLED
1st Sun Mar
1st Sun Nov
Once the hour is set,
press the CENTER
button to highlight
minutes.
Press the ↓ or the ↑
button to decrease or
increase the minutes.
Once the minutes are set,
press the CENTER button
to save the setting.
SET TIME AND DATE
PREVIOUS MENU
TIME:
DATE:
DST:
START:
END:
05:30 am
03/30/09
ENABLED
1st Sun Mar
1st Sun Nov
SET TIME AND DATE
PREVIOUS MENU
TIME:
DATE:
DST:
START:
END:
01 :
00
am
03/30/09
ENABLED
1st Sun Mar
1st Sun Nov
SET TIME AND DATE
PREVIOUS MENU
TIME:
DATE:
DST:
START:
END:
05 :
30
am
03/30/09
ENABLED
1st Sun Mar
1st Sun Nov
Setting the DATE
Press the ↓ button to
highlight DATE.
Press the CENTER
button to highlight the
month.
Press the ↓ or the ↑
button to change the
month.
SET TIME AND DATE
PREVIOUS MENU
TIME:
DATE:
DST:
START:
END:
05:30 am
03/30/09
ENABLED
1st Sun Mar
1st Sun Nov
SET TIME AND DATE
PREVIOUS MENU
TIME:
DATE:
DST:
START:
END:
05 : 30 am
03
/30/09
ENABLED
1st Sun Mar
1st Sun Nov
SET TIME AND DATE
PREVIOUS MENU
TIME:
DATE:
DST:
START:
END:
05 : 30 am
04
/30/09
ENABLED
1st Sun Mar
1st Sun Nov
Press the CENTER
button to move to day.
Press the ↓ or the
↑ button to change
the day.
Press the CENTER
button to move to year.
SET TIME AND DATE
PREVIOUS MENU
TIME:
DATE:
DST:
START:
END:
05 : 30 am
04/
30
/09
ENABLED
1st Sun Mar
1st Sun Nov
SET TIME AND DATE
PREVIOUS MENU
TIME:
DATE:
DST:
START:
END:
05 : 30 am
04/
01
/09
ENABLED
1st Sun Mar
1st Sun Nov
SET TIME AND DATE
PREVIOUS MENU
TIME:
DATE:
DST:
START:
END:
05 : 30 am
04/01/
09
ENABLED
1st Sun Mar
1st Sun Nov
Press the ↓ or the ↑
button to change the
year.
Once the DATE values are
set, press the CENTER
button to save the setting.
SET TIME AND DATE
PREVIOUS MENU
TIME:
DATE:
DST:
START:
END:
05:30 am
04/01/10
ENABLED
1st Sun Mar
1st Sun Nov
SET TIME AND DATE
PREVIOUS MENU
TIME:
DATE:
DST:
START:
END:
05 : 30 am
04/01/
10
ENABLED
1st Sun Mar
1st Sun Nov
Setting the DST (DAyLIGHT SAVINGS TIME)
Press the ↓ button to
move to highlight DST.
Press the CENTER
button to highlight
ENABLED.
Press the ↓ or the
↑ button to choose
ENABLED or DISABLED.
SET TIME AND DATE
PREVIOUS MENU
TIME:
DATE:
DST:
START:
END:
05:30 am
03/30/09
ENABLED
1st Sun Mar
1st Sun Nov
SET TIME AND DATE
PREVIOUS MENU
TIME:
DATE:
DST:
START:
END:
05 : 30 am
04/30/09
ENABLED
1st Sun Mar
1st Sun Nov
SET TIME AND DATE
PREVIOUS MENU
TIME:
DATE:
DST:
START:
END:
05 : 30 am
04/30/09
DISABLED
1st Sun Mar
1st Sun Nov
Once DST is enabled
or disabled, press the
CENTER button to save
the setting.
SET TIME AND DATE
PREVIOUS MENU
TIME:
DATE:
DST:
START:
END:
05:30 am
03/30/09
ENABLED
1st Sun Mar
1st Sun Nov
Setting the DST START DATE
Press the ↓ button
to move to highlight
START.
Press the CENTER
button to move to Week
in the month.
Press the ↓ or the ↑
button to choose the
week.
SET TIME AND DATE
PREVIOUS MENU
TIME:
DATE:
DST:
START:
END:
05:30 am
03/30/09
ENABLED
1st Sun Mar
1st Sun Nov
SET TIME AND DATE
PREVIOUS MENU
TIME:
DATE:
DST:
START:
END:
05 : 30 am
04/30/09
ENABLED
1st
Sun Mar
1st Sun Nov
SET TIME AND DATE
PREVIOUS MENU
TIME:
DATE:
DST:
START:
END:
05 : 30 am
04/30/09
DISABLED
2nd
Sun Mar
1st Sun Nov
Once the week is selected,
Press the CENTER button
to highlight month.
Press the ↓ or the ↑
button to choose the
month.
Once the month is set,
press the CENTER
button to save the
setting.
SET TIME AND DATE
PREVIOUS MENU
TIME:
DATE:
DST:
START:
END:
05:30 am
03/30/09
ENABLED
2nd Sun Apr
1st Sun Nov
SET TIME AND DATE
PREVIOUS MENU
TIME:
DATE:
DST:
START:
END:
01 : 00 am
03/30/09
ENABLED
2nd Sun
Mar
1st Sun Nov
SET TIME AND DATE
PREVIOUS MENU
TIME:
DATE:
DST:
START:
END:
05 : 30 am
03/30/09
ENABLED
2nd Sun
Apr
1st Sun Nov
Setting the DST END DATE
Repeat the same process as setting the DST start date for setting the DST end date.
Once the DST end date is set, press the ↓ button to highlight PREVIOUS menu.
Press CENTER button to return to the SETUP menu.
LOCATION
Setting the TIME ZONE
Press the ↓ button to
highlight LOCATION.
Press the CENTER
button to highlight
TIME ZONE.
Press the CENTER
button to highlight
time zone values.
SETUP
SET TIME AND DATE
LOCATION
PREFERENCES
SCHEDULING
MAIN PAGE
LOCATION
PREVIOUS MENU
TIME ZONE:
-08
LONGITUDE: -121º
LATITUDE:
+37º
LOCATION
PREVIOUS MENU
TIME ZONE:
-08
LONGITUDE: -121º
LATITUDE:
+37º
Press the ↓ or the ↑
button to decrease or
increase the value.
Once time zone is set,
press the CENTER
button to save the
setting.
LOCATION
PREVIOUS MENU
TIME ZONE:
-08
LONGITUDE: -121º
LATITUDE:
+37º
LOCATION
PREVIOUS MENU
TIME ZONE:
-11
LONGITUDE: -121º
LATITUDE:
+37º
Setting the LONGITUDE
Press the ↓ button to
highlight LONGITUDE.
Press the CENTER
button to highlight
Longitude values.
Press the ↓ or the ↑
button to to decrease or
increase the value.
LOCATION
PREVIOUS MENU
TIME ZONE: -08
LONGITUDE:
-121º
LATITUDE:
+37º
LOCATION
PREVIOUS MENU
TIME ZONE: -08
LONGITUDE:
-121º
LATITUDE:
+37º
LOCATION
PREVIOUS MENU
TIME ZONE: -08
LONGITUDE:
+155º
LATITUDE:
+37º
Once Longitude is set,
press the CENTER
button to save the
setting.
LOCATION
PREVIOUS MENU
TIME ZONE: -08
LONGITUDE:
-121º
LATITUDE:
+37º
Setting the LATITUDE
Press the ↓ button to
highlight LATITUDE.
Press the CENTER
button to highlight
Latitude values.
Press the ↓ or the ↑
button to to decrease or
increase the value.
LOCATION
PREVIOUS MENU
TIME ZONE: -08
LONGITUDE: -121º
LATITUDE
:
+37º
LOCATION
PREVIOUS MENU
TIME ZONE: -08
LONGITUDE: -121º
LATITUDE:
+37º
LOCATION
PREVIOUS MENU
TIME ZONE: -08
LONGITUDE: +155º
LATITUDE:
+37º
Once Latitude is set,
press the CENTER
button to save the
setting.
Press the ↓ button to
highlight PREVIOUS
menu.
Once PREVIOUS menu
is highlighted press the
CENTER button to return
to SETUP menu.
LOCATION
PREVIOUS MENU
TIME ZONE: -08
LONGITUDE: -121º
LATITUDE
:
+37º
SETUP
SET TIME AND DATE
LOCATION
PREFERENCES
SCHEDULING
MAIN PAGE
LOCATION
PREVIOUS MENU
TIME ZONE: -08
LONGITUDE: -121º
LATITUDE:
+37º
PREfERENCES
Setting the TIME fORMAT
Press the ↓
button to highlight
PREFERENCES..
Press the CENTER
button to highlight
TIME FMT.
Press the CENTER
button to highlight the
time setting.
SETUP
SET TIME AND DATE
LOCATION
PREFERENCES
SCHEDULING
MAIN PAGE
PREFERENCES
PREVIOUS MENU
TIME FMT:
12 HOURS
DATE FMT:
MM/DD/YY
SOUND:
ENABLED
FLASH:
DISABLED
PREFERENCES
PREVIOUS MENU
TIME FMT:
12
HOURS
DATE FMT:
MM/DD/YY
SOUND:
ENABLED
FLASH:
DISABLED
Press the ↓ or the ↑
button to switch between
12 hours and 24 hours.
Once time format is
set, press the CENTER
button to save the
setting.
PREFERENCES
PREVIOUS MENU
PREFERENCES
PREVIOUS MENU
TIME FMT:
24
HOURS
DATE FMT:
MM/DD/YY
SOUND:
ENABLED
FLASH:
DISABLED
TIME FMT
:
24 HOURS
DATE FMT:
MM/DD/YY
SOUND:
ENABLED
FLASH:
DISABLED
Setting the DATE fORMAT
Press the ↓ button to
highlight DATE FMT.
Press the CENTER
button to highlight
month setting.
Press the ↓ or the ↑
button to choose the
month setting.
PREFERENCES
PREVIOUS MENU
TIME FMT:
12 HOURS
DATE FMT:
MM/DD/YY
SOUND:
ENABLED
FLASH:
DISABLED
PREFERENCES
PREVIOUS MENU
TIME FMT:
12 HOURS
DATE FMT:
MM/DD/YY
SOUND:
ENABLED
FLASH:
DISABLED
PREFERENCES
PREVIOUS MENU
TIME FMT:
24 HOURS
DATE FMT:
MM/DD/YY
SOUND:
ENABLED
FLASH:
DISABLED
Once month format is set,
press the CENTER button
to save the setting.
PREFERENCES
PREVIOUS MENU
TIME FMT:
12 HOURS
DATE FMT:
MM/DD/YY
SOUND:
ENABLED
FLASH:
DISABLED
Setting the SOUND
Press the ↓ button to
highlight SOUND.
Press the CENTER
button to highlight
ENABLED.
Press the ↓ or the
↑ button to choose
ENABLED or DISABLED.
PREFERENCES
PREVIOUS MENU
TIME FMT:
12 HOURS
DATE FMT:
MM/DD/YY
SOUND:
ENABLED
FLASH:
DISABLED
PREFERENCES
PREVIOUS MENU
TIME FMT:
12 HOURS
DATE FMT:
MM/DD/YY
SOUND:
ENABLED
FLASH:
DISABLED
PREFERENCES
PREVIOUS MENU
TIME FMT:
24 HOURS
DATE FMT:
MM/DD/YY
SOUND:
DISABLED
FLASH:
DISABLED
Once sound preference
is set, press the CENTER
button to save the setting.
PREFERENCES
PREVIOUS MENU
TIME FMT:
12 HOURS
DATE FMT:
MM/DD/YY
SOUND:
DISABLED
FLASH:
DISABLED
Setting ON/Off
This sets when the program will come on. The options for this setting are DUSK,
DAWN, or TIME. The DAWN or DUSK option will program the number of minutes
before or after dawn or dusk that program should take effect.
Press the ↓ button to
highlight ON.
Press the CENTER
button to highlight the
DUSK options.
Press the ↓ or the ↑
button to choose DUSK,
DAWN, or TIME.
SCHEDULING
PREVIOUS MENU
SCHEDULING
PREVIOUS MENU
PROGRAM:
#
2
DAY(s):
None
ON:
DUSK
OFF: DUSK
+00 Min
+00 Min
PROGRAM:
#
2
DAY(s):
None
ON:
DUSK
OFF: DUSK
+00 Min
+00 Min
SCHEDULING
PREVIOUS MENU
PROGRAM:
#
2
DAY(s):
Mon - Fri
ON:
TIME
OFF: TIME
2:00 PM
12:00 AM
To set the time:
Press the CENTER button
to highlight the hour.
Press the ↓ or the ↑
button to decrease or
increase the hour
Press the CENTER
button to move to the
minutes.
SCHEDULING
PREVIOUS MENU
SCHEDULING
PREVIOUS MENU
PROGRAM:
#
2
DAY(s):
Mon - Fri
ON: TIME
OFF: TIME
2:
00 PM
12: 00 AM
PROGRAM:
#
2
DAY(s):
Mon - Fri
ON: TIME
OFF: TIME
2:
00 PM
12: 00 AM
SCHEDULING
PREVIOUS MENU
PROGRAM:
#
2
DAY(s):
Mon - Fri
ON: TIME
OFF: TIME
2:
00
PM
12: 00 AM
Press the ↓ or the ↑
button to decrease or
increase the minutes
Once the time is set,
press the CENTER button
to save the setting.
Press the ↓ button to
move to OFF.
SCHEDULING
PREVIOUS MENU
PROGRAM:
#
2
DAY(s):
Mon - Fri
ON: TIME
OFF: TIME
2:
00
PM
12: 00 AM
SCHEDULING
PREVIOUS MENU
PROGRAM:
#
2
DAY(s):
None
ON:
TIME
OFF: TIME
2: 00 PM
12: 00 AM
SCHEDULING
PREVIOUS MENU
PROGRAM:
#
2
DAY(s):
None
ON: TIME
OFF:
TIME
2: 00 PM
12: 00 AM
Follow the same steps for setting the OFF options as you did for setting the ON
options.
The same process is used for setting the DAWN and DUSK options that was used
for setting the TIME option.
Navigating Back to the MAIN PAGE
Press the ↓ button to
highlight PREVIOUS
MENU.
Press the CENTER
button to return to
SETUP menu.
Press the ↓ button to
highlight MAIN PAGE.
SCHEDULING
PROGRAM:
#
2
DAY(s):
None
ON: TIME
OFF: TIME
17 : 30
06 : 30
SETUP
SET TIME AND DATE
LOCATION
PREFERENCES
SCHEDULING
MAIN PAGE
SETUP
SET TIME AND DATE
LOCATION
PREFERENCES
SCHEDULING
MAIN PAGE
PREVIOUS MENU
Press the CENTER
button to return to the
MAIN PAGE.
DST
PM
Tue 03/31/2009
01:15
PROG
Call 800.223.4185 for Technical Support
Call 800.223.4185 for Technical Support
Setting the fLASH
Press the ↓ button to
highlight FLASH.
Press the CENTER
button to highlight
DISABLED.
Press the ↓ or the
↑ button to choose
ENABLED or DISABLED.
PREFERENCES
PREVIOUS MENU
TIME FMT:
12 HOURS
DATE FMT:
MM/DD/YY
SOUND:
DISABLED
FLASH:
DISABLED
PREFERENCES
PREVIOUS MENU
TIME FMT:
12 HOURS
DATE FMT:
MM/DD/YY
SOUND:
DISABLED
FLASH:
DISABLED
PREFERENCES
PREVIOUS MENU
TIME FMT:
24 HOURS
DATE FMT:
MM/DD/YY
SOUND:
DISABLED
FLASH:
ENABLED
Once flash preference is
set, press the CENTER
button to save the setting.
PREFERENCES
PREVIOUS MENU
TIME FMT:
12 HOURS
DATE FMT:
MM/DD/YY
SOUND:
DISABLED
FLASH:
ENABLED
PREFERENCES
PREVIOUS MENU
TIME FMT:
12 HOURS
DATE FMT:
MM/DD/YY
SOUND:
DISABLED
FLASH:
ENABLED
SETUP
SET TIME AND DATE
LOCATION
PREFERENCES
SCHEDULING
MAIN PAGE
SCHEDULE
Setting the PROGRAM
Press the ↓
button to highlight
SCHEDULING.
Press the CENTER
button to enter the
PROGRAM menu.
Press the CENTER
button to highlight the
program #.
SETUP
SET TIME AND DATE
LOCATION
PREFERENCES
SCHEDULING
MAIN PAGE
SCHEDULING
PREVIOUS MENU
SCHEDULING
PREVIOUS MENU
PROGRAM:
#
1
DAY(s):
None
ON DUSK
OFF DUSK
+00 Min
+00 Min
PROGRAM:
#
1
DAY(s):
None
ON DUSK
OFF DUSK
+00 Min
+00 Min
Press the ↓ or the ↑
button to decrease or
increase program #.
Once the program # is
set, press the CENTER
button to save the setting.
SCHEDULING
PREVIOUS MENU
PROGRAM:
#
2
DAY(s):
None
ON DUSK
OFF DUSK
+00 Min
+00 Min
SCHEDULING
PREVIOUS MENU
PROGRAM:
#
2
DAY(s):
None
ON DUSK
OFF DUSK
+00 Min
+00 Min
There are 8 different programs that can be set.
Setting the DAy(s)
This refers to the days of the week when the program will be initiated
Press the ↓ button to
highlight DAY(s)
Press the CENTER
button to highlight the
day(s) options.
Press the ↓ or the ↑
button to choose the
day(s) options.
SCHEDULING
PREVIOUS MENU
SCHEDULING
PREVIOUS MENU
PROGRAM:
#
2
DAY(s):
None
ON DUSK
OFF DUSK
+00 Min
+00 Min
PROGRAM:
#
2
DAY(s):
None
ON DUSK
OFF DUSK
+00 Min
+00 Min
SCHEDULING
PREVIOUS MENU
PROGRAM:
#
2
DAY(s):
Mon - Fri
ON DUSK
OFF DUSK
+00 Min
+00 Min
Press CENTER button to
save the setting.
SCHEDULING
PREVIOUS MENU
PROGRAM:
#
2
DAY(s):
Mon - Fri
ON DUSK
OFF DUSK
+00 Min
+00 Min
Options include:
None, All, Mon – Fri, Weekends, Sun, Mon, Tue, Wed, Thu, Fri, Sat.
Once PREVIOUS MENU
is highlighted press the
CENTER button to return
to SETUP menu.
Press the ↓ button to
highlight PREVIOUS
MENU.
340897 12252_RT-24.indd 7-12
8/25/09 4:04 PM