Is-0320 rev. c – Legrand AU7396 User Manual
Page 2
301 Fulling Mill Road, Suite G
Middletown, PA 17057
Phone (800) 321-2343 / Fax (717) 702-2546
www.onqlegrand.com
Page 2 of 2
INSTRUCTION/INSTALLATION SHEET
lyriQ™ SINGLE SOURCE 4 ZONE
AUDIO DISTRIBUTION HUB
IS-0320 REV. C
©Copyright 2007 by On-Q/Legrand All Rights
Reserved
.
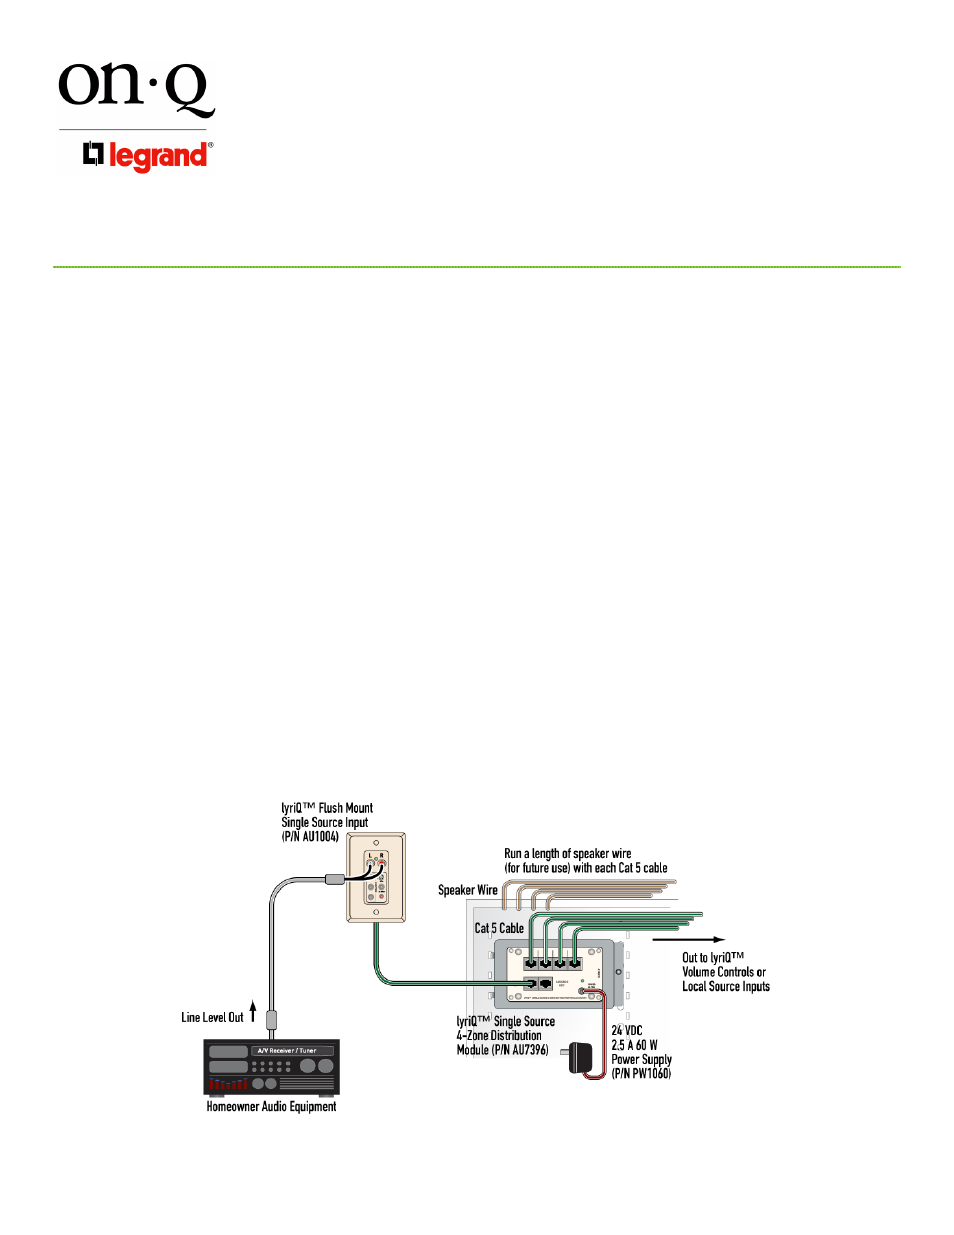
NOTE: To provide ultimate flexibility for future products, run two Category 5 cables from the location of
the lyriQ™ Flush Mount Single Source Input to the lyriQ™ Single Source 4 Zone Audio Distribution Hub.
Also, run a 16/2 or 16/4 speaker cable, along with the Category 5 cable, from the lyriQ™ Single Source 4
Zone Distribution Hub to each volume control location.
A. “Rough-in” steps:
1. Run a Category 5 cable from the room location containing the lyriQ™ Flush Mount Single Source Input
(typically the entertainment center location) to the lyriQ™ Audio Distribution Hub located in the
Enclosure.
2. Run Category 5 cables from the room locations containing the lyriQ™ Volume Controls to the lyriQ™
Audio Distribution Hub located in the Enclosure.
B. “Trim-out”
steps:
NOTE: Make sure that the Power Supply is not connected to the Distribution Hub.
1. Install one or more lyriQ™ Audio Distribution Hubs in the enclosure by first attaching the Hubs to
their included brackets using the 4 corner plungers. Then insert the bracket tabs into the slots on
the left of the enclosure and use the bracket push-pin to secure each Hub to the enclosure.
2. Terminate all Category 5 cables with RJ-45 plugs using the T568A wiring standard.
3. Connect the lyriQ™ Flush Mount Single Source Input AUDIO OUT jack via a Category 5 cable to
the SOURCE IN jack of the lyriQ™ Audio Distribution Hub (see Figure 2).
4. Connect the Category 5 cables coming from the room locations containing the lyriQ™ Volume
Controls to the Zone Output jacks on the lyriQ™ Audio Distribution Hub (see Figure 2).
5. If applicable, connect additional lyriQ™ Audio Distribution Hubs together by connecting a Category 5
jumper cable from the CASCADE OUT jack on one Hub to the SOURCE IN jack on the other Hub.
6. Plug the 24 volt power supply cable into the Power jack on the lyriQ™ Audio Distribution Hub.
7. Verify system functionality.
Figure 2