Legrand ADTP703TU User Manual
Page 2
No: 340972 – 10/12 Rev. 1
© Copyright 2012 Legrand All Rights Reserved.
60 Woodlawn Street
West Hartford, CT 06110
1.877.BY.LEGRAND
(295.3472)
www.legrand.us
570 Applewood Crescent
Vaughan, ONT L4K 4B4
905.738.9195
www.legrand.ca
WARNING: Do not pair different size wires in the same
terminal. If you have different size wires, use a wire nut to add a
6 inch pigtail of the same gauge wire to the smaller gauge wire.
AVERTISSEMENT : Ne pas associer des fils de section
différente dans la même borne. Avec des fils de section différ-
ente, utiliser un capuchon de connexion pour ajouter un toron
de 15 cm (6 pouces) du même calibre au fil de calibre plus petit.
ADVERTENCIA: No junte cables de diferentes calibres en
el mismo terminal. Si tiene cables de diferentes calibres, utilice
una tuerca para cables para agregar un empalme de 15 cm
(6 pulg.) del mismo calibre al cable de menor calibre.
Same size.
Section identique.
Mismo calibre.
Different size.
Section différente.
Diferente calibre.
Different size with pigtail.
Section différente avec toron.
Diferente calibre con empalme.
WHIT
E
1-POLE
STRIP G
AGE
HOT
3-WAY
WHIT
E
1-POLE
STRIP G
AGE
HOT
3-WAY
H
HO
WA
WA
H
H
WH
WH
W
WH
WH
W
Neutra
l
Neutra
l
WHIT
E
1-POLE
STRIP G
AGE
HOT
3-WAY
WHIT
E
1-POLE
STRIP G
AGE
HOT
3-WAY
H
HO
WA
WA
H
H
WH
WH
W
WH
WH
W
Neutra
l
Neutra
l
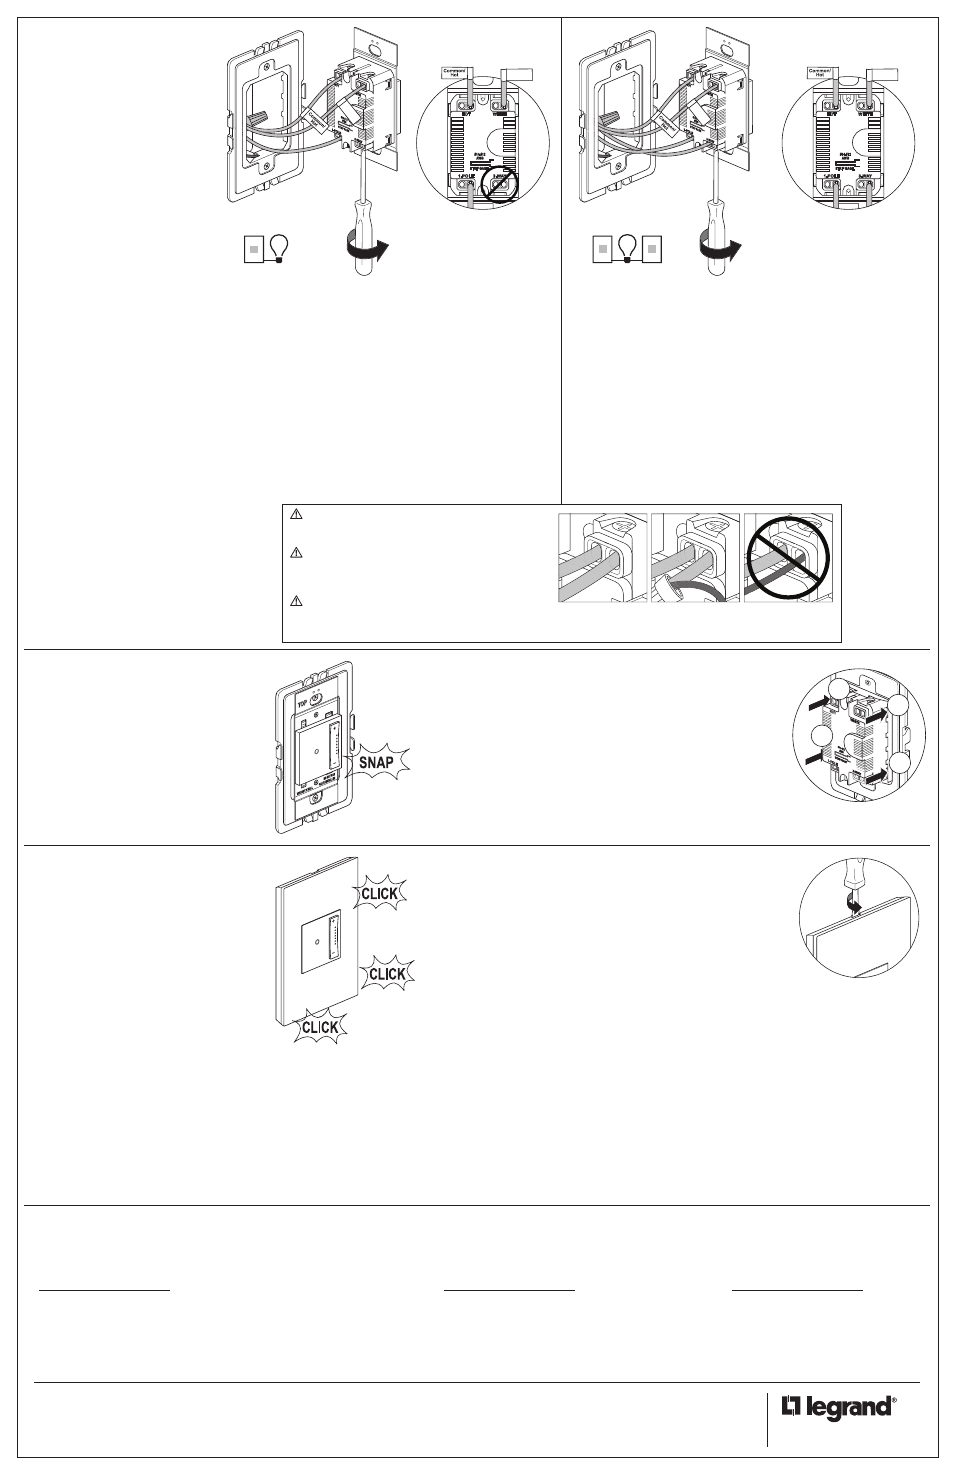
3-Way
• Connect the wire identified as Common/Hot in Step 1 to HOT.
• Connect the wire identified as Neutral in Step 1 to WHITE.
• Connect one of the other wires to 1-POLE.
• Connect remaining wire to 3-WAY.
Trois voies
• Raccorder le fil identifié par « Common/Hot » (commun/courant) de l’étape 1
à « HOT » (courant).
• Raccorder le fil neutre identifié à l’étape 1 à « WHITE » (blanc).
• Raccorder l’un des autres fils à « 1-POLE » (pôle simple).
• Raccorder le dernier fil à « 3-WAY » (3 voies).
3 vías
• Conecte el cable identificado como Común/Vivo en el paso 1 a HOT (Vivo).
• Conecte el cable identificado como Neutro en el paso 1 a WHITE (Blanco).
• Conecte uno de los otros cables a 1-POLE (polo único).
• Conecte el cable restante a 3-POLE (tres polos).
Technical Assistance:
(877) 295-3472
www.adornemyhome.com/install
Assistance technique :
(877) 295-3472
www.adornemyhome.com/install
Asistencia técnica:
(877) 295-3472
www.adornemyhome.com/install
LIMITED LIFETIME WARRANTY
Limited lifetime warranty information for adorne
TM
products is available
at www.adornemyhome.com/warranty. Limited warranty information for
adorne
TM
products may also be obtained free of charge by sending a
written request, along with your proof of purchase (including purchase
date), to:
Legrand
Attn: adorne Customer Service/Warranty Department
50 Boyd Avenue
Syracuse, NY 13209
GArANTIE À VIE LIMITÉE
Des informations concernant la garantie à vie limitée des produits
adorne
TM
sont disponibles sur www.adornemyhome.com/warranty. Des
informations sur la garantie à vie limitée des produits adorne
TM
peuvent
aussi être obtenues gratuitement en envoyant une demande écrite,
accompagnée d’une preuve d’achat (avec la date d’achat), à :
Legrand
Attn: adorne Customer Service/Warranty Department
50 Boyd Avenue
Syracuse, NY 13209
GArANTÍA LIMITADA DE Por VIDA
Hay disponible información sobre la garantía limitada de por vida para
los productos adorne
TM
en www.adornemyhome.com/warranty. También
puede obtenerse información sobre la garantía limitada para los pro-
ductos adorne
TM
sin cargo si se envía un pedido por escrito, junto con
una prueba de compra (que incluya la fecha de compra), a:
Legrand
Attn: adorne Customer Service/Warranty Department
50 Boyd Avenue
Syracuse, NY 13209
Single Pole
• Connect the wire identified as Common/Hot in Step 1 to HOT.
• Connect the wire identified as Neutral in Step 1 to WHITE.
• Connect other wire to 1-POLE.
• Do NOT use 3-WAY.
Pôle simple
• Raccorder le fil identifié par « Common/Hot » (commun/courant)
de l’étape 1 à « HOT » (courant).
• Raccorder le fil neutre identifié à l’étape 1 à « WHITE » (blanc).
• Raccorder l’autre fil à « 1-POLE » (pôle simple).
• Ne PAS utiliser « 3-WAY ».
Polo único
• Conecte el cable identificado como Común/Vivo en el paso 1 a
HOT (Vivo).
• Conecte el cable identificado como Neutro en el paso 1 a WHITE
(Blanco).
• Conecte el otro cable a 1-POLE (polo único).
• NO use 3-WAY (3 vías).
Carefully fold wires into box.
Snap dimmer into frame.
Plier soigneusement les fils dans la boite.
Enclencher le dispositif dans le boitier.
Pliegue cuidadosamente los cables hacia
el interior de la caja.
Encastre el dispositivo en el bastidor.
4
5
6
NOTE – If you need to remove dimmer after snapping into frame, first
remove frame from wall box to access the four locking tabs on the back
of the dimmer. Insert a flat screwdriver to depress tabs as you apply
pressure to push dimmer out.
REMARQUE - Si un dispositif doit être enlevé du boitier, retirer le boitier
de la boite murale. Insérer un tournevis à tête plate à l’arrière du boitier
et appuyer sur les languettes du dispositif pour le déverrouiller et le
pousser vers l’avant.
NOTA: Si necesita quitar un dispositivo del bastidor, retire el bastidor
de la caja de la pared. Inserte un destornillador plano desde la parte
posterior del bastidor y presione las lengüetas en el dispositivo para
destrabarlas y empujarlo hacia adelante.
NOTE – To remove wall plate, insert a small, flat screwdriver in notches
on wall plate and twist gently to pry from frame.
REMARQUE - Si la plaque murale doit être retirée, insérer un tournevis
à tête plate dans les rainures situées à l’arrière de la plaque et les tourner
lentement.
NOTA: Para quitar la placa de pared o retirarla, inserte un destornillador
plano en la muesca como se muestra, y gire suavemente.
Connect new dimmer as shown.
Insert wires into terminals and
tighten screws securely. Do
NOT over-tighten. (to 10 in. lbs.)
Brancher le nouveau variateur
comme illustré. Insérez les fils
dans les bornes et serrez fer-
mement les vis. Ne PAS trop
serrer. (à 10 livres-pouce).
Conecte el nuevo regulador
como se muestra en la figura.
Inserte los cables en los termi-
nales y ajuste bien los tornillos.
NO ajuste en exceso. (Ajuste a
10 libras-pulgada)
CLIC
CLIC
ENCLENCHEMENT
ENCASTRE
DO N
OT U
SE
PLAT
E INS
TALL
ED
WITH
OUT A
WAL
L
TOP
WHIT
E
LE
LLL
POLE
P
-PO
P
1-
TT
OTT
O
O
O
O
H
H
H
H
H
H
1
2
3
4
Snap wall plate to frame.
There are three click-stops to adjust the fit of
the wall plate to the dimmer and the wall.
Enclencher la plaque murale au boitier.
Trois arrêts par enclenchement sont
disponibles pour permettre de choisir
l’alignement de la plaque murale avec la
surface frontale du dispositif.
Encastre la placa de pared al bastidor.
Hay tres topes de profundidad con clics para
que pueda elegir la forma en la que la placa
de pared se alinea con la superficie frontal del
dispositivo.
Never apply cleaner directly to the
dimmer or wall plate. Apply to a
soft cloth and use cloth to remove
any smudges from the product.
N’appliquer jamais de produit net-
toyant directement sur le variateur
ou la plaque murale. Appliquez
sur un chiffon doux et utilisez ce
dernier pour retirer toute trace du
produit.
Nunca aplique limpiador directa-
mente en el regulador o en la placa
de pared. Use un paño suave para
quitar cualquier mancha que pud-
iera haber en el producto.
NOTE - In a 3-Way installation,
use one dimmer and one switch.
Do NOT use two dimmers.
REMARQUE : Dans une installa-
tion à trois voies, utiliser un varia-
teur et un commutateur. Ne PAS
utiliser deux variateurs.
NOTA: En una instalación de 3
vías, utilice un regulador y un
interruptor. NO utilice dos regu-
ladores.
1-POLE
STRIP GAGE
HOT
WHITE
3-WAY
1-POLE
STRIP GAGE
HOT
WHITE
3-WAY
Neutral
Neutral
1-POLE
STRIP GAGE
HOT
WHITE
3-WAY
1-POLE
STRIP GAGE
HOT
WHITE
3-WAY
Neutral
Neutral
DO N
OT U
SE
PLAT
E INS
TALL
ED
WITH
OUT A
WAL
L
TOP
WHIT
E
LE
LLL
POLE
P
-PO
P
1-
TT
OTT
O
O
O
O
H
H
H
H
H
H