Connectivity, User interface, Other bindings – Legrand RS232 User Manual
Page 3: Pushbuttons
All Miro wireless devices installed in the same system must
acquire the same unique House ID before use. This process
is known as house binding. Each wireless device is bound
to all other wireless devices in the house. If you are not
familiar with the binding processes for the wireless devices
in your installation, please review the Installation Guide, or
individual installation instructions provided with the devices.
IMPORTANT: The MR232 can not be used to initiate a house
binding until it has acquired a house ID through a binding
initiated from another Miro wireless device in the system.
1. With all devices installed and energized, make sure
that every wireless device LED is yellow (amber).
If any LED is off, be sure the circuit breaker is
on and the device is correctly installed.
2. Go to any wireless device EXCEPT the MR232. Press
and hold the Up and the Down buttons simultaneously
until its LED flashes yellow (about 2 seconds). This
indicates that it has acquired a unique House ID.
3. Make sure that all other wireless device
LEDs are flashing green and the MR232 is
flashing yellow, indicating that they have
all acquired the same House ID.
4. Return to the device used in step 2, which is
still flashing yellow. Press and hold the Up and
the Down buttons simultaneously until the LED
changes to solid green (about 2 seconds).
5. All device LEDs in the House change to solid
green, indicating house binding is complete.
Other Bindings
The MR232 is a whole house device that is not bound to
any group or room. Other wireless devices in the system
should be bound to appropriate groups and rooms before
you attempt to control them from the Network Interface.
CONNECTIVITY
The illustration below shows the pin-outs from the
Miro Network Controller’s RS232 DB9 connector.
1
2
3
4
5
6
7
8
9
RS232 Port
on MR232
5=Ground
3=RX
2=TX
1
2
3
4
5
6
7
8
9
RS232 Port
on automation
system control
terminal
5=Ground
3=TX
2=RX
To communicate with the MR232 from the control system,
setup the terminal’s RS232 COM port as follows:
Baud Rate ..............................................................38.4Kbd
Data Bits ............................................................................ 8
Parity ........................................................................... None
Stop Bits ............................................................................ 1
Flow Control ............................................................... None
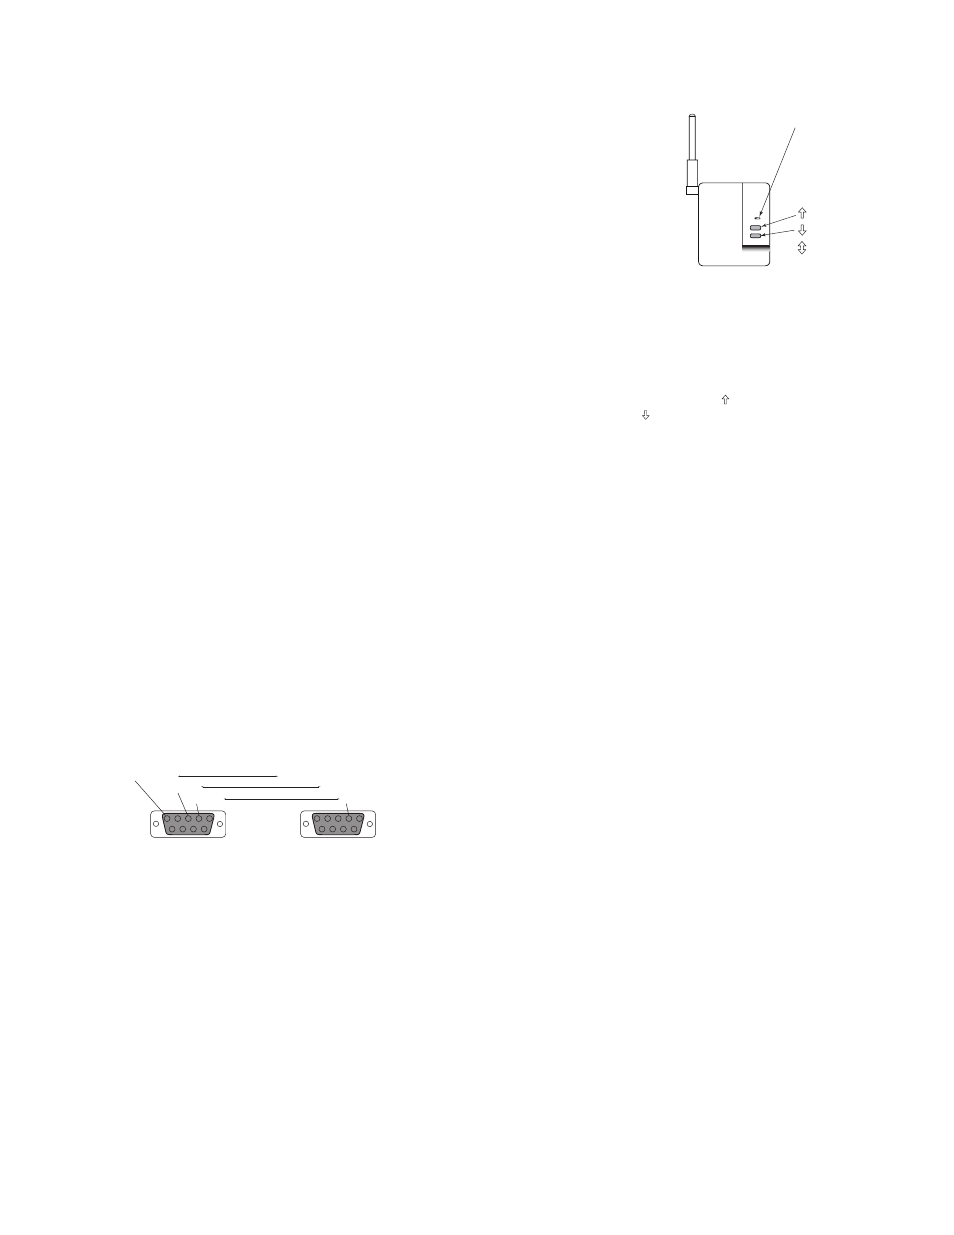
uSER INTERFACE
The MR232 has two user
interfaces. The first
consists of two pushbuttons
and a multi-color LED
for device status.
The second interface is
through an ASCII terminal
connection over the RS232
port. Through this, ASCII
commands can be issued
and cause controlled
responses on the system.
The “HELP” command
lists the system
commands. The commands and operands are described
in the MR232 Protocol Guide, available online.
Pushbuttons
The pushbuttons are the Top button ( )
and the Bottom button ( ).
Initiate Version and Status Messages
Press either pushbutton to transmit an identification or
version message over the RS232 connection as well as
a status message over the wireless network. This can
be used to verify outgoing communications between the
serial interface and a terminal emulator. The message
includes the product name, part number, firmware
version, and current configuration. Regardless of the
configuration, it will also transmit a status message
on the wireless network with its MAC address so that it
can be identified like any other wireless network device.
(This message can be invoked over the ASCII interface
though the command line with the “VER” command.)
Learn Function and Binding Operations
Press both buttons simultaneously for about 2 seconds to
invoke the LEARN function. When un-configured the MR232
cannot be the first device to initiate a house binding (its
LED flashes red). However, after a house ID is assigned
to the MR232 - either by a house ID binding initiated from
another wireless device or with the “SETH” command - the
MR232 can be used to initiate future binding processes.
Reset to Factory Default/unconfigure
When both the buttons are simultaneously pressed
for a period of 10 seconds, the device will perform
a system reset and clear all memory contents. This
resets the device to an unbound, unconfigured state
with a House ID of zero (0) and Building ID of one (1).
Status LED
Green
Yellow (amber)
Red
Pushbuttons
Top
Bottom
Press both
simultaneously